Step 1: Login to Payex’s portal
Log on to our portal at https://portal.payex.io/Home, and key-in your credentials.
Step 2: Create payment link & QR code
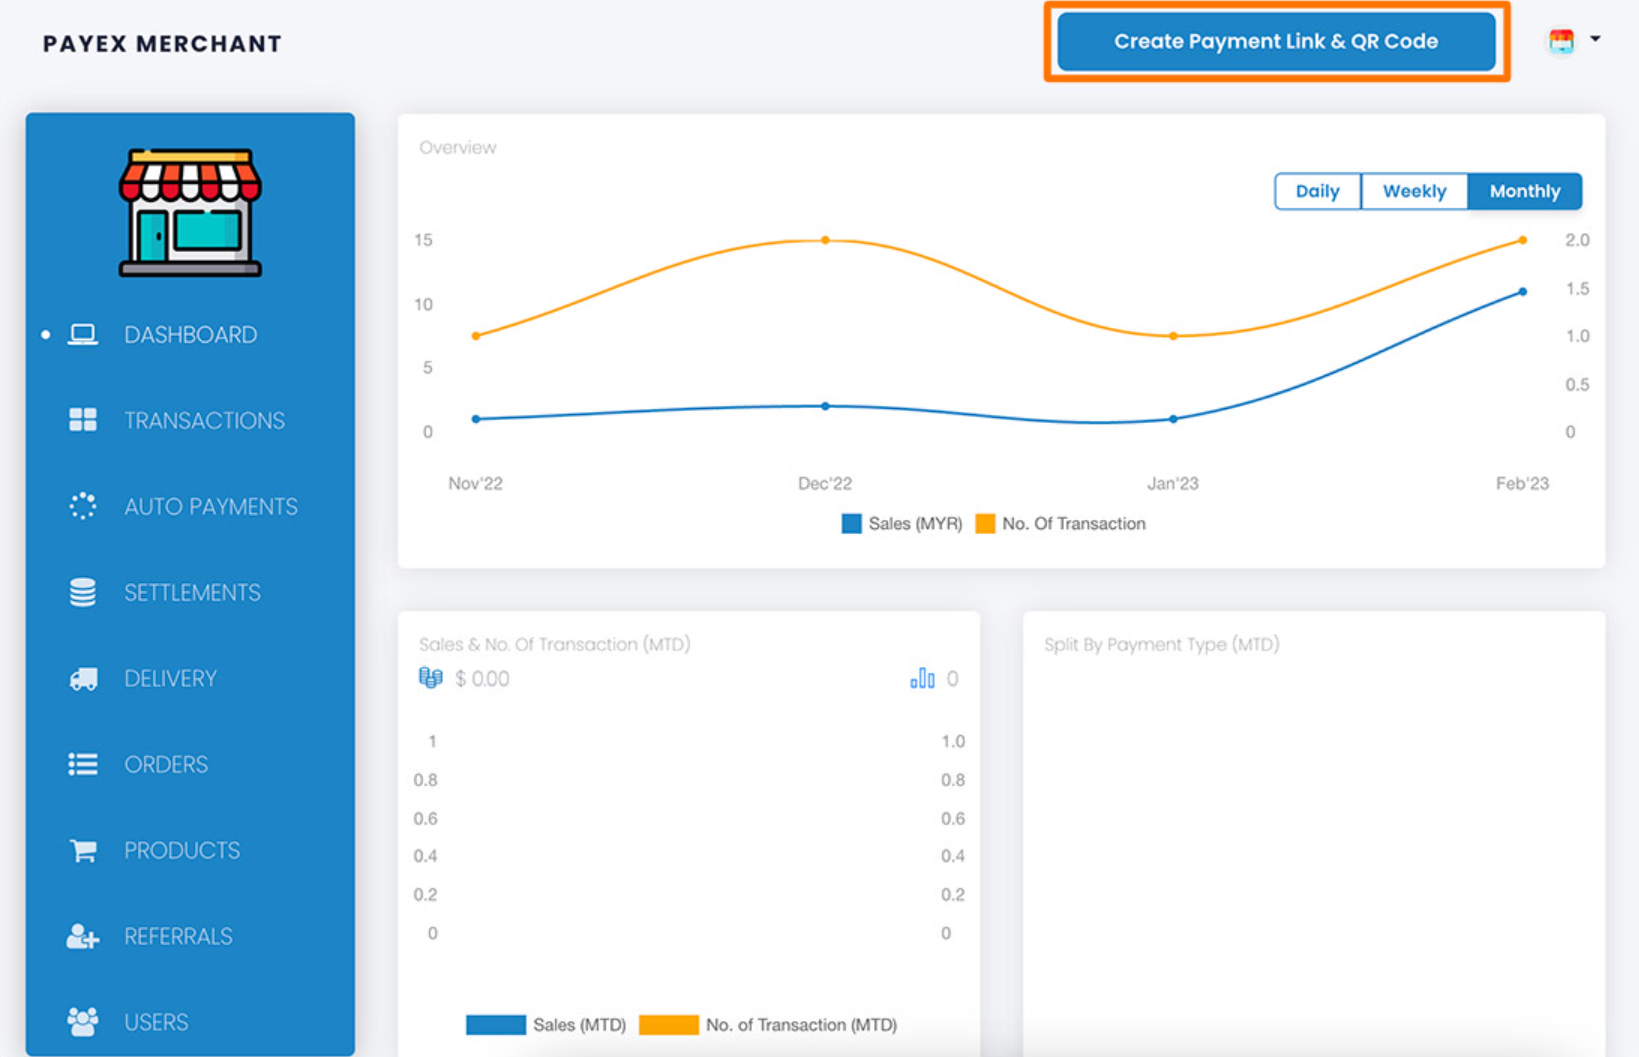
Click the “Create Payment Link & QR Code” button on the top of the page once you’re logged in.

Step 3: Fill out payment details
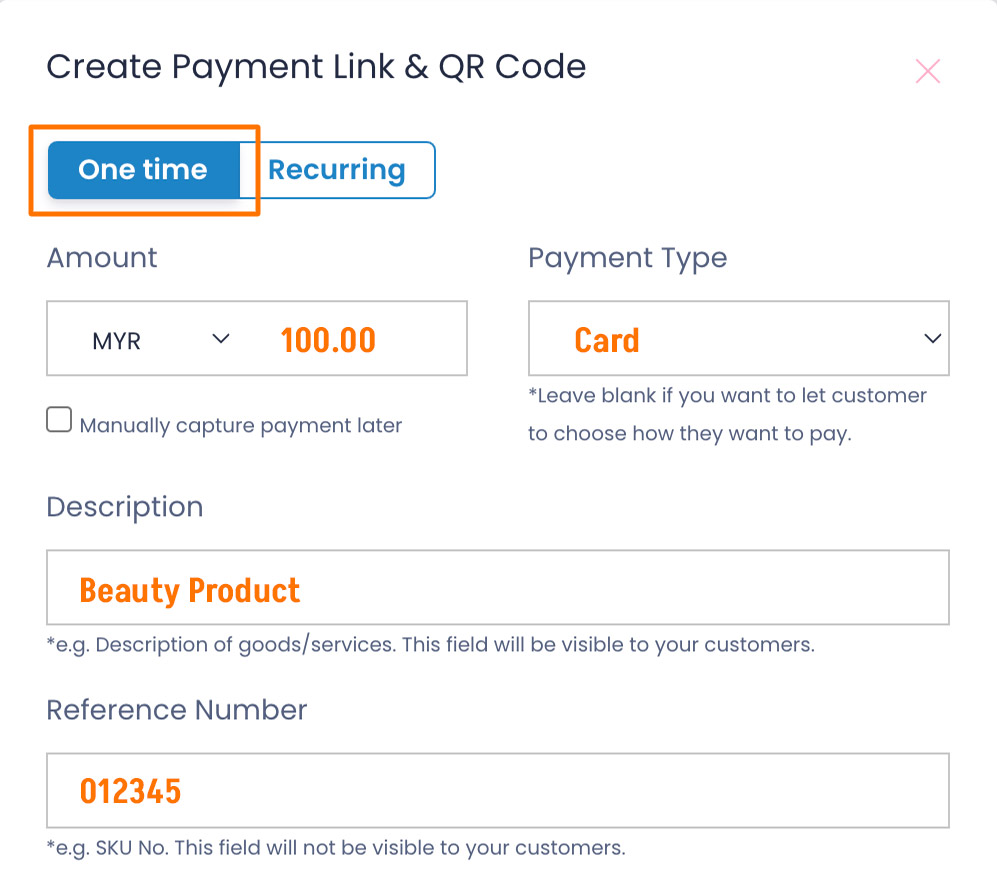
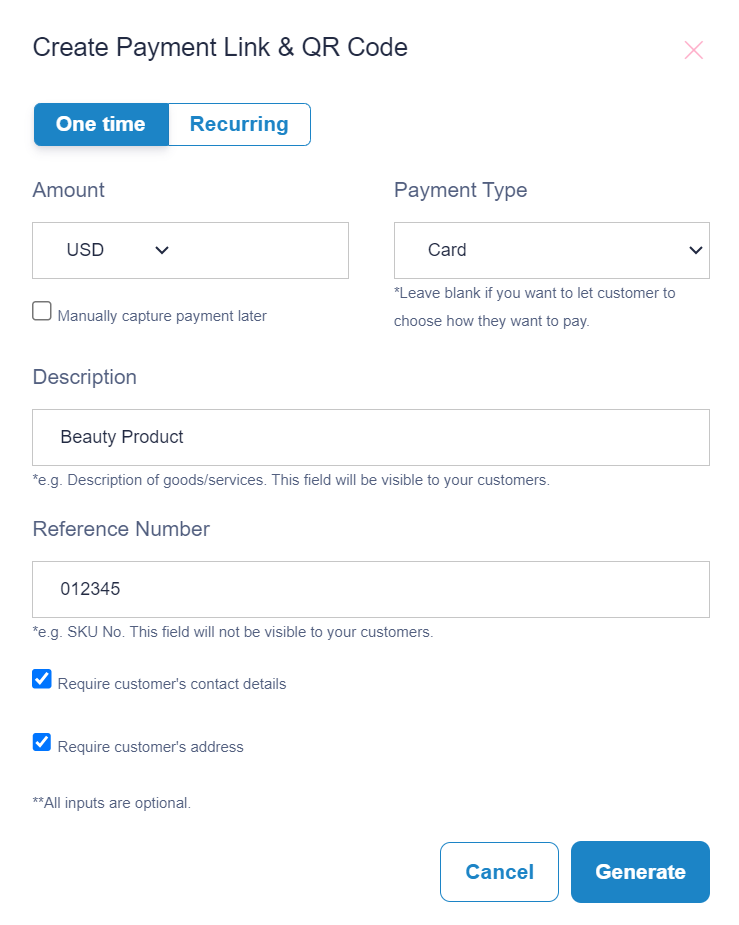
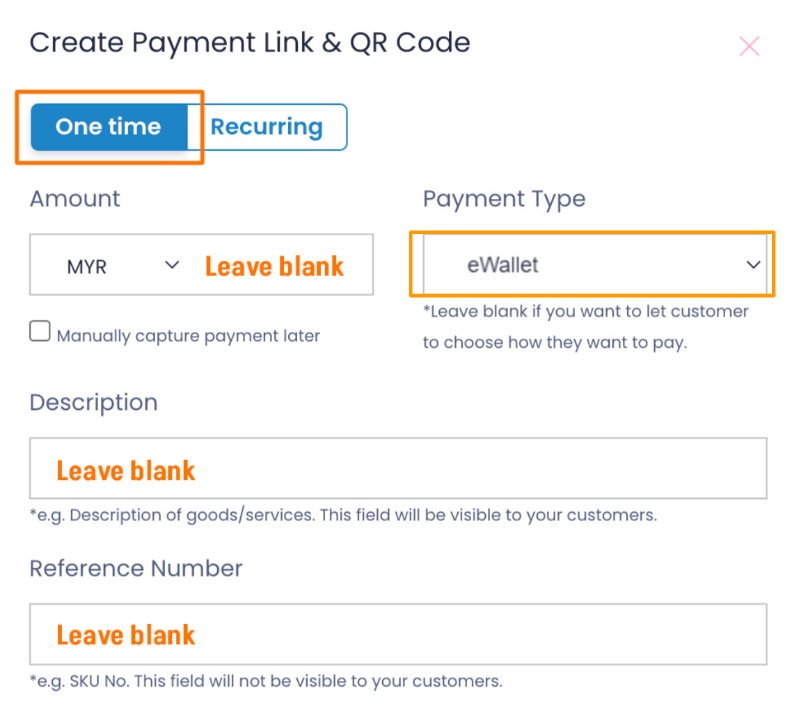
For a one-time use payment link, click the “One time” tab. There are 2 options:
Option 1: Static Payment Link / QR Code
To create a payment link with the amount and payment type determined by the merchant, fill in all the fields on the form.
Option 2: Dynamic Payment Link / QR
To create a payment link for general use, leave the fields blank to be filled out by the customer.

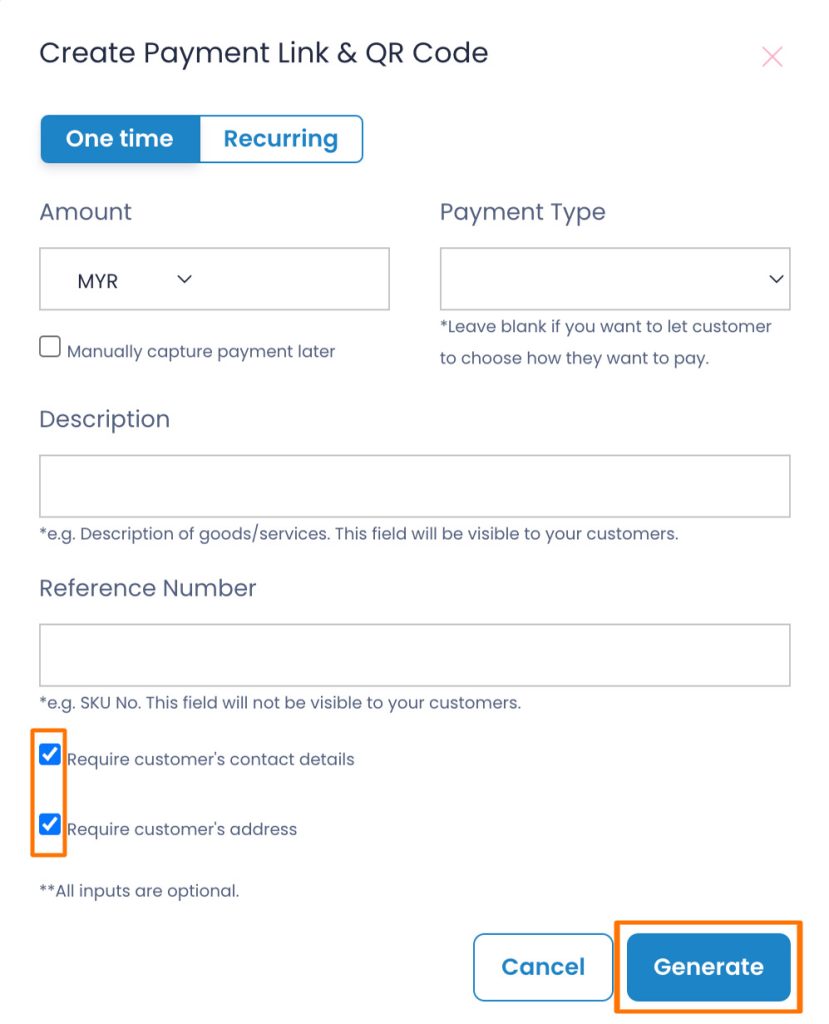
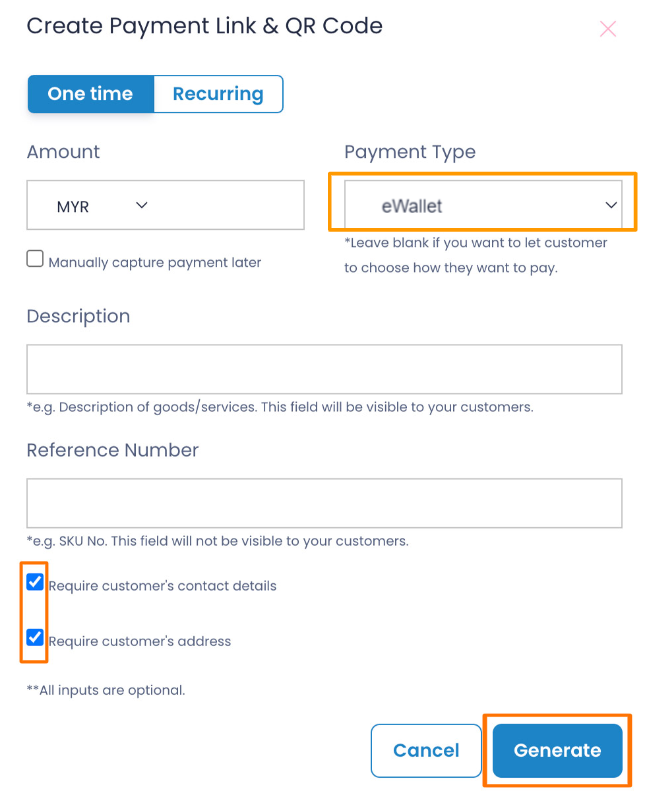
Step 4: Generate payment link & QR code
Uncheck the box for “Require customer’s contact details” if you do not require customer’s details.
Uncheck the box for “Require customer’s address” if you do not require customer’s address.
Click the “Generate” button to generate the payment link & QR code.
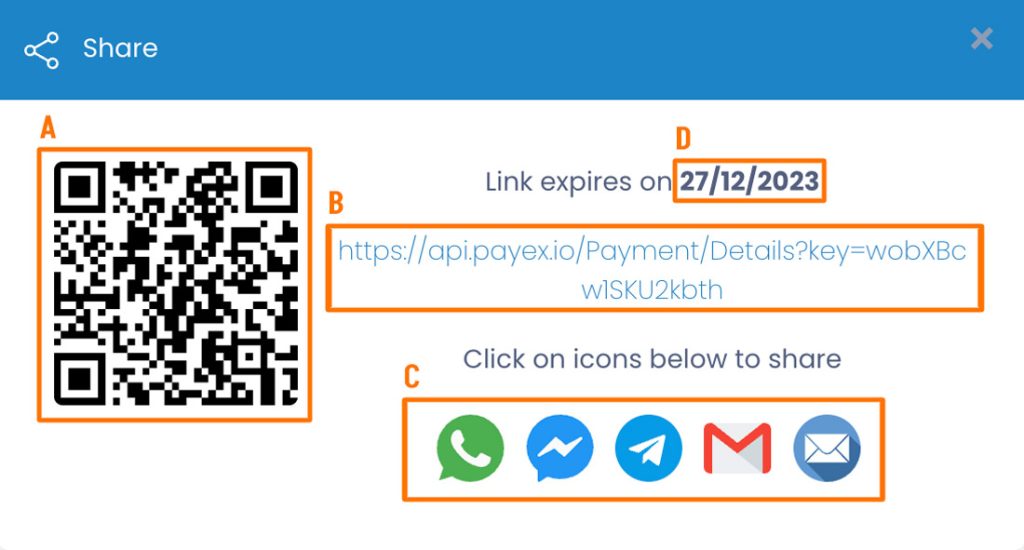
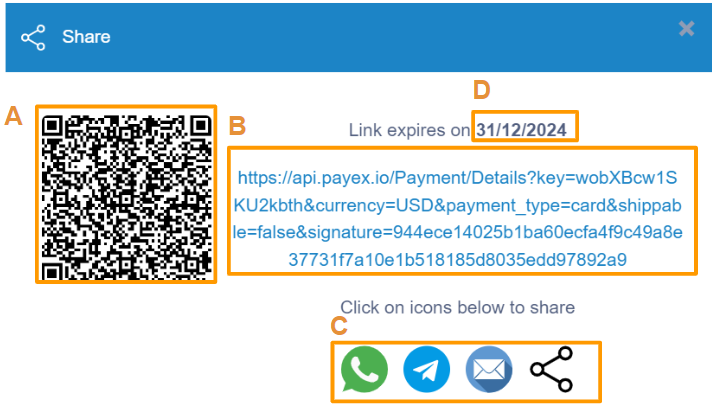
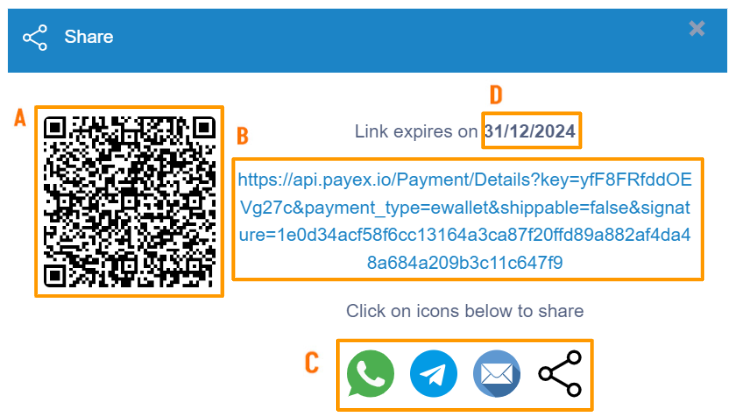
Step 5: Save & share payment link & QR code
A: Right-click and select “Save” to store the QR code to be printed and displayed at your cashier counter.
B: Copy the payment link to save or share to your customers.
C: Click on any platform’s icons to share the payment link to your customers.
D: Do note the expiry date of your payment link. All payment links are valid for 1 year from the date of creation.
Note: We do not store payment links & qr codes. Please re-generate a new link if you lost yours.
]]>Log on to our portal at https://portal.payex.io/Home, and key-in your credentials. Do ensure that your account has been activated for multi-currency, you may contact merchant support at merchantsupport@payex.io or WhatsApp +60192713728 for more info on this.
Step 2: Create payment link & QR code
Click the “Create Payment Link & QR Code” button on the top of the page once you’re logged in.

Step 3: Fill out multi-currency payment details
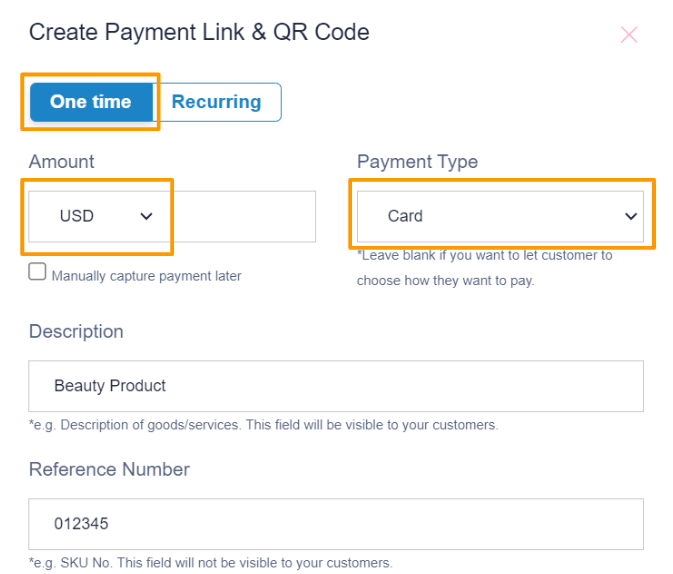
- Select “One time“
- Select preferred currency, for example “USD” based on dropdown under Amount . Similar to Payex standard payment link, there are two options to create payment link, refer here for more details:
Option 1 – create payment link with amount specified
Option 2 – create payment link without amount specified (for general use, where customer enters the amount to pay at their end) - Select “Card” as payment type as Payex multi-currency is only supported via Card payment type.
Step 4: Generate payment link & QR code
- Uncheck the box for “Require customer’s contact details” if you do not require customer’s details.
- Uncheck the box for “Require customer’s address” if you do not require customer’s address.
- Click the “Generate” button to generate the payment link & QR code.
Step 5: Save & share payment link & QR code
A: Right-click and select “Save” to store the QR code to be printed and displayed at your cashier counter.
B: Copy the payment link to save or share to your customers.
C: Click on any platform’s icons to share the payment link to your customers.
D: Do note the expiry date of your payment link. All payment links are valid for 1 year from the date of creation.
Log on to our portal at https://portal.payex.io/Home, and key-in your credentials.
Step 2: Create payment link & QR code
Click the “Create Payment Link & QR Code” button on the top of the page once you’re logged in.
Step 3: Fill out payment details
For GrabPay Later payment link, click the “One time” tab and make sure to select “eWallet” as Payment Type. There are 2 options:
Option 1: To create a GrabPay Later payment link with the amount, description and reference number determined by the merchant, fill in all the fields on the form.
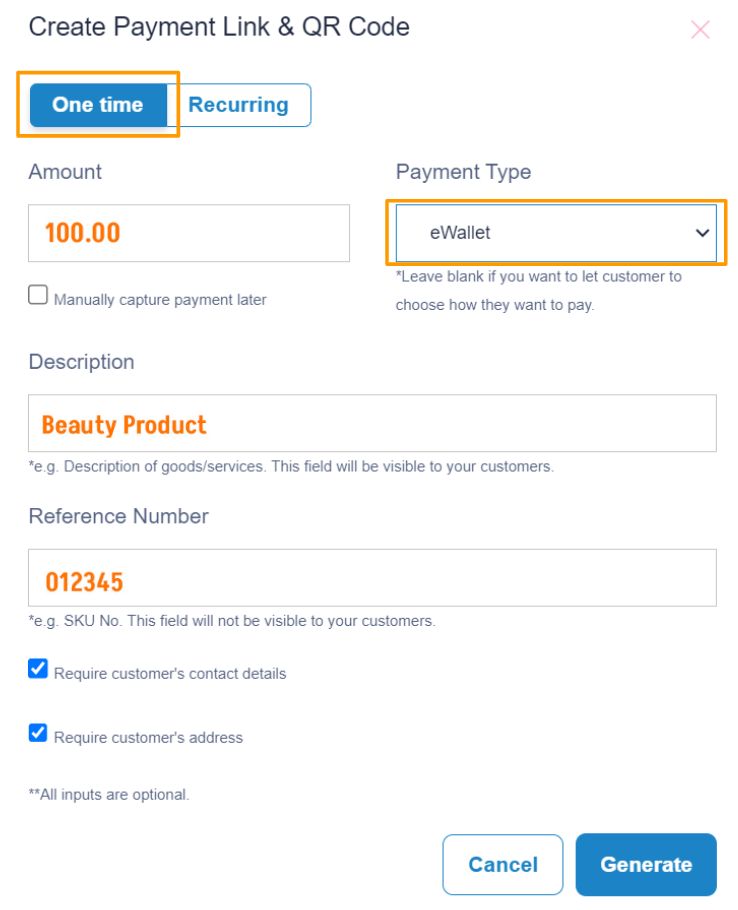
Option 2: To create a GrabPay Later payment link for general use, leave the fields blank to be filled out by the customer.
Step 4: Generate payment link & QR code
- Uncheck the box for “Require customer’s contact details” if you do not require customer’s details.
- Uncheck the box for “Require customer’s address” if you do not require customer’s address.
- Click the “Generate” button to generate the payment link & QR code.
Step 5: Save & share payment link & QR code
A: Right-click and select “Save” to store the QR code to be printed and displayed at your cashier counter.
B: Copy the payment link to save or share to your customers.
C: Click on any platform’s icons to share the payment link to your customers.
D: Do note the expiry date of your payment link. All payment links are valid for 1 year from the date of creation.
Log on to our portal at https://portal.payex.io/Home, and key-in your credentials.
Step 2: Create pre-auth payment link & QR code
Click the “Create Payment Link & QR Code” button on the top of the page once you’re logged in.
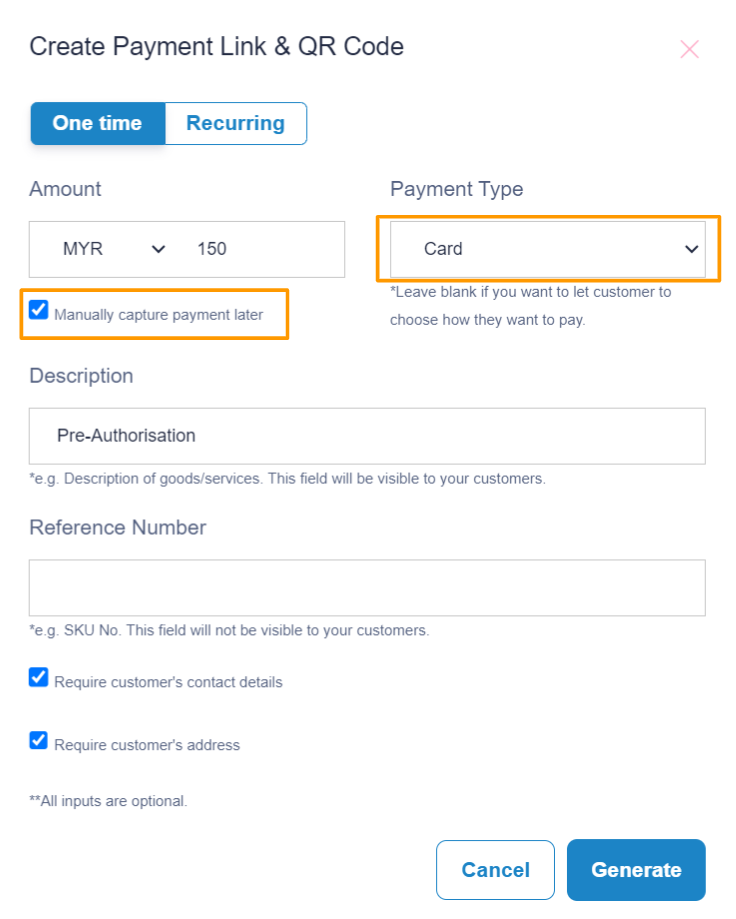
Step 3: Fill out pre-auth payment details
To create a payment link with the pre-auth amount set by you, simply fill in all relevant fields as below. Note: Make sure to check the box for “Manually capture payment later” & select payment type as “Card“
- Uncheck the box for “Require customer’s contact details” if you do not require customer’s details.
- Uncheck the box for “Require customer’s address” if you do not require customer’s address.
Click the “Generate” button to generate the payment link & QR code.
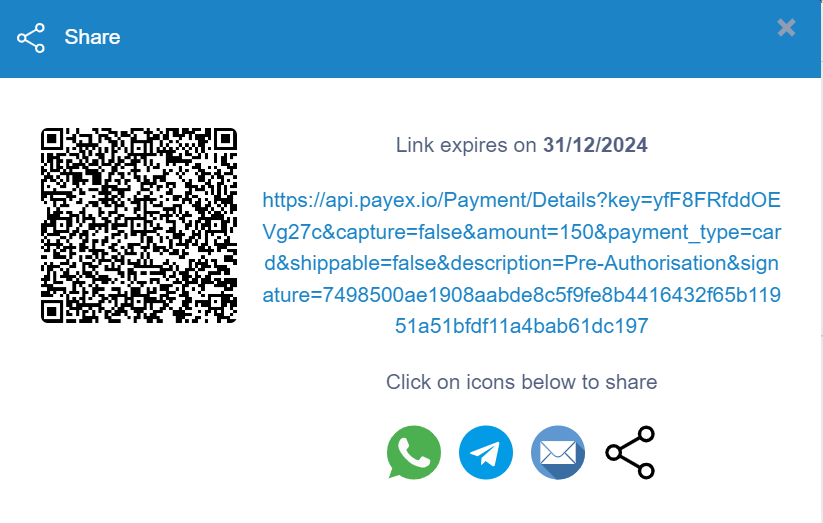
Step 5: Save & share pre-auth payment link & QR code
Copy the payment link or right click the QR code to save or share to your customers.Note:
1. The expiry date of your payment link. All payment links are valid for 1 year from the date of creation.
2. We do not store payment links & QR codes. Please re-generate a new link if you lost yours.
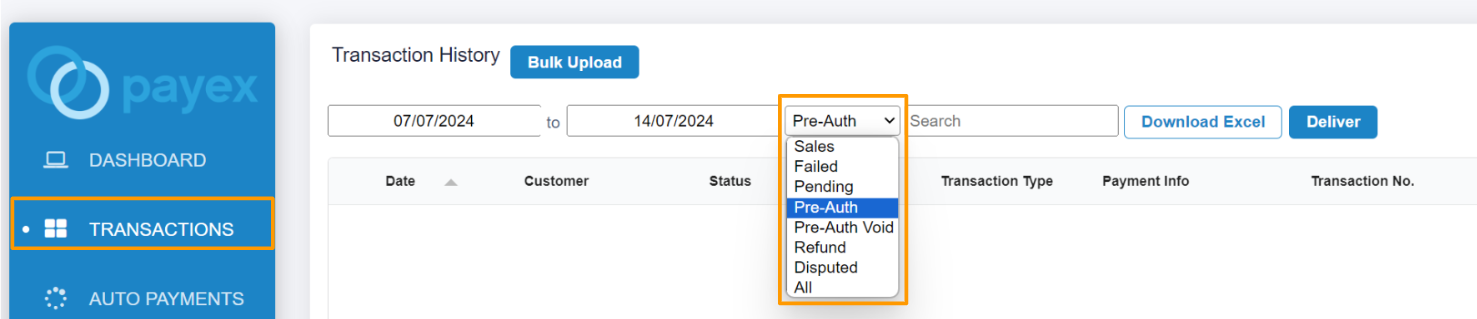
Step 6: How to check your Pre-Auth Transaction Status
Filter to view status of “Pre-Auth” transactions.
- The “Pre-Auth” status means your customer has successfully completed the pre-authorization process using the payment link you shared.
Step 7: How to charge my customer within the pre-auth duration
To charge your customer, click the 3-dot icon > select “Capture” > enter the amount you wish to charge > click “Confirm“. Note:
1. The maximum pre-auth duration is 7 days.
2. The maximum amount you can charge your customer cannot exceed the pre-authorized amount. For example, if the pre-authorization was for RM150.00, that’s the most you can charge.
3. If the payment isn’t captured, the pre-authorized amount will be released automatically, typically after 7 days. However, the exact timing for the funds to be returned to your customer’s card depends on their bank and might take a bit longer.
To void the pre-auth transaction, click on the 3-dot icon and select “Void.” Once you’ve voided it, the transaction status will change from “Pre-Auth” to “Pre-Auth Void“


Payment link allows your end customer to choose the payment channel they want to pay with. The payment flow will vary depending on your customer’s payment channel selection, as illustrated below.
1. Pay with Credit/Debit Cards
- When your customer chooses Credit / Debit Card to pay, they will see input fields to type in their name, card number, card expiry date and CVV/CVC.
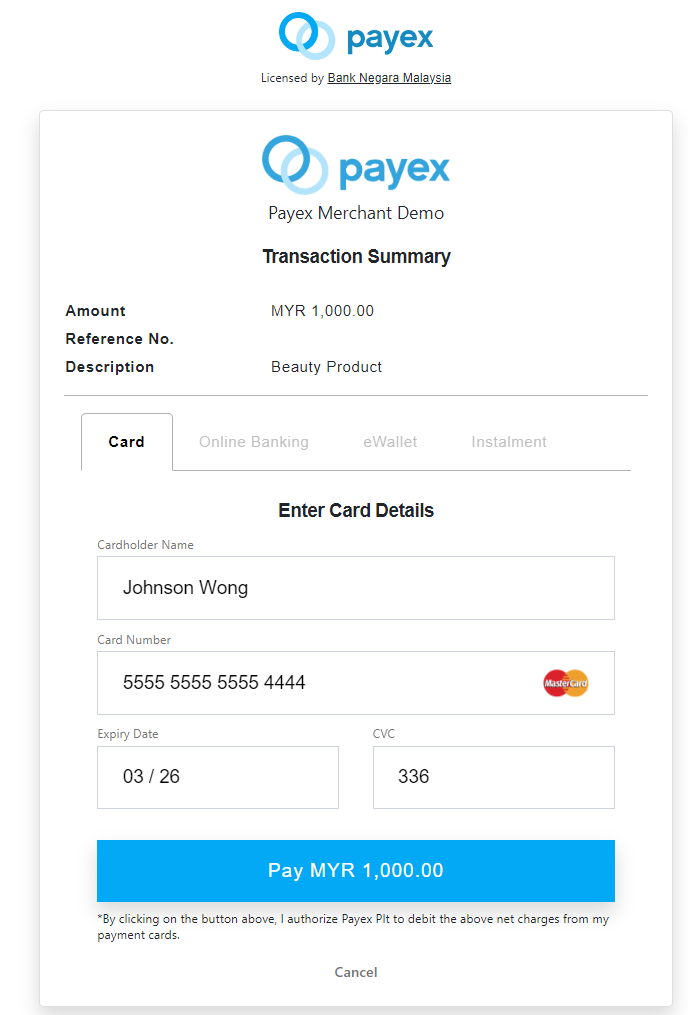
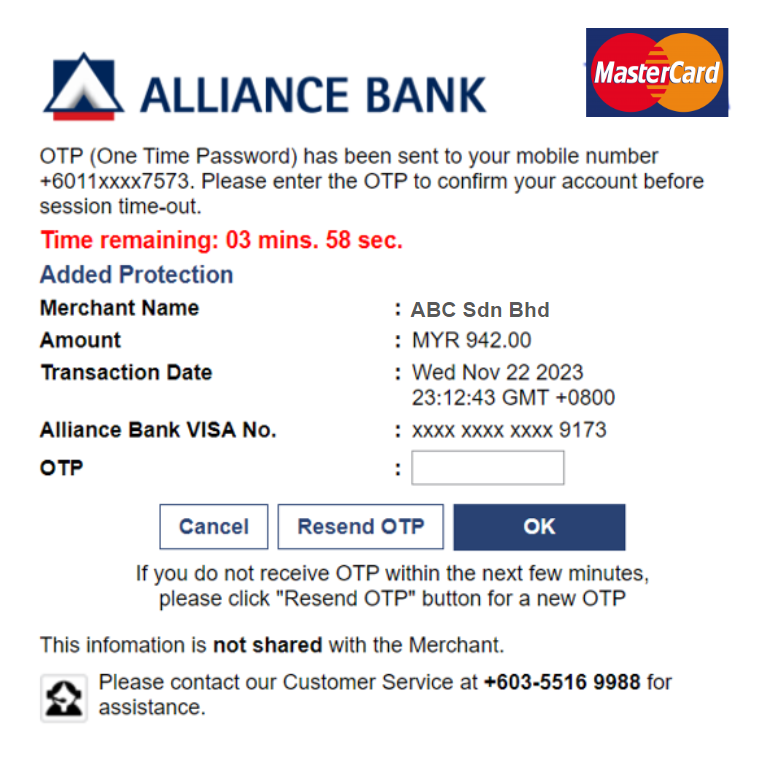
- When your customer clicks “Pay MYR 1,000.00”, they will need to pass the authentication process and may be asked to input a One-Time Password/Pin (OTP).
2. Pay with Online Banking/FPX Bank Transfer
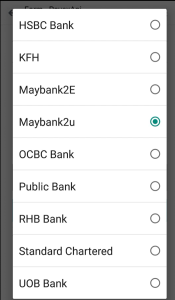
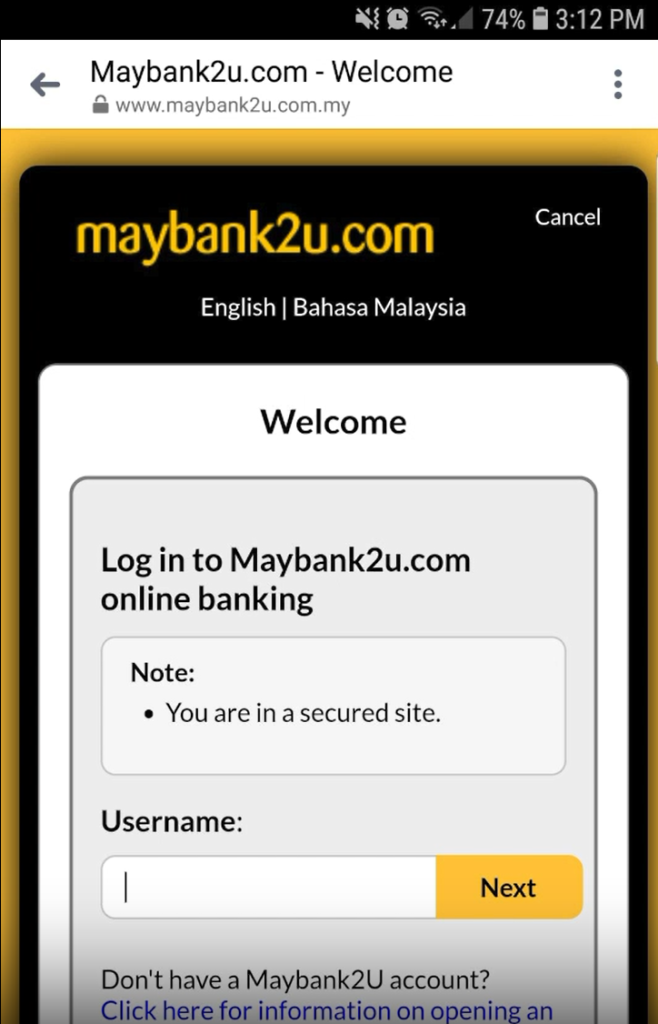
- When your customer chooses Online Banking to pay, they will see the list of available banks they can pay through.
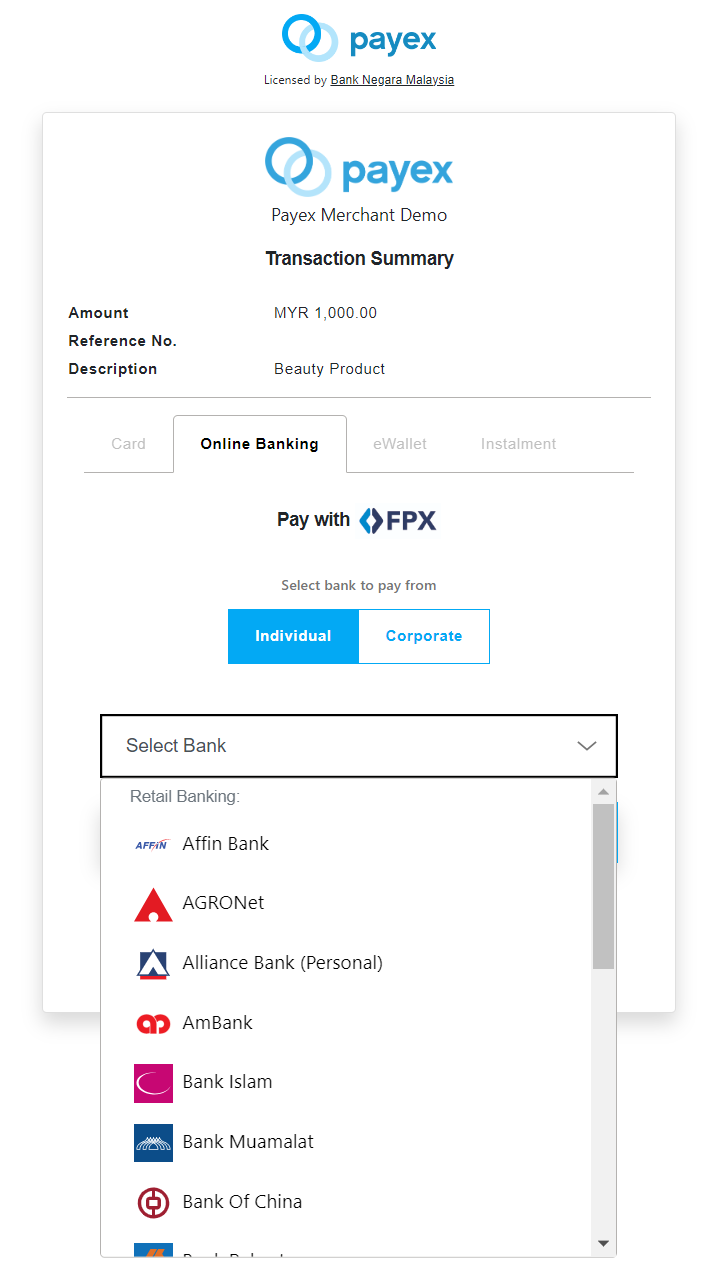
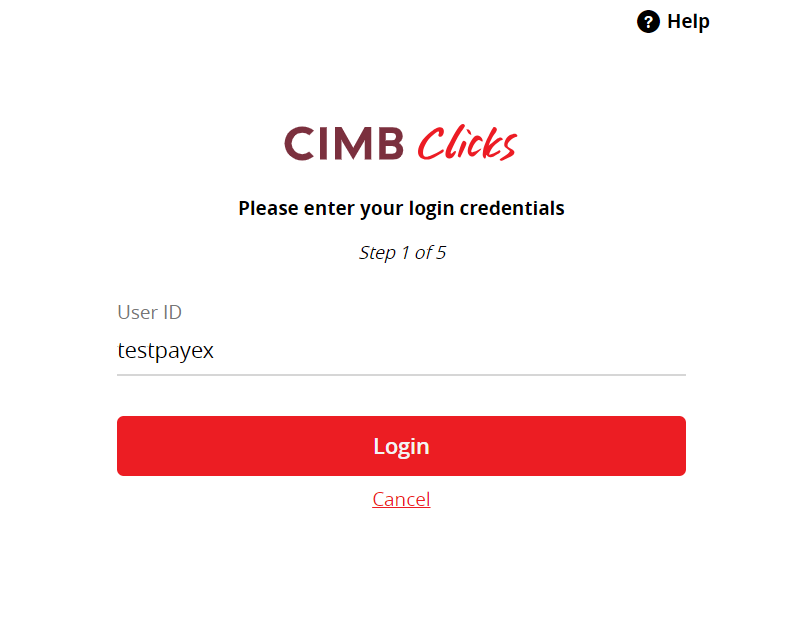
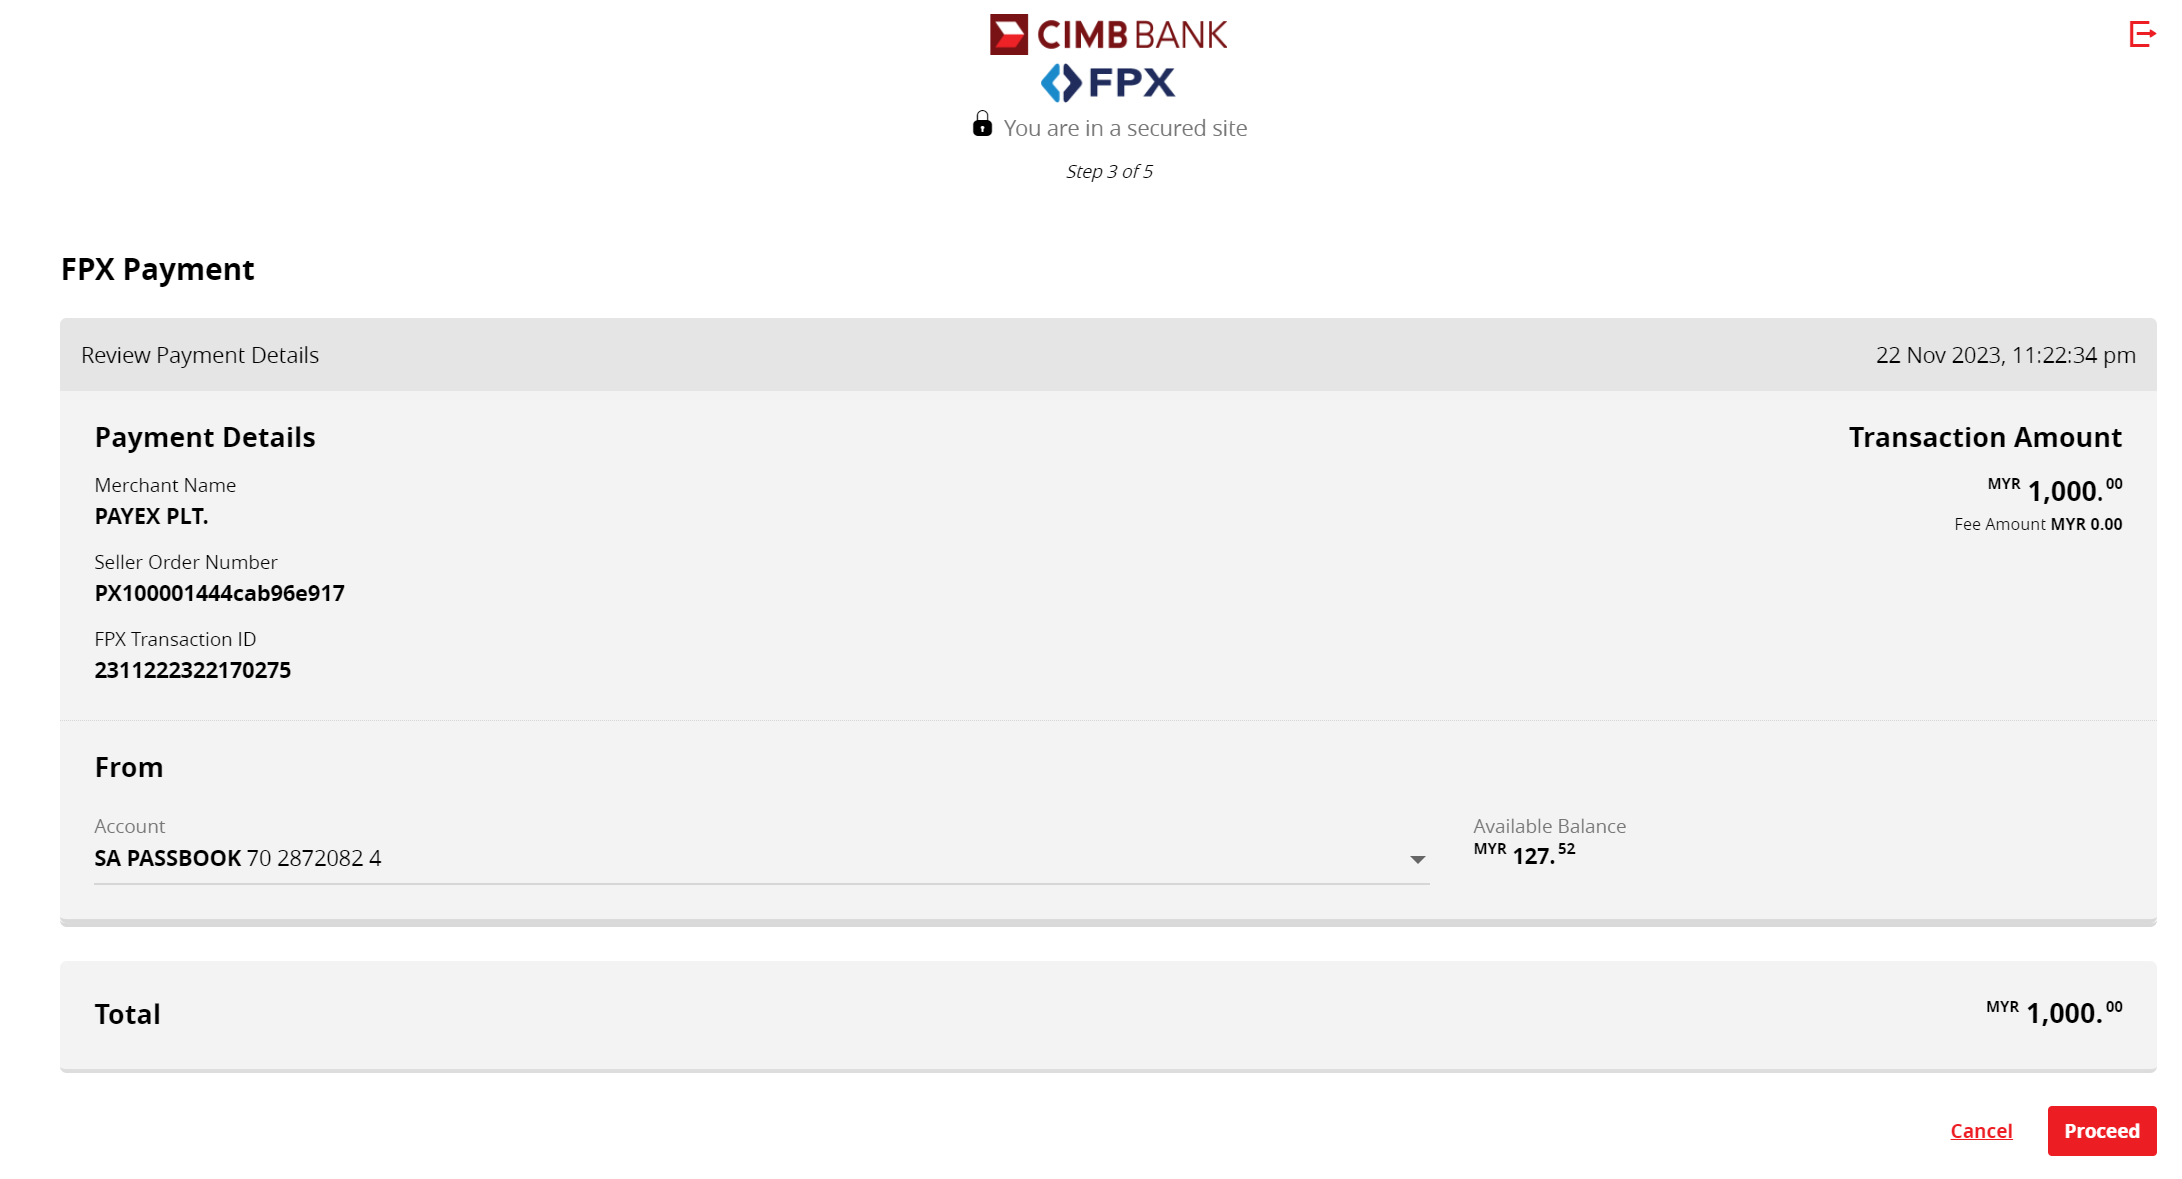
- Once they click on one of the bank accounts, they will be directed to the bank login page and in this example, the customer may click “Proceed” at the CIMB Clicks FPX Payment page.
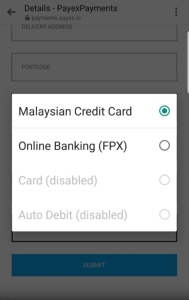
3. Pay with Online Banking/FPX Credit Card
- Select Malaysian Credit Card from payment selection dropdown
- Select your credit card issuing bank
- You will be redirected to your preferred online banking page. Please login to continue.
- Select your credit card from dropdown (do not select current or saving account)
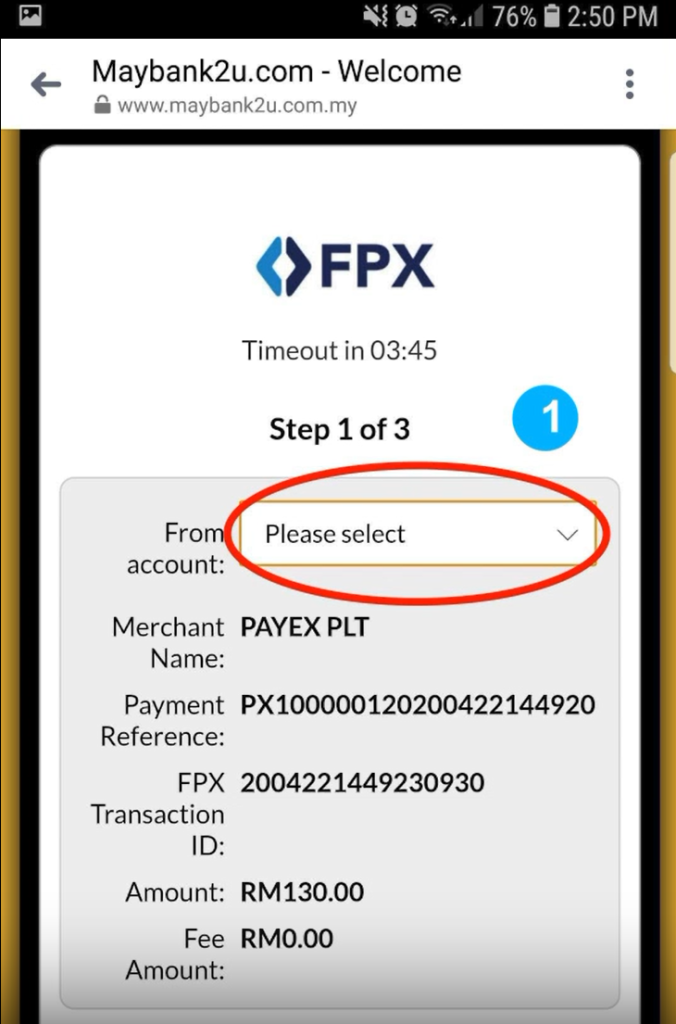
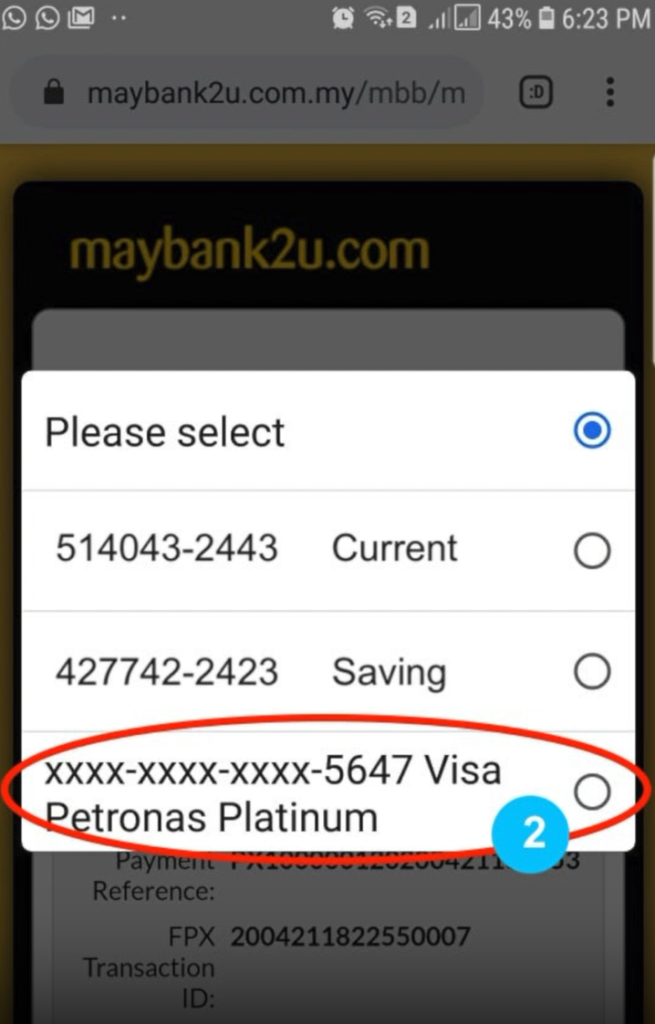
- Click Continue. Enter SMS TAC code and you are done!
4. Pay with eWallet
- When your customer chooses eWallet to pay, they will see the list of available eWallets they can pay through.
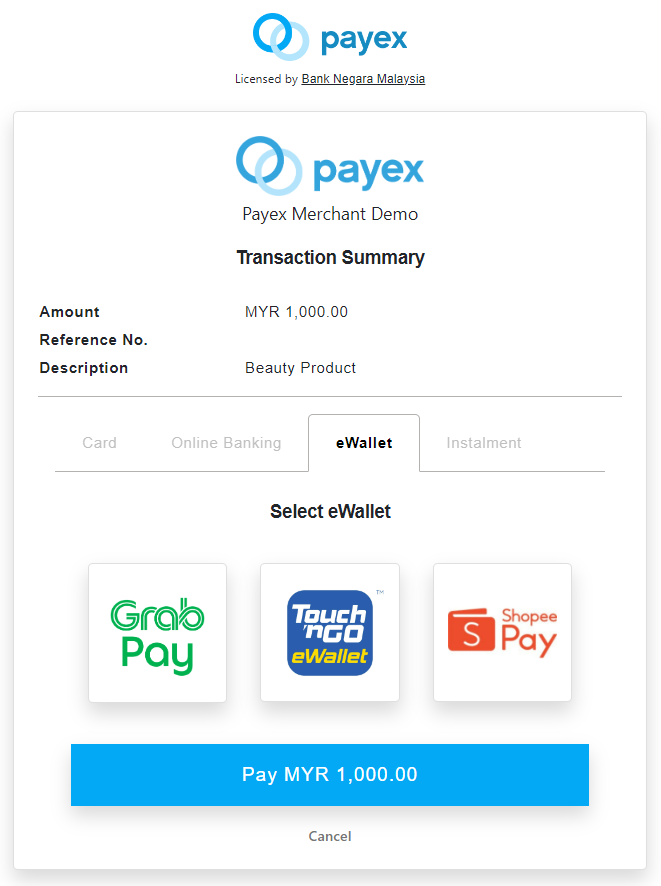
- When your customer clicks on an eWallet, they will see channel-specific instructions on how to proceed with the payment (in this example, your customer will need to click “Confirm” to top up and pay on the eWallet app.
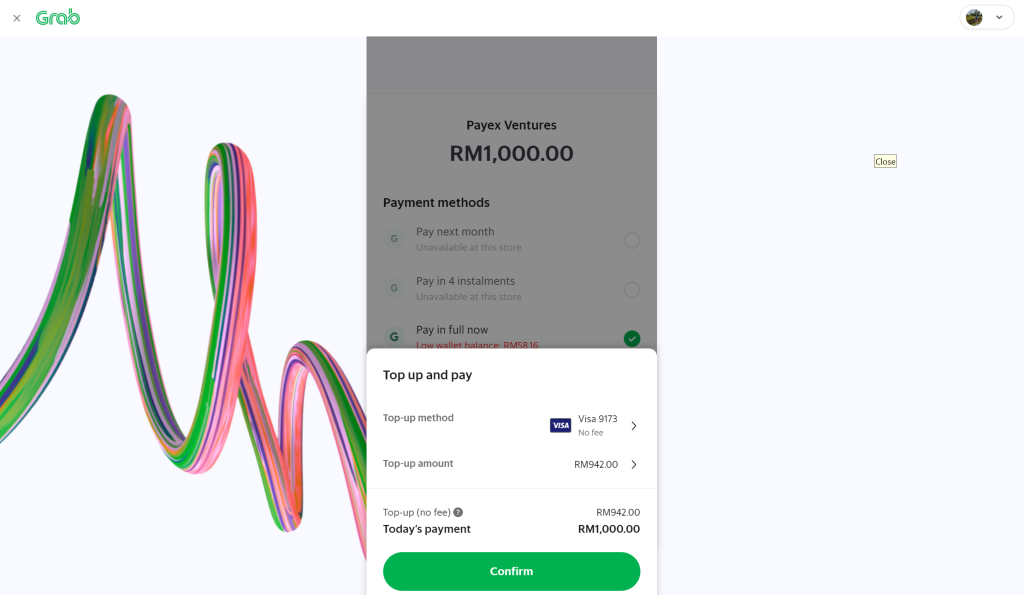
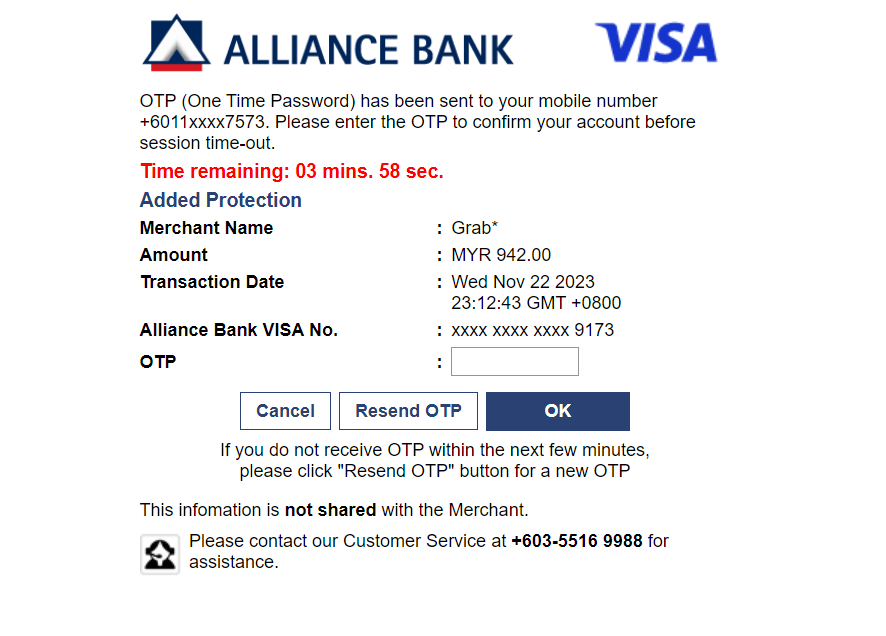
- The customer will receive an OTP to the mobile number and needs to input the OTP before paying with GrabPay
5. Pay with GrabPay Later (eWallet)
- Before your customer can pay via GrabPay Later, they will need to first meet Grab’s eligibility and be approved for PayLater activation.
- Your customer will need to provide the necessary information to Grab via their app (provided that they have performed the standard electronic Know Your Customer (eKYC) procedure). CTOS will then conduct the required credit checks on them.
- Successful applicants will receive a notification to activate PayLater. Your customer may contact Grab customer service if they require further help on this.
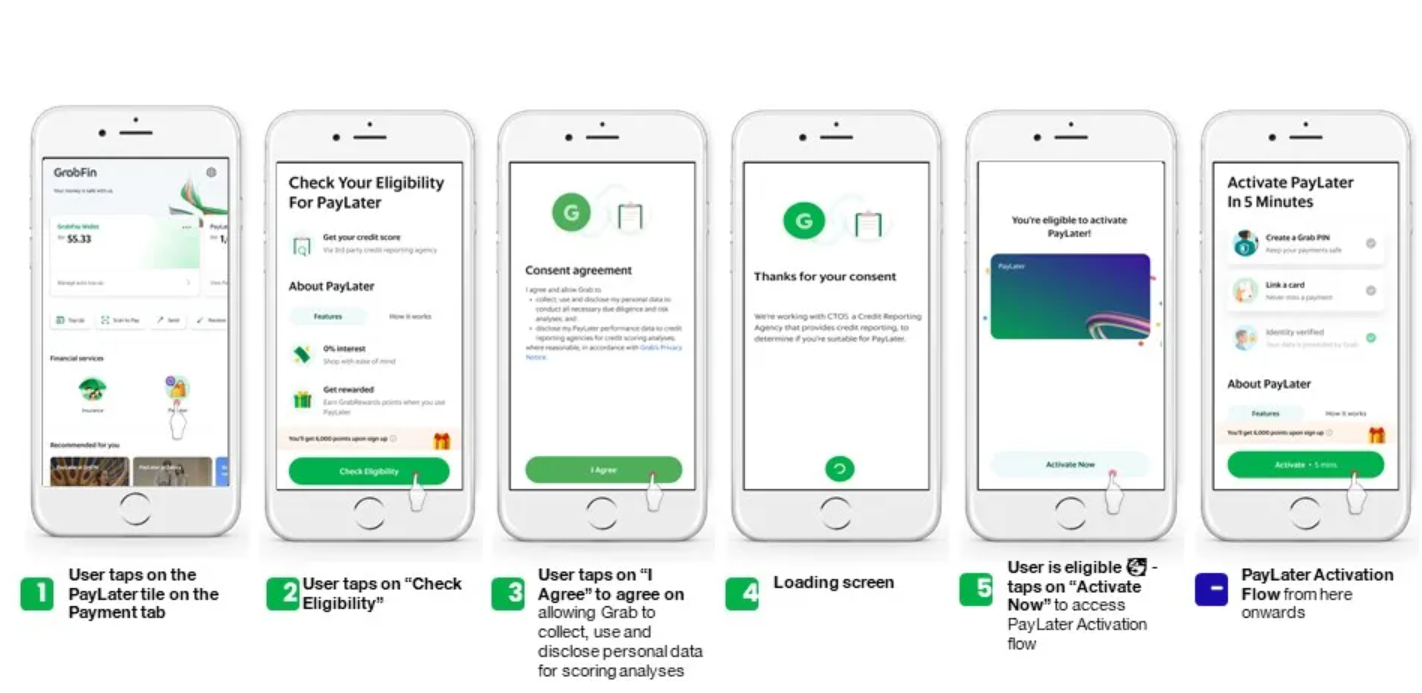
- If your customer is eligible for Grab PayLater they will be able to see a PayLater balance on their app.
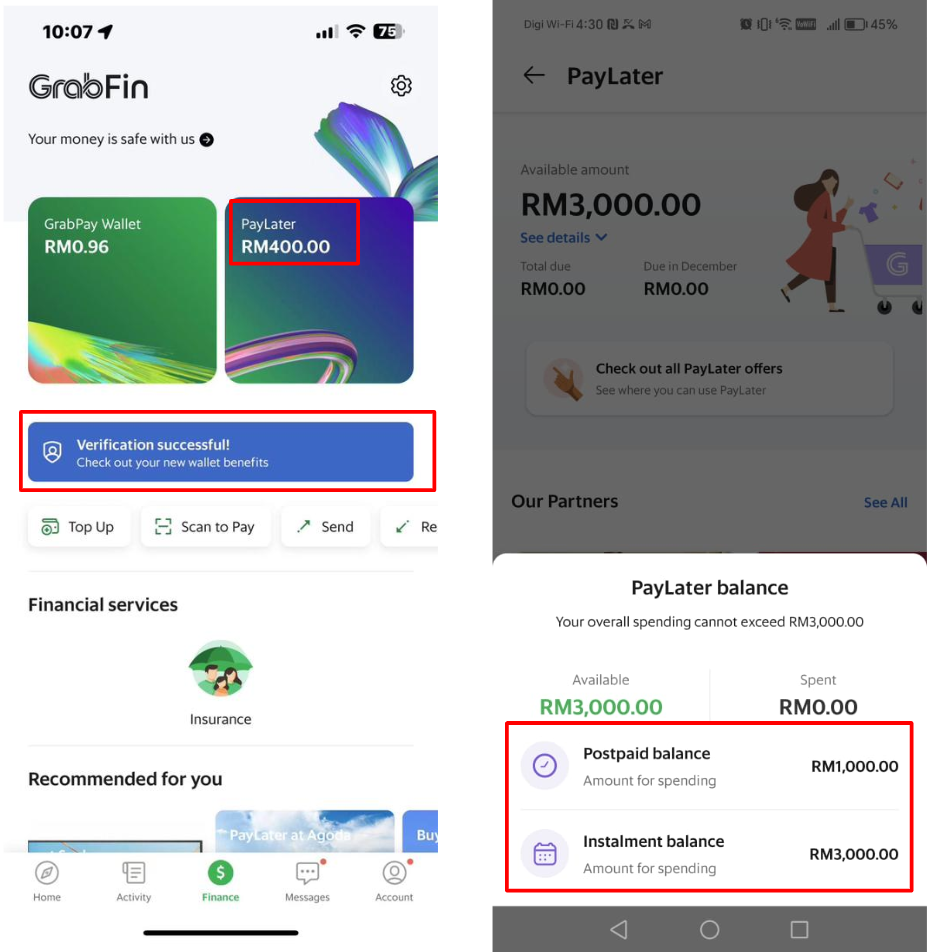
- When your customer selects Grab eWallet to pay via Payex QR code, they will see 3 payment options available for selection:
- Pay in 4 instalments
- Pay next month
- Pay in full now
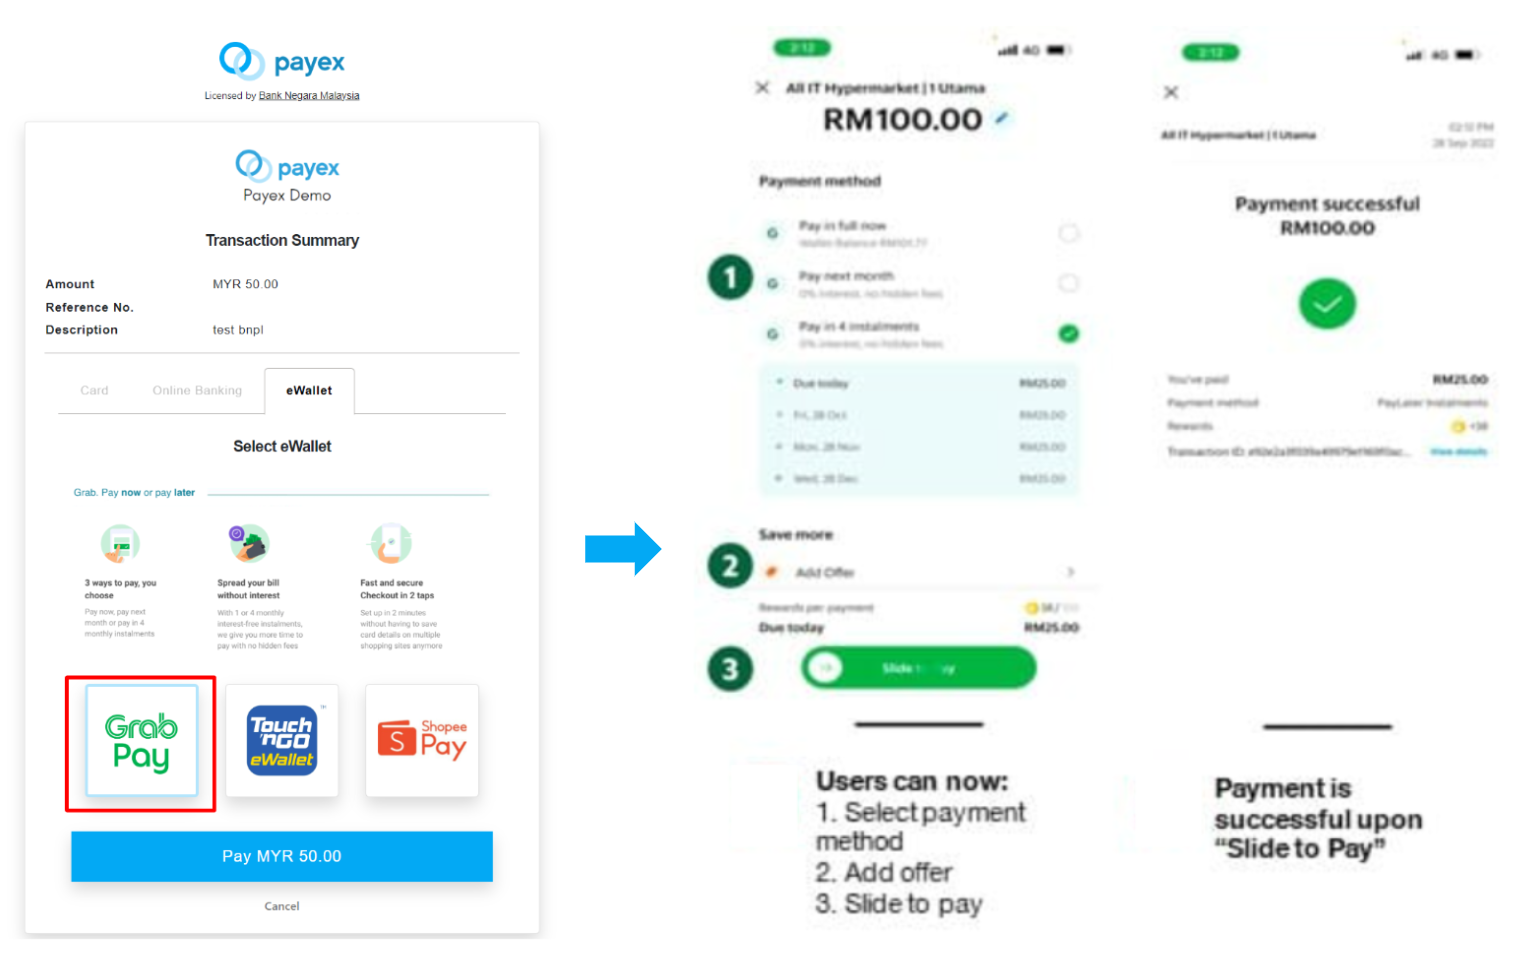
- Upon selecting Pay in 4 instalments, customer can slide to pay using their debit card or credit card (linked to their Grab App)
- Upon successful payment, customer will receive notification on their Grab App
6. Pay with Riipay (3-month Instalment)
- When your customer chooses Instalment to pay, they will see the available Buy-Now-Pay-Later (BNPL) providers they can pay with up to 3-interest free instalments.
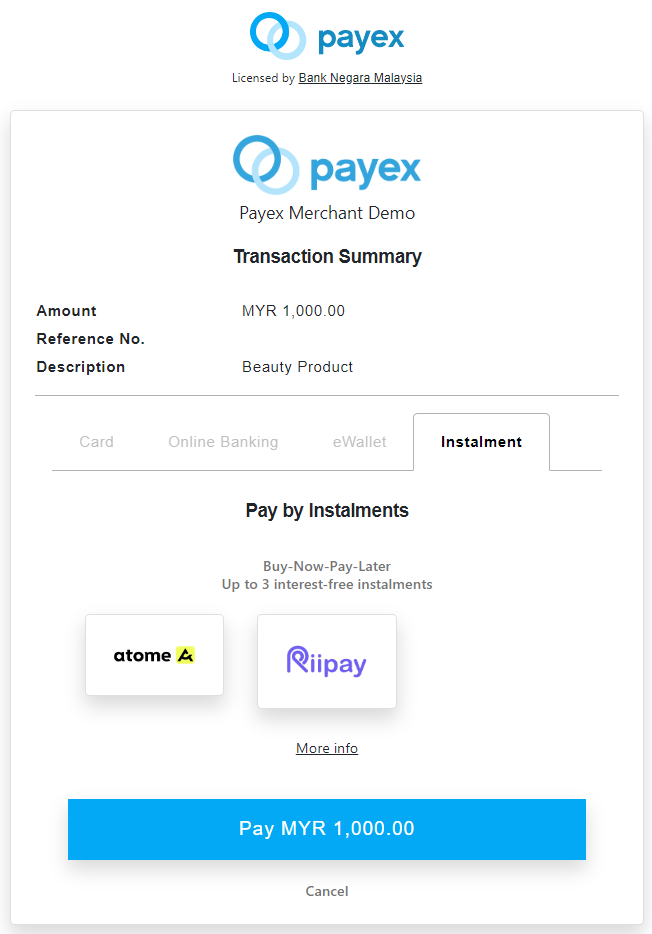
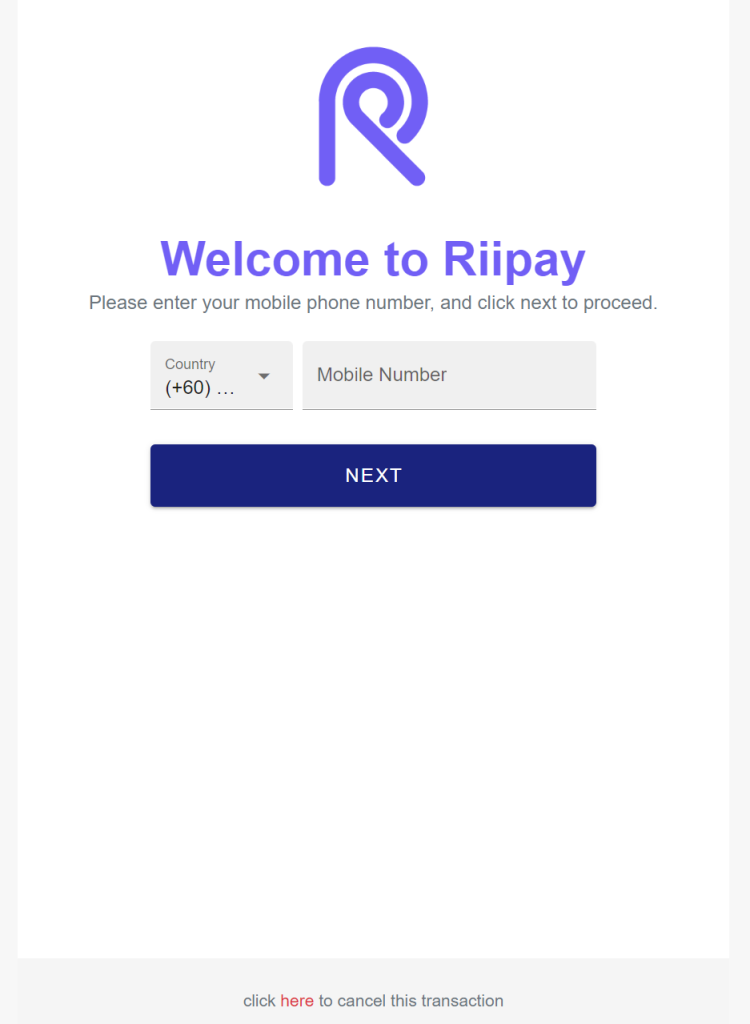
- In this example, upon clicking “Riipay“, customer will be directed to Riipay payment screen as below.
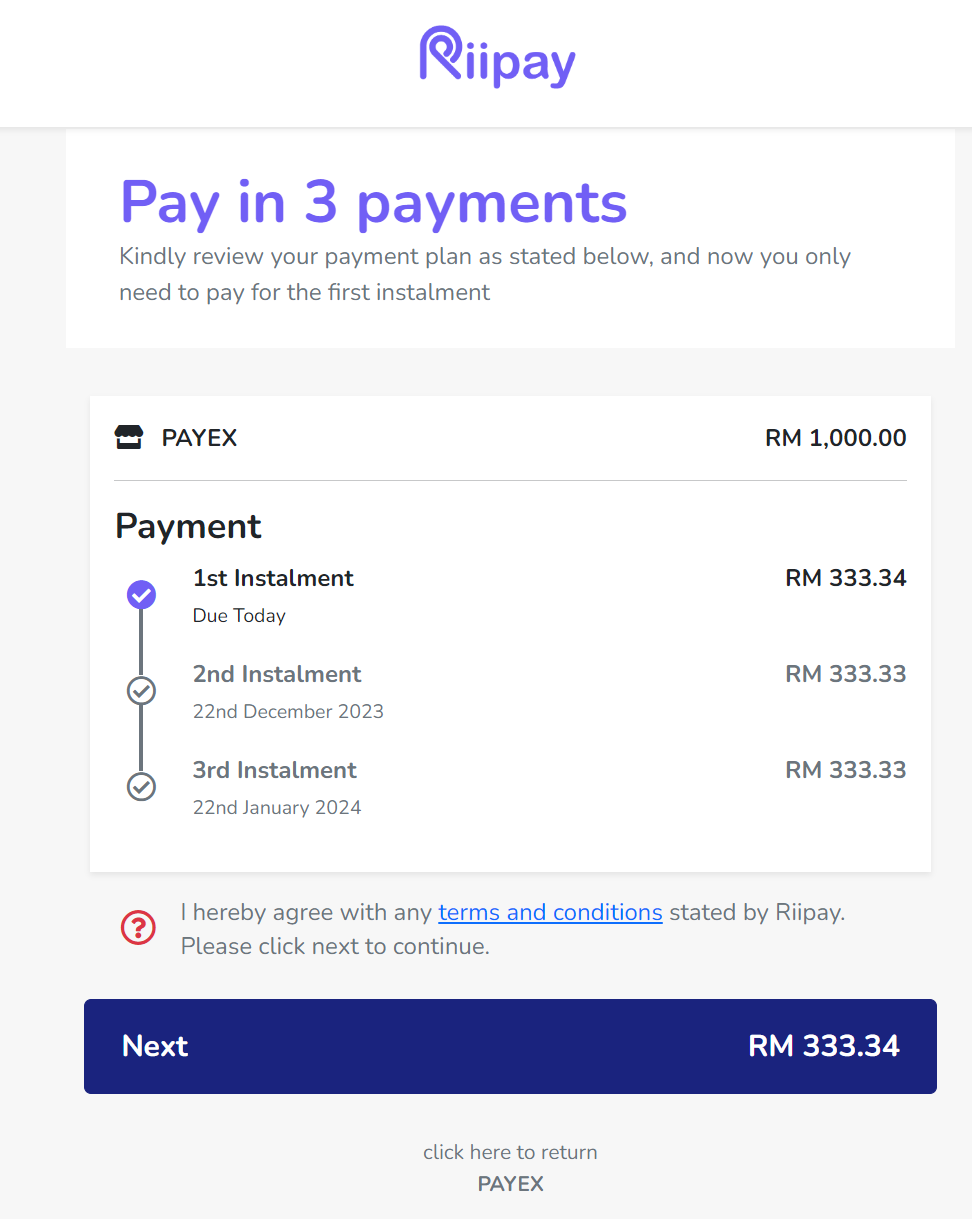
- Upon clicking “Next“, customer will need to verify themselves by entering their mobile number.
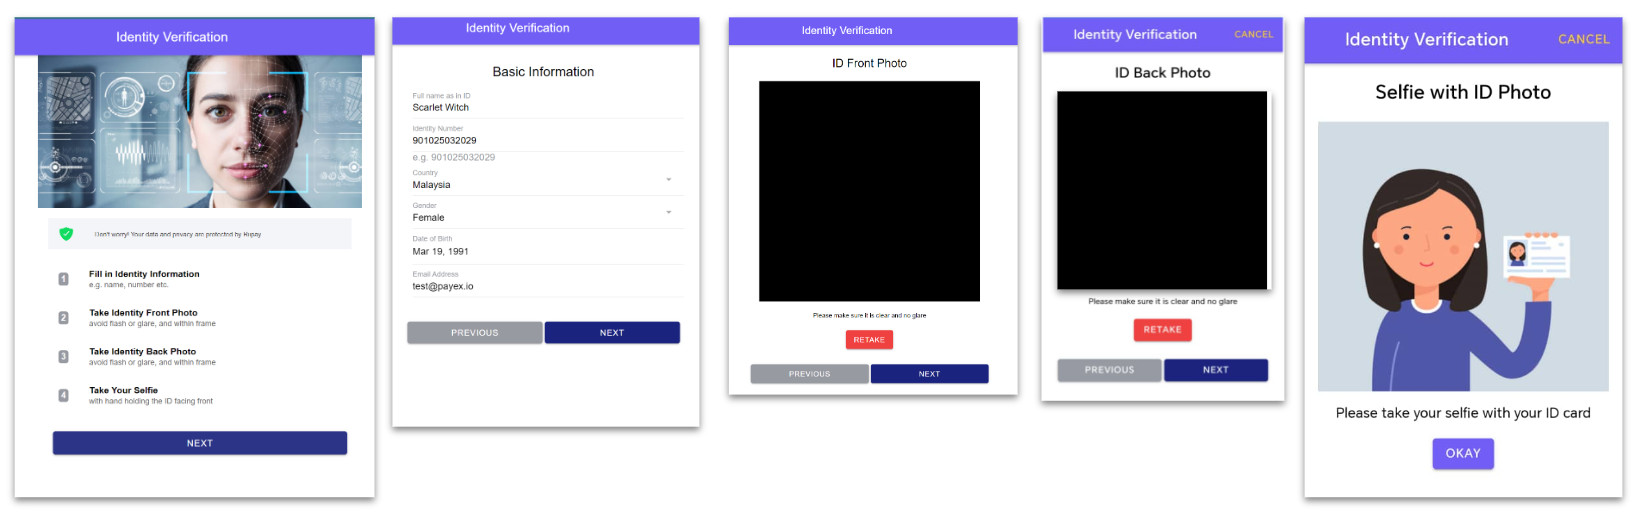
- As first-time applicant, customer will need to complete 4-step identify verification / eKYC process.
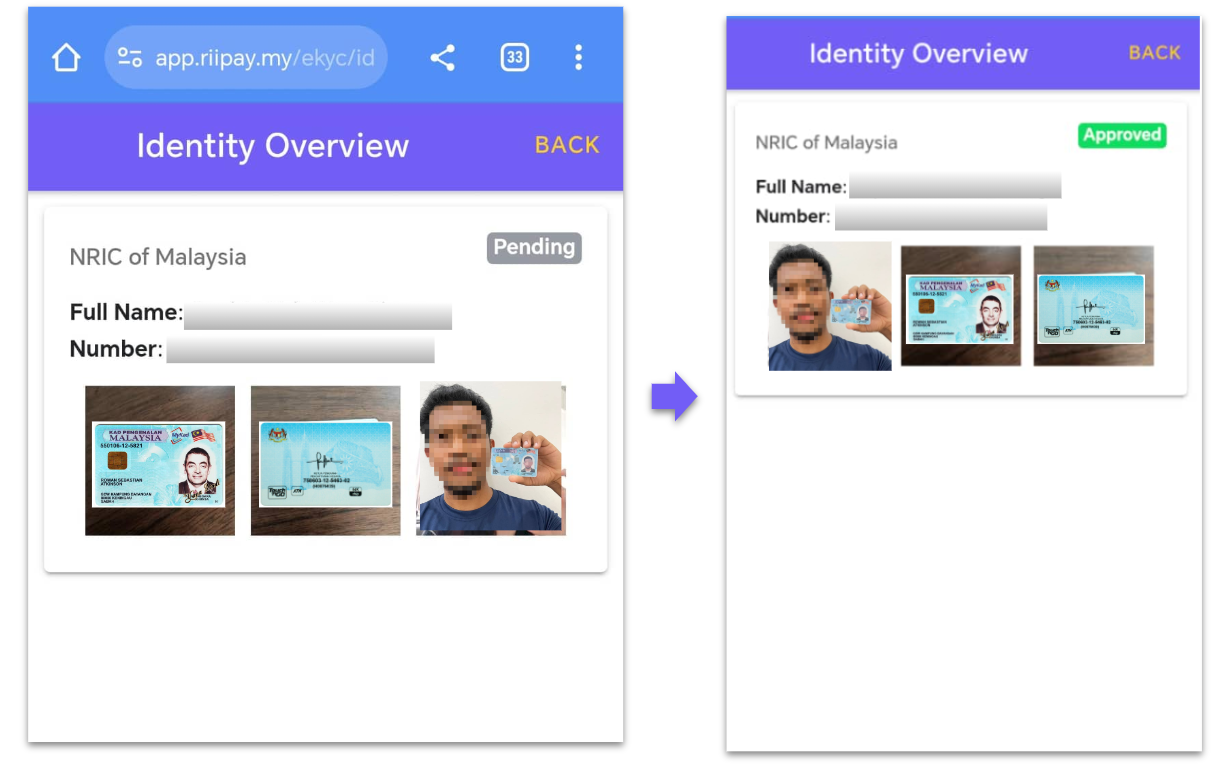
- Customer will be able to track the status of verification process on the Riipay Dashboard
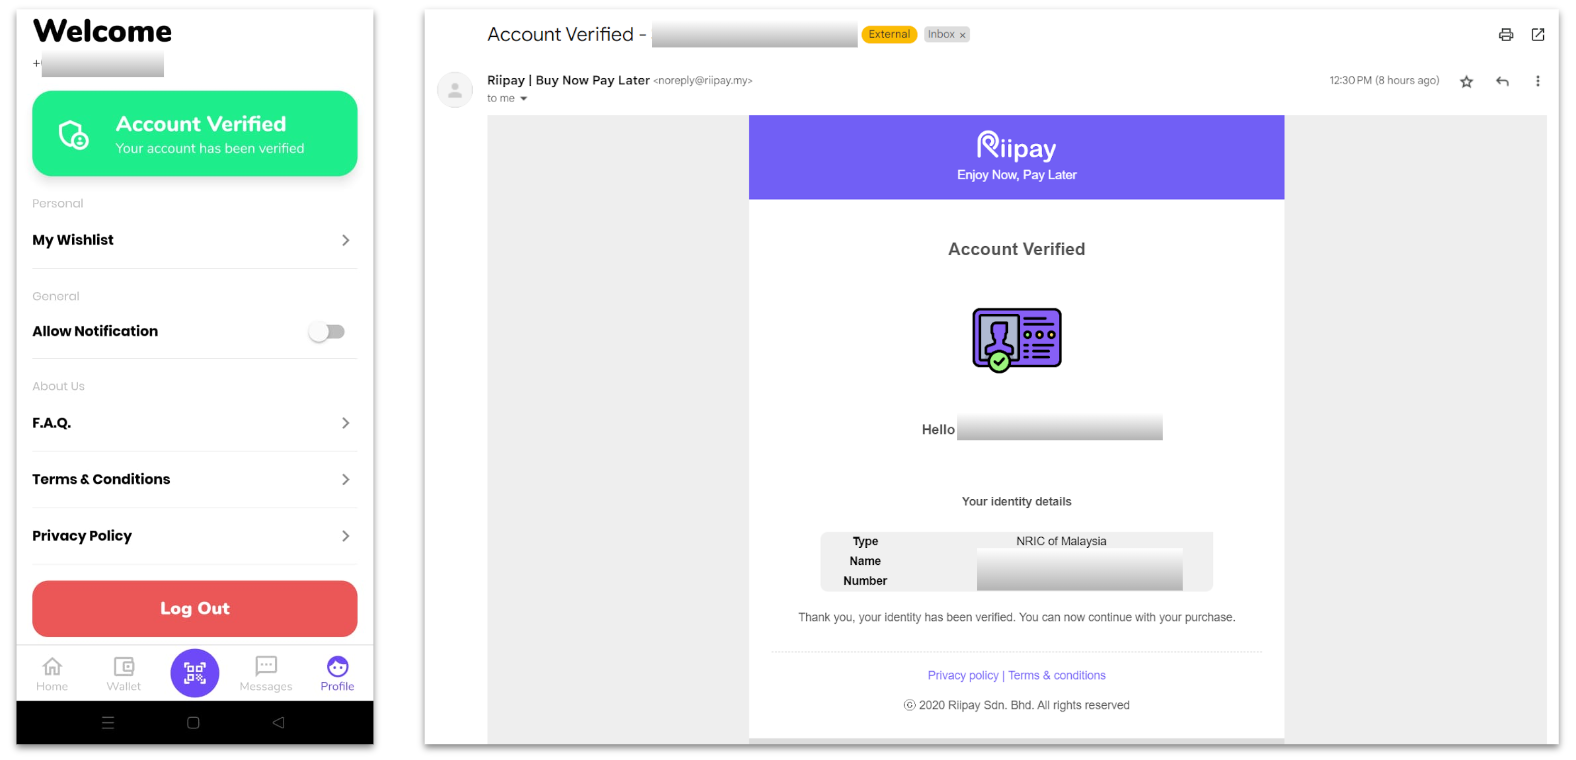
- Customer will also receive an email from Riipay on the Account Verified status and will now be able to complete the instalment payment journey.
- If your customer payment is still unsuccessful via Riipay, please advise your customer to check their email for the status of verification or WhatsApp Riipay Support Team at +60 16-214 9212 for further assistance.
- Upon account verification, your customer can start over the payment journey via your payment link (as per video below)
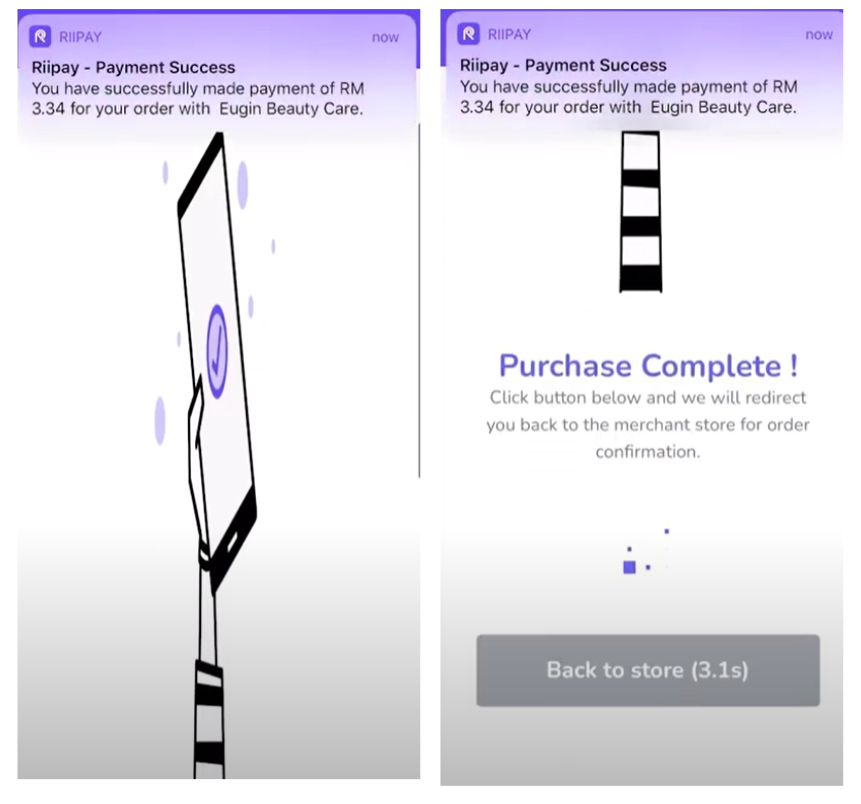
- Upon entering the OTP, your customer will be directed back to Payex screen to enter bank card details and click “Pay”

- Your customer will receive email notification & Riipay App notification on payment status
- Merchants selling high ticket items goods and services like luxury items
- Merchants selling low value goods and services that want to reach new customers who might not have credit cards
Wide range of industries
In general, merchants who use BNPL in Payex are from various industries:
- Beauty products & services, clothings, and accessories
- Home living and furnitures
- Education, membership, online courses and classes
- Others, such as sports, baby and kids, workshop services etc.
Payment journey in 4 simple steps!
- At checkout, customer chooses to pay with a BNPL option.
- Customer creates or logs into an account with the BNPL provider.
- Customer goes through e-KYC process for first-time account sign up.
- Customer accepts or declines the terms of the repayment plan.
How do BNPL providers decide the customer’s credit limit?
Credit Limit is determined by Payex’s Buy Now, Pay Later (BNPL) partners based on your customer’s personal information. This includes your customer’s name, identity number (NRIC), debit card details, and other relevant details provided during the sign-up process.<space>
- Example of customer’s eligibility criteria by

- At least 18 years old
- A mobile number issued with a Malaysia prefix (+60)
- Legal full name
- A Malaysian NRIC
- Date of birth
- A valid email address
- A credit/debit card issued by a financial institution
- Residential Address
- Residential Status
<space>
- Example of customer’s eligibility criteria by

- Existing Grab user for at least 6 months
- 21 years and older
- Account has been fully verified
- Platinum, Gold, or Silver GrabRewards tier member
- Grab app has been updated to the latest version
- Credit limit can be increased over time based on the end-users’ activities. Payex is not involved in this process.
- If eligible for PayLater, your customer will be able to activate it in-app, or simply launch your Grab app, tap on Payments, tap on Enjoy Now and Pay Later under Explore GrabPay.
ssss
- Example of customer’s eligibility criteria by

- Require minimum sufficient balance for first instalment (1/3 of price)
- Accept both debit and credit card for all local banks
- Do not accept foreign card
- Do not accept prepaid card
<space>
See also:
You may refer to our BNPL pricing here.
]]>A dispute (also known as a chargeback) occurs when a cardholder questions your payment with their card issuer.
When a customer disputes a transaction successfully to get their money back, the charge is returned to their card. Chargebacks play a vital role in the payment ecosystem, particularly in the cards industry. By offering customers the ability to raise disputes/chargebacks, it boosts their trust and confidence in using debit and credit cards for payments.
Chargeback vs Refunds
| Chargeback | Refunds | |
|---|---|---|
| Who initiates the process | Customers initiate through the bank that issued their card. | Merchant initiates to repay a customer who is returning a product or is dissatisfied with goods or services |
| Who the customer deals with | The issuing bank facilitates the chargeback process on the customer’s behalf. | The customer works with the merchant to resolve the problem and collect their payment. |
| What happens to the funds | The disputed funds are collected from the merchant’s account and held until a decision is made | After the merchant initiates the refund request, funds will be returned to the customer’s balance |
| How long the process takes | Can’t be estimated, depends on the process | Less than 14 work days – depends on the issuer |
| Fees | Can be up to USD 100 or more | None |
What can cause Chargebacks?
Customers may contact their card issuer for refunds due to reasons like identity theft, unauthorized transactions, or fraud. Merchants should engage with customers to confirm the causes for chargebacks for clear communication.
- A buyer does not want to use the product
- The product does not meet the expectations of the buyer
- The buyer is not happy with the service of the merchant
- A buyer does not recognize the purchase of the product which could be because the cardholder’s card was stolen, or because of social engineering
In some cases, a cardholder might raise a dispute on purpose to keep the goods/purchase without settling the payment. This is commonly known as ‘friendly fraud.’
Chargeback Process
When a cardholder raises a dispute/chargeback, the process might be different depending on the card network, but typically follows a standard scenario as shown below :
- The dispute begins when a cardholder raises a chargeback directly to the issuing bank. The issuing bank will then review the transactions and decide whether or not the customer has grounds to file a chargeback.
- If the issuing bank decides to grant the cardholder the chargeback, the bank will notify the card network (e.g. VISA, Mastercard), and the network will forward it to the acquiring bank (the merchant’s bank).
- Once received by the acquiring bank, the acquiring bank will then forward the chargeback to Payex as the merchant’s payment facilitator.
- The merchant will then be notified of the chargeback by Payex and can choose to accept or challenge the chargeback by providing a defense document. Merchants must defend the chargeback within a certain time frame depending on the card network’s policy.
- The issuer will then review the defense document and decide whether to accept/reject the defense. If accepted, Payex will return the funds back to the merchant.
Fighting the Chargebacks
When determining a judgment for a chargeback, transparency will prevent you from losing. Transparency means that you have recorded and maintained all interactions with the cardholder, details of the transaction, and anything that will confirm that the cardholder acknowledged/is aware of the product that they were purchasing. Some examples of evidence that you can provide:
- Screenshot of the account that the cardholder used
- Screenshot of the invoice of the product that the cardholder bought + screenshot of the product
- Screenshot of the payment details (e.g. masked card number, name, email, phone number, shipping address, etc.)
- Screenshot of the invoice/payment reference from Payex (external ID/order ID) with the reference details from the merchant that match
- Screenshot of the shipping proof
- Screenshot that the cardholder has received the product
- Screenshot that the cardholder has used the product
The evidence can be sent to merchantsupport@payex.io The more relevant the evidence that you send, the more you are likely to win the chargeback. If Payex does not have enough evidence that support a successful reversal of the chargeback, we will request additional documentation. A certain period of time will be given (depending on the issuing bank) to submit all documentation to us.
Chargeback Results
If the acquiring bank deems that the supporting evidence is not enough, Payex will be informed, and there will be additional time to gather more evidence. The bank will review the evidence received and notify Payex of the chargeback results.
Preventing Chargebacks
Chargeback will surely cost the merchants/businesses the disputed amount along with the chargeback fees. Therefore, preventing chargeback is more important than fighting it.
Here’s how you can minimize this from happening:
- Protect Transaction with 3D-Secure (3DS)
- Have authentication (3DS) enabled before charging to give you more protection from chargeback liability
- Allow Foreign Cards only based on the Use Case
- Be mindful of accepting foreign cards and accept new countries on a case-by-case approach
- Good Fraud Prevention Strategy
- Manually review transactions and cancel transactions with suspicious characteristics
- Pass your customer’s billing details upon charge. Using an Address Verification Service (AVS) can make your charge much more solid
- Remains vigilant and implement appropriate measures to identify and mitigate suspicious patterns
- Good Chargeback Management Strategy
- Clearly state return & exchange policies on product pages, checkout screens, and order confirmations
- Use delivery confirmation for every shipment, and use signature confirmation for expensive orders, create a transparent shipping and billing process
- Clear acknowledgment proof from the customer’s end on your TnC (e.g. have a clear customer acknowledgment (ie. signature) for a non-refundable deposit, etc)
- Use the same business name when possible on websites, order confirmations for expensive orders
- Keep all customer correspondence and transactional records until after the chargeback window has passed
- Include a clear product description on your website
- Respond to customers’ inquiries as quickly as possible