| Use Case | Description |
|---|---|
| Subscriptions fixed billing | Scheduled direct debit or auto debit/ merchant initiated deductions of fixed amount on regular time intervals Example: Property rental, Gym membership fees, Video streaming service See more: How to create Auto Collection via Mandate Link for Subscription Payment |
| Subscriptions usage based billing | Scheduled direct debit or auto debit/ merchant initiated deductions of varying amount on regular time intervals, merchant will need to update final amount for deductions based on end user consumption Example: Utilities service See more: How to create Manual Collection via Mandate Link for Subscription Payment |
Why choose Payex Subscription?
- Wide range of payment methods – Payex’s Subscriptions product allows merchants to collect payments from bank account/credit cards (direct debit method) and debit card/credit card/foreign cards (auto debit method)
- Simple and flexible integration – Serve different subscriptions models with the same integration endpoint
- Advanced features to maximize payment success – Payex’s Subscriptions include payment auto retries, notification and user portals for reconciliation of failed payments. Automate to maximize your success rates!
- Reliable service uptime – Proven track record with large and small customers for high service uptime and quick response time.
Subscriptions Payment (Auto-Billing) also known as Direct Debit/Auto Debit enables merchants to collect payment directly from their customer’s bank account balance by linking their bank account or cards access. Payex supports:
- Direct Debit: Subscriptions via online banking (bank account and credit card). This requires merchants to have an RHB account. If merchants do not have an RHB account, Payex will arrange for RHB officer to contact you within 7 working days.
- Auto Debit: Subscriptions via Visa/Mastercard (credit card, debit card, foreign card). This is upon request and subject to approval by Visa/Mastercard.
For the integration guide, see our documentation and flowchart.
Activation Steps
Follow these steps to start accepting payments through Subscriptions Payment (Auto-Billing):
- Contact Payex Merchant Support at +60192713728 to request for Subscriptions Payment Activation.
- Payex will relay your activation request to RHB / Visa and Mastercard. Supporting documents will be needed.
- In parallel, you can proceed with integration and testing by following our integration guide.
- Once done, Payex will notify you upon successful activation.
- That’s it! You can now start accepting live payments via Subscriptions Payment on your platform.
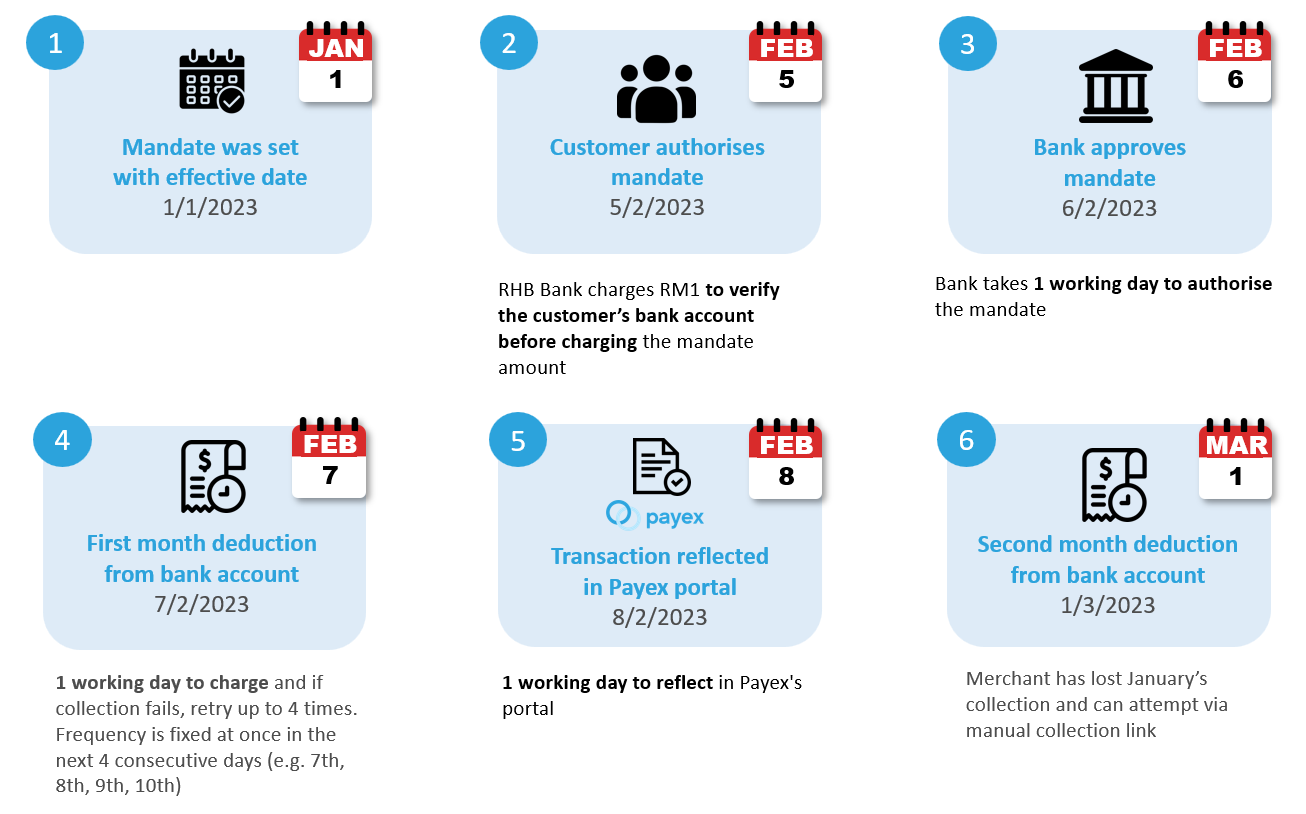
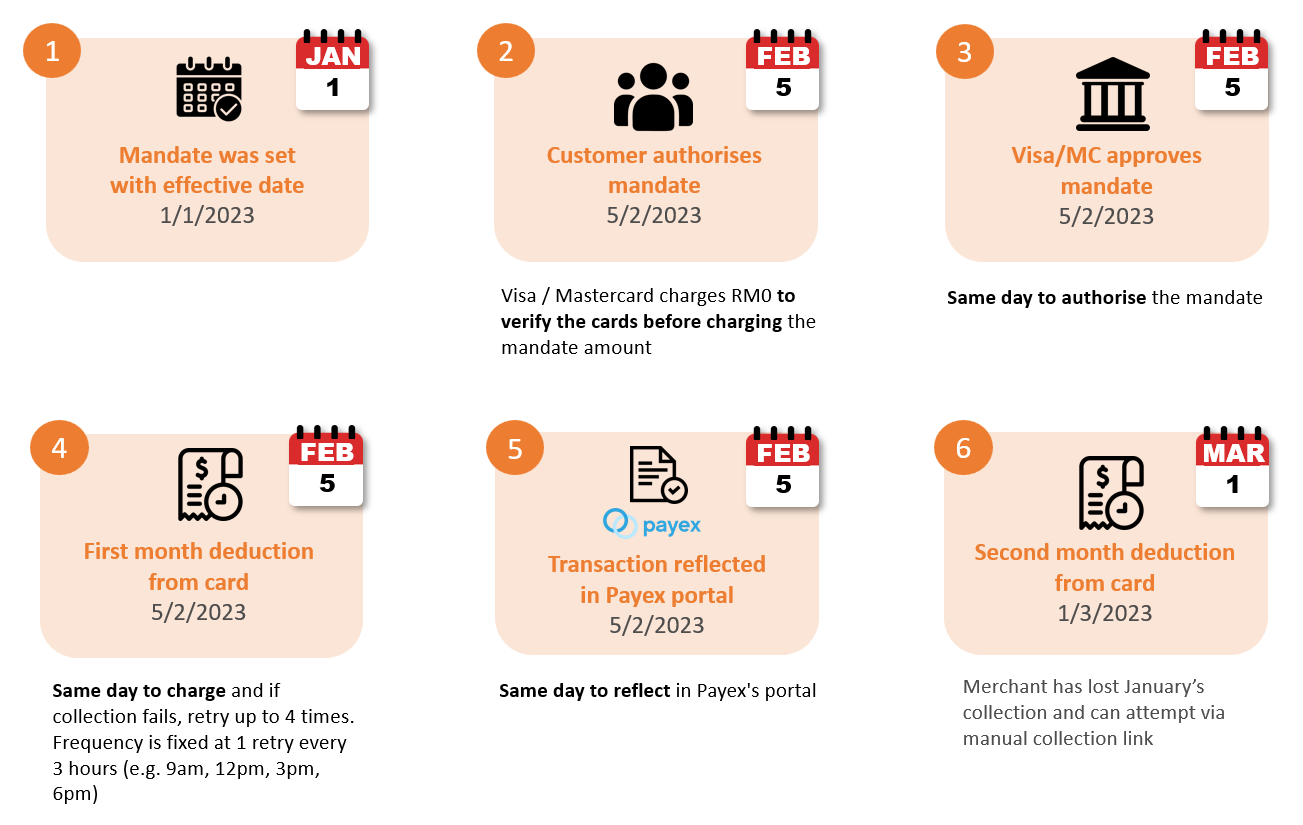
| High level process for scenarios below: | Direct Debit timeline | Auto Debit timeline |
|---|---|---|
| Customer authorises mandate | Day T | Day T |
| Bank or Visa / Mastercard approves mandate | T+1 working day | Instant |
| First deduction from bank account / cards | T+2 working day | Instant |
| Transaction reflected in Payex portal | T+3 working day | Instant |
| Settlement to merchant | Instant | T+2 working days |
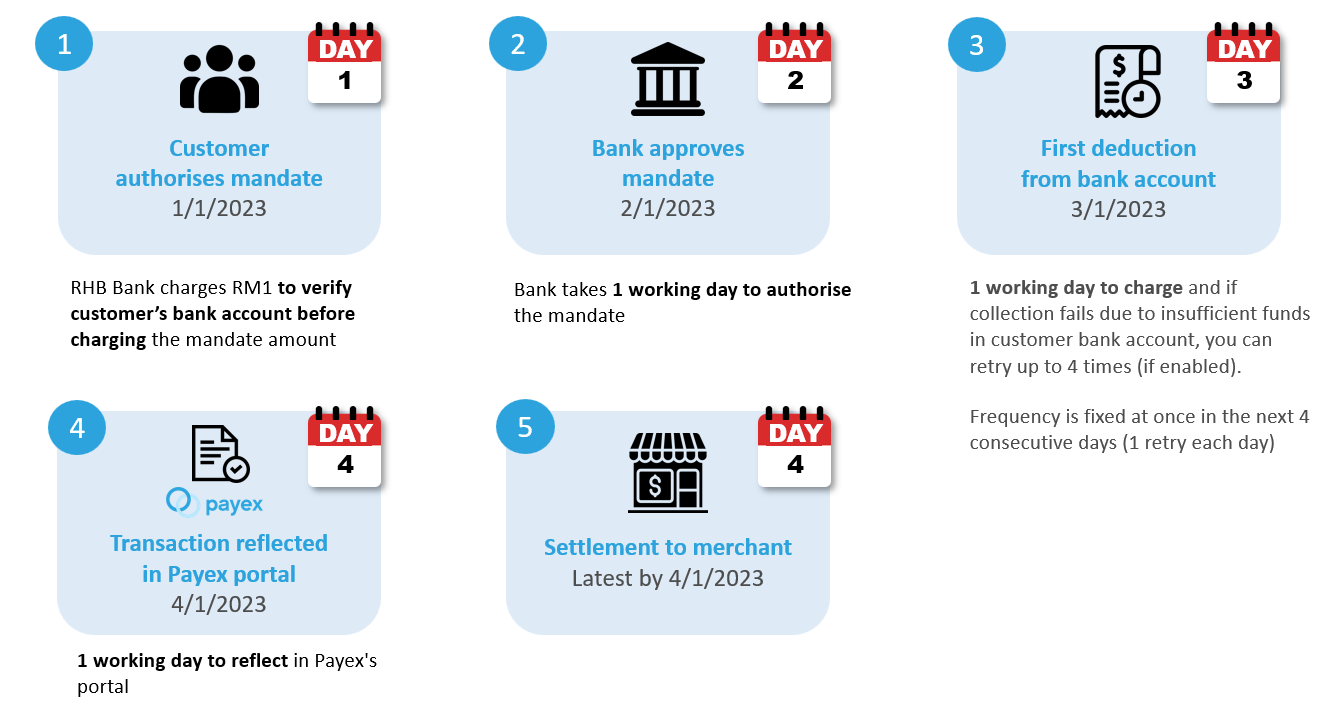
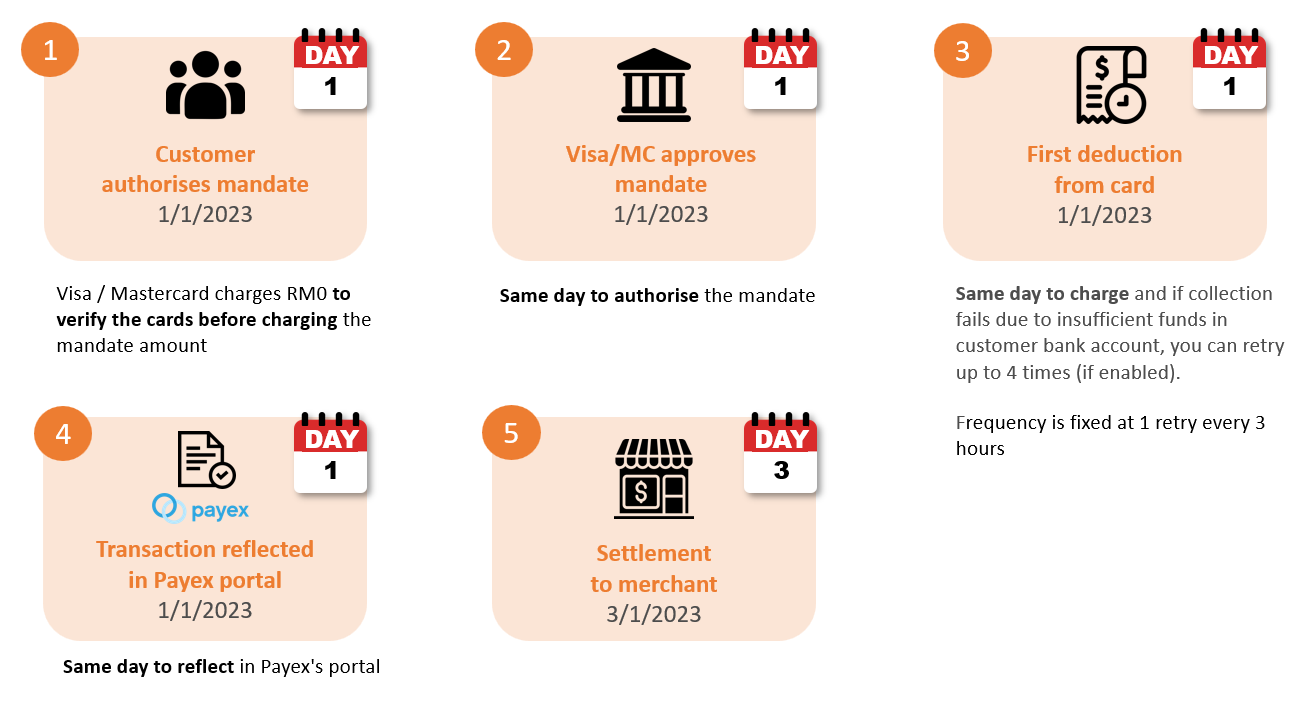
Scenario 1: If customer authorises mandate upon receiving the link
| Direct Debit (bank account) | Auto Debit (cards) |
|---|
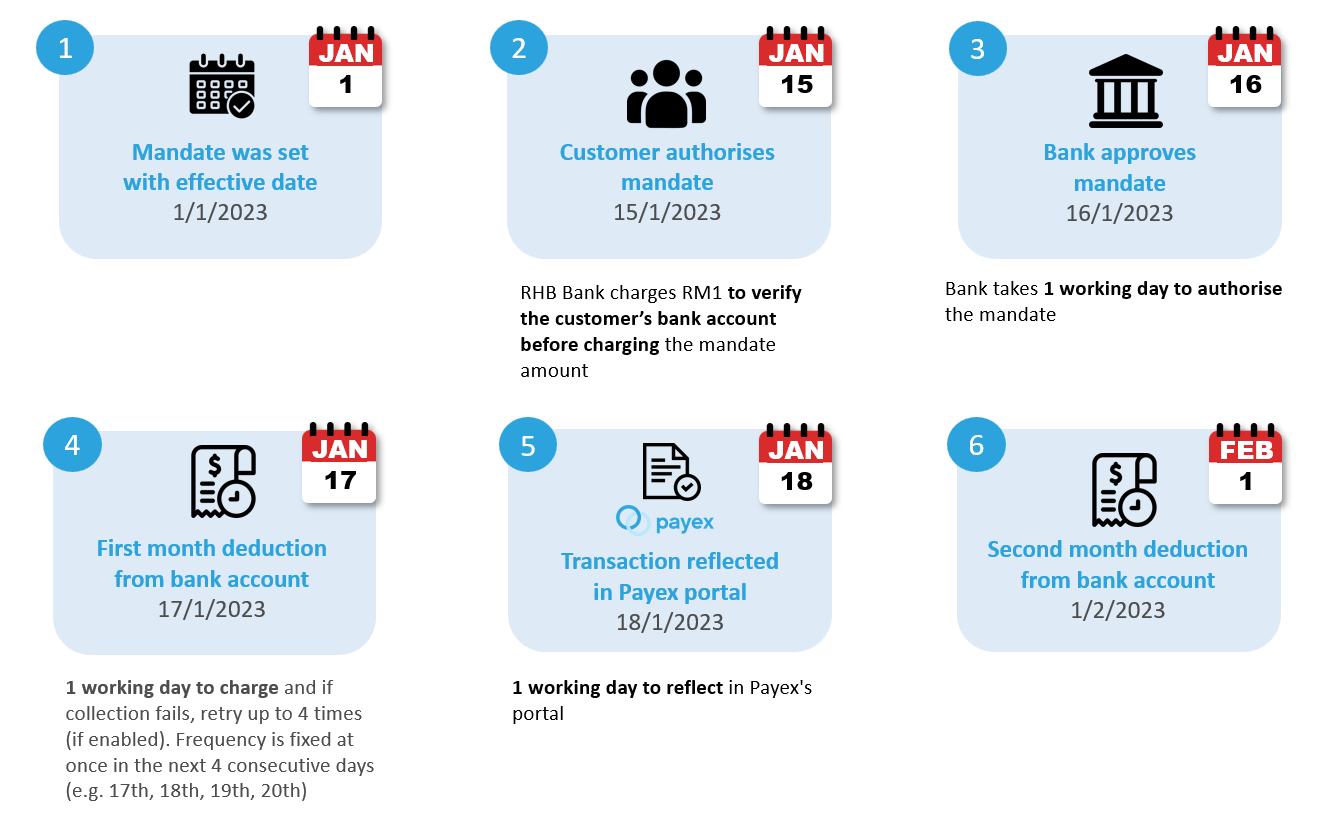
Scenario 2: If customer delays in authorising mandate (e.g. 2 weeks later)
| Direct Debit (bank account) | Auto Debit (cards) |
|---|
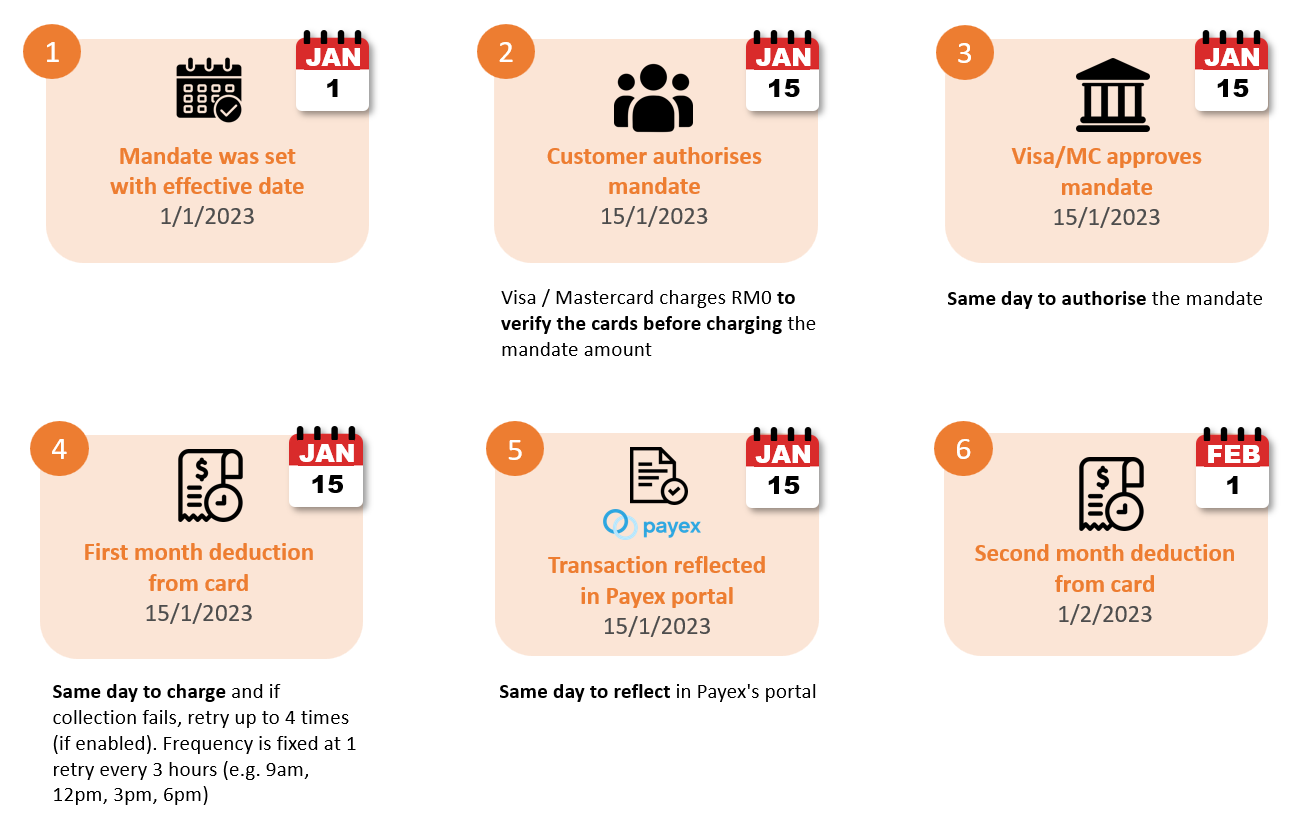
Scenario 3: If customer delays in authorising mandate (e.g. more than 1 month)
| Direct Debit (bank account) | Auto Debit (cards) |
|---|
* depending on the mode of subscription payment :
- Bank account – earliest first deduction fall on the next day after the approval by the bank
- Local / foreign card – earliest first deduction fall on the same day after the approval by the bank
Email notification from Payex
Direct Debit
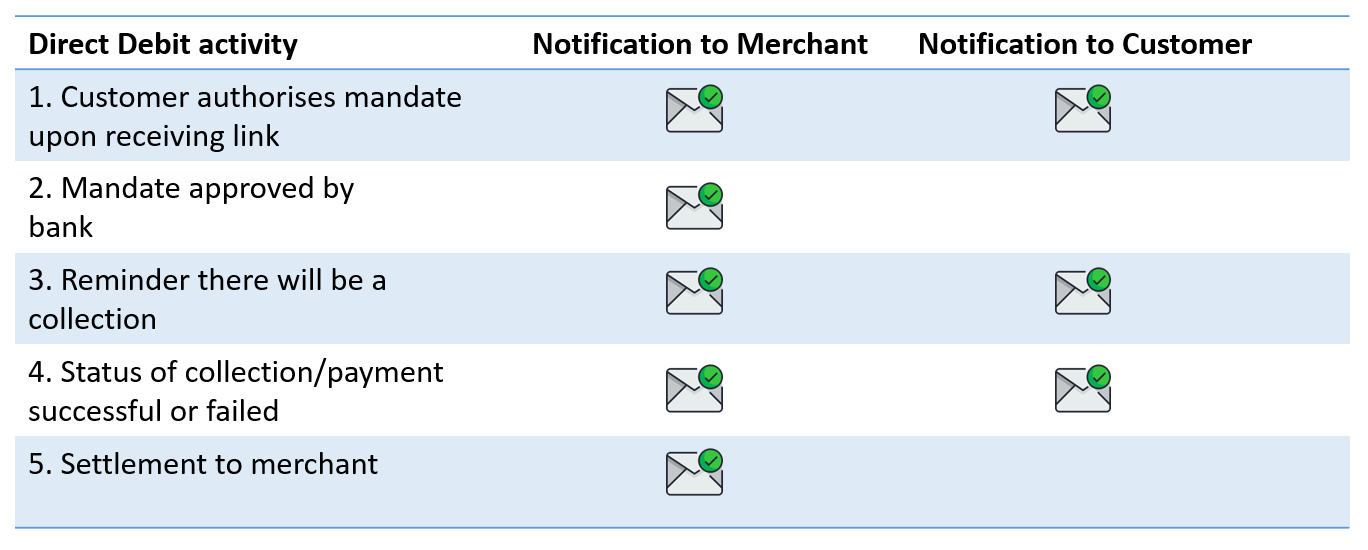
Note: For Direct Debit, customer will be notified via email each time Payex attempts to deduct (retry collection) from customer’s bank account.
Auto Debit
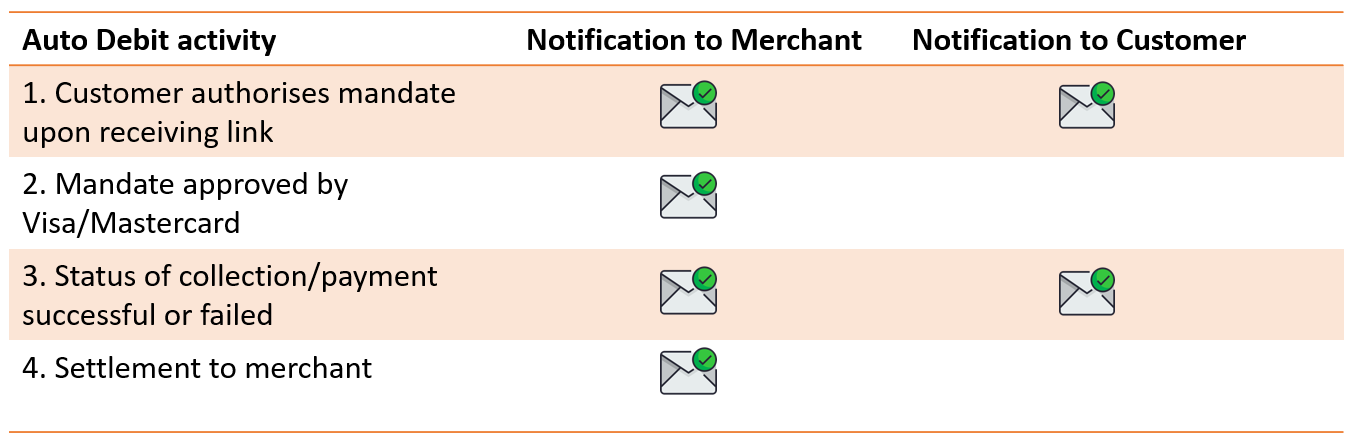
Note: There is no notification reminder when there will be a collection, as collection will happen same day as approval.
For Auto Debit, after a collection retry is attempted, Payex API includes endpoint to retry the same collections. you may also use that API endpoint to customise the notification on the retries made.
See also:
]]>Step 1: Login to Payex’s portal
Log on to our portal at https://portal.payex.io/Home, and key-in your credentials.
Step 2: Create mandate link
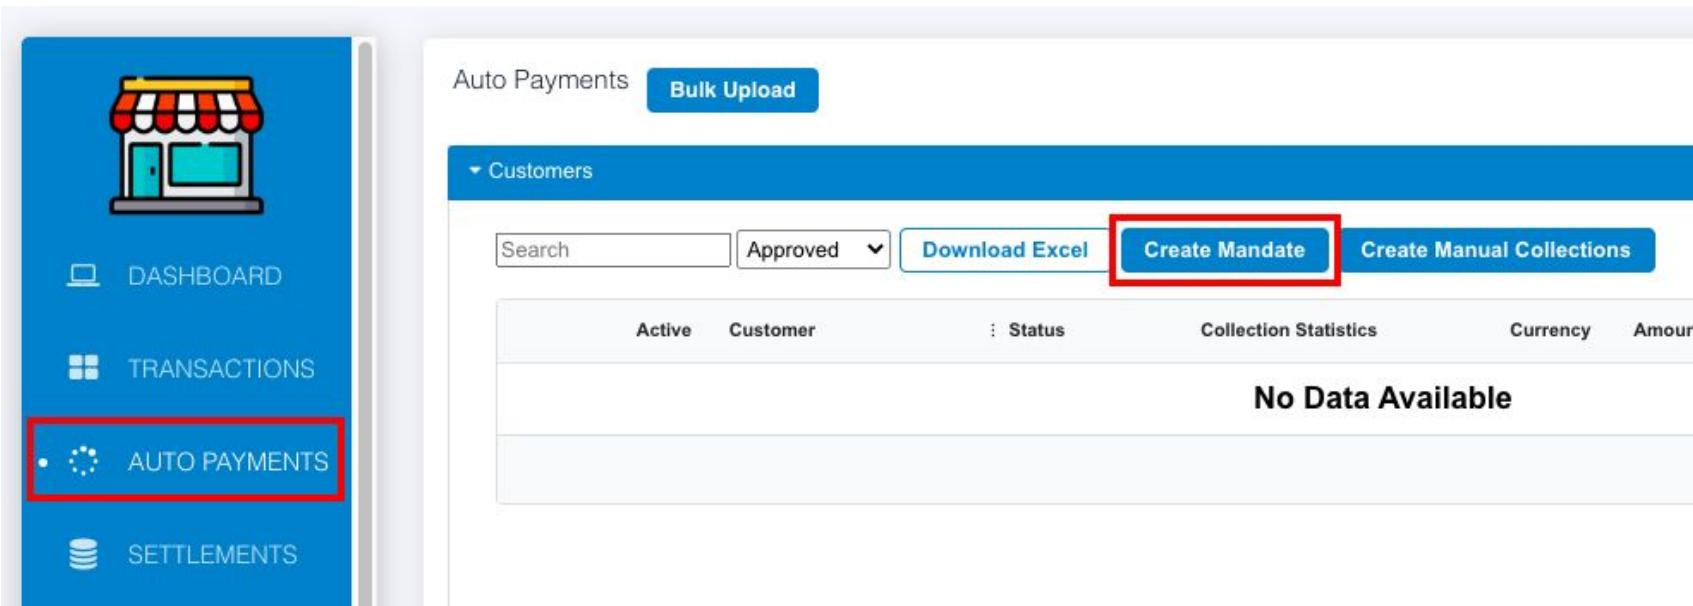
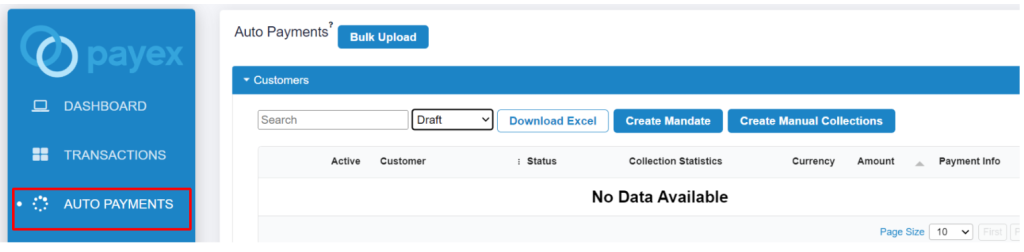
- Click “Auto Payments” on the left panel once you’re logged in.
- Click “Create Mandate“
Step 3: Fill out the mandate application (Part I)
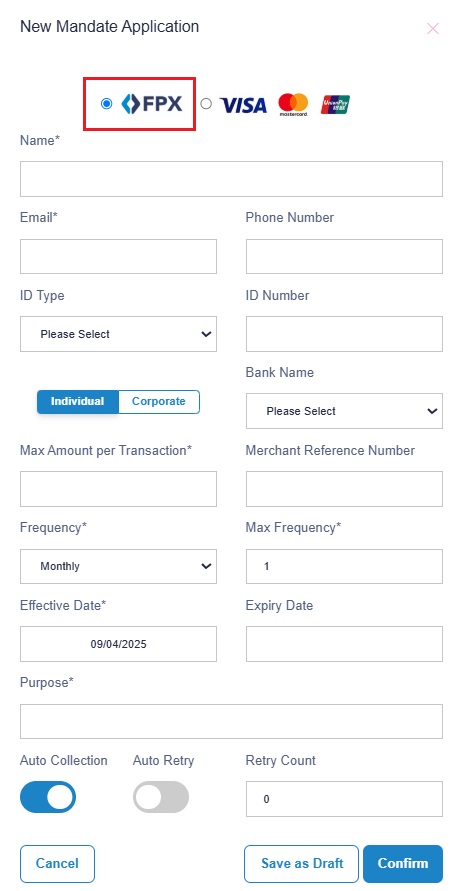
- FPX – link to customer’s bank account
- Fill out the relevant details:
a. Name – customer’s name
b. Email – customer’s email address
c. Phone number – customer’s contact number
d. ID Type – customer’s ID type
e. ID Number – customer’s ID number
f. Bank Name – leave it for your customer to choose
g. Individual / Corporate – leave it for your customer to choose
h. Max Amount per Transaction – the maximum amount you want to charge the customer/amount you want to charge the customer
i. Merchant Reference Number – any reference number you want to put
Step 4: Fill out the mandate application (Part II)
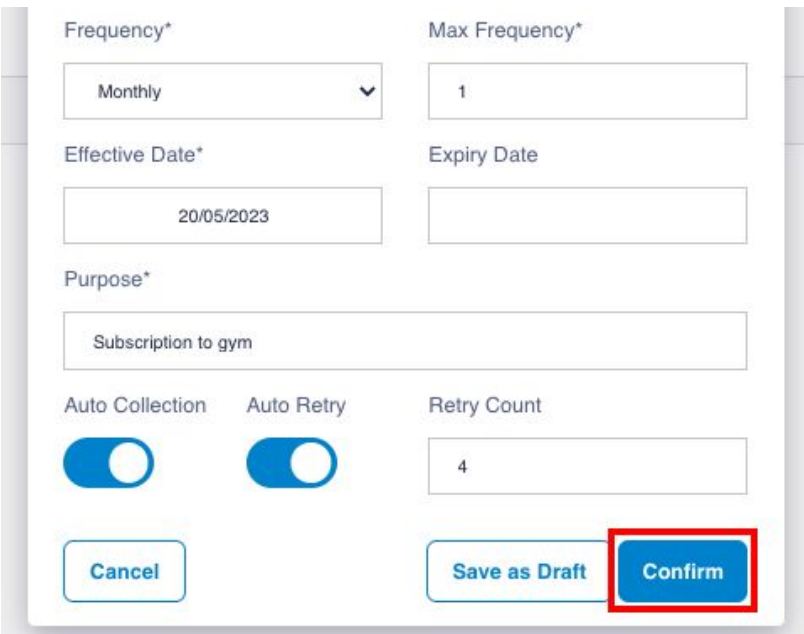
- Fill out the relevant details:
a. Frequency – Monthly (charge monthly). You may also select daily, weekly, quarterly or yearly frequency.
b. Max Frequency – 1 (charge 1 time in a month)
c. Effective Date – 20/05/2023 (collect payment on every 20th)
d. Expiry Date – you may leave it blank if you do not have a date (i.e. if you choose 30/12/2023, the last collection will fall on 20/12/2023)
e. Purpose – purpose of payment
f. Auto Collection – enable it to auto collect every month
g. Auto Retry – enable it to let system auto retry the collection if payment fails
h. Retry Count – 4 (the maximum retry count for system is 4) (i.e. payment failed to collect on 20th, system will retry on 21st, 22nd, 23rd & 24th)
i. Click “Confirm” to generate the mandate link
Step 5: Share the mandate link to your customer
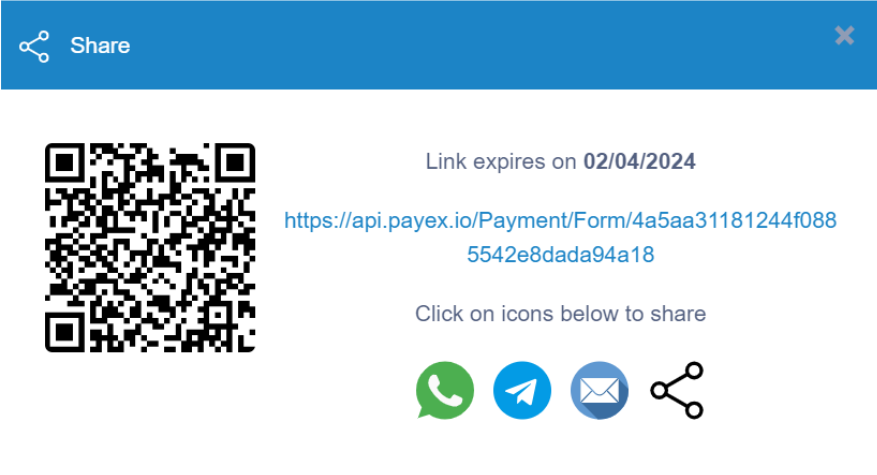
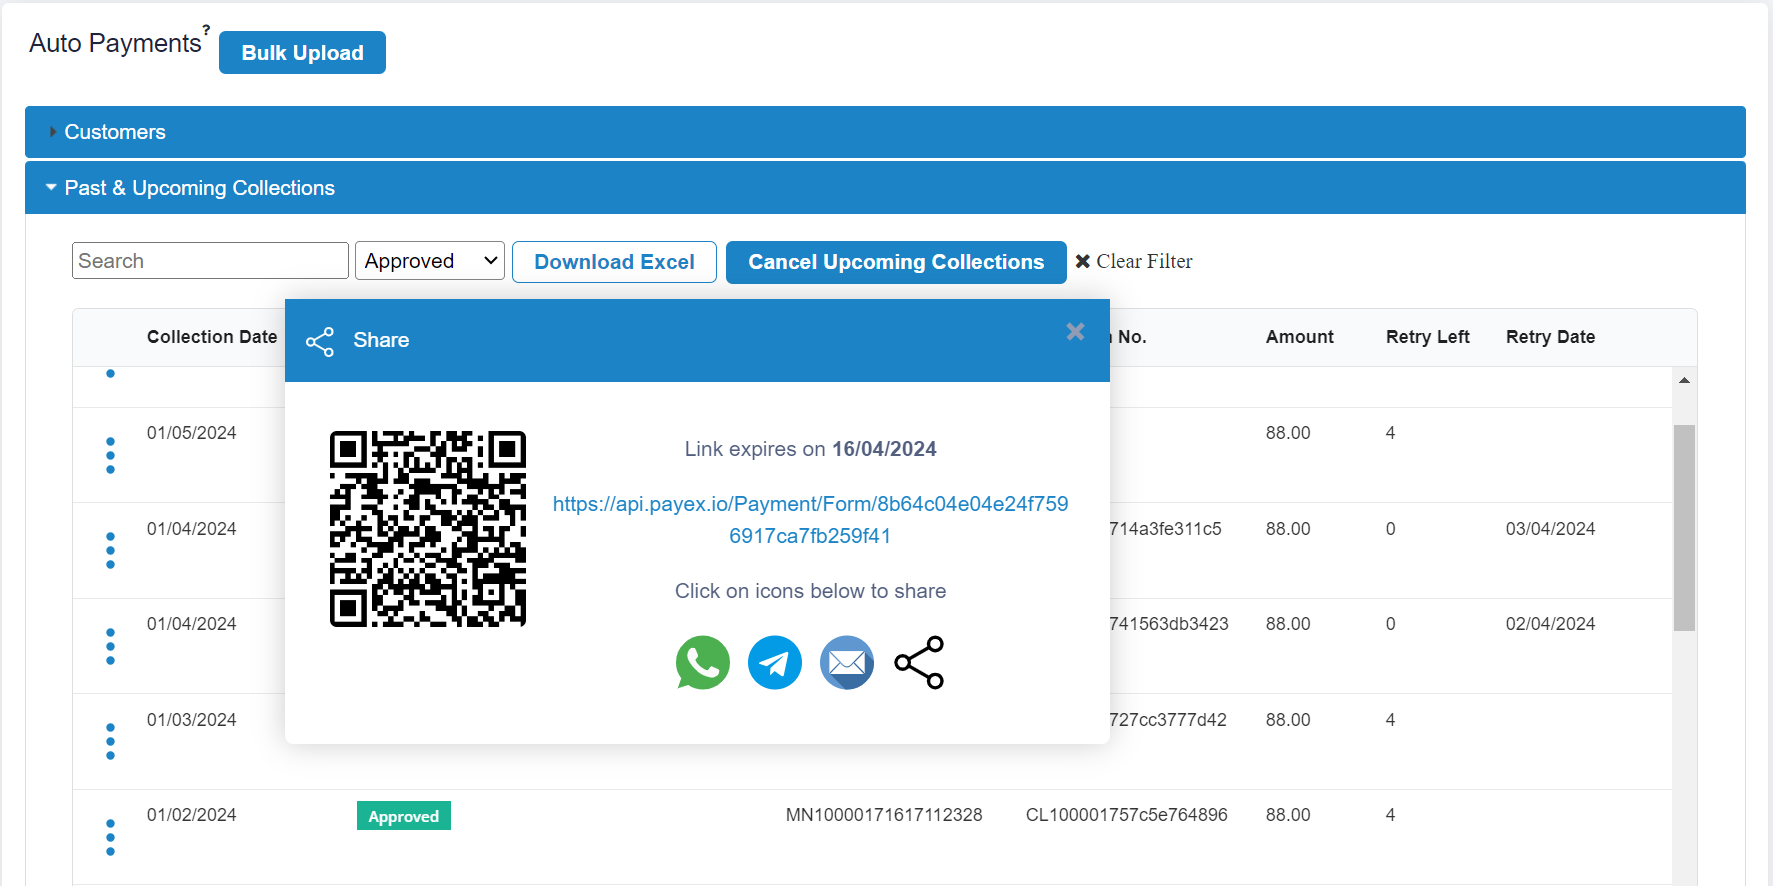
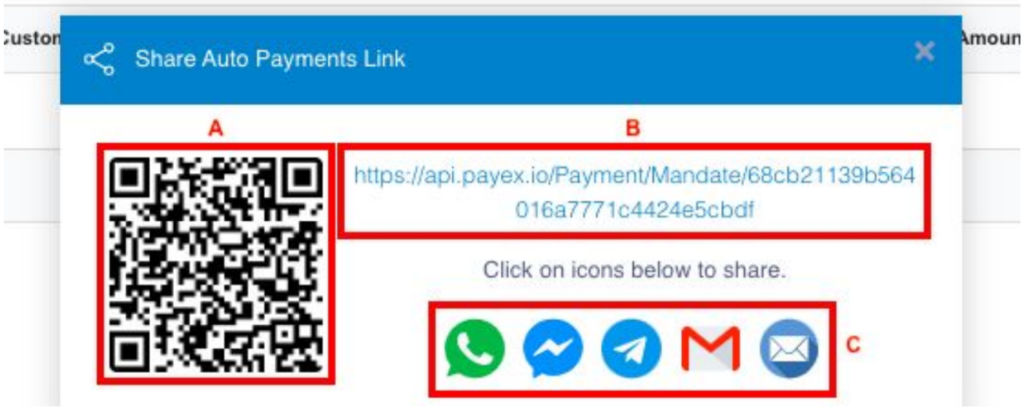
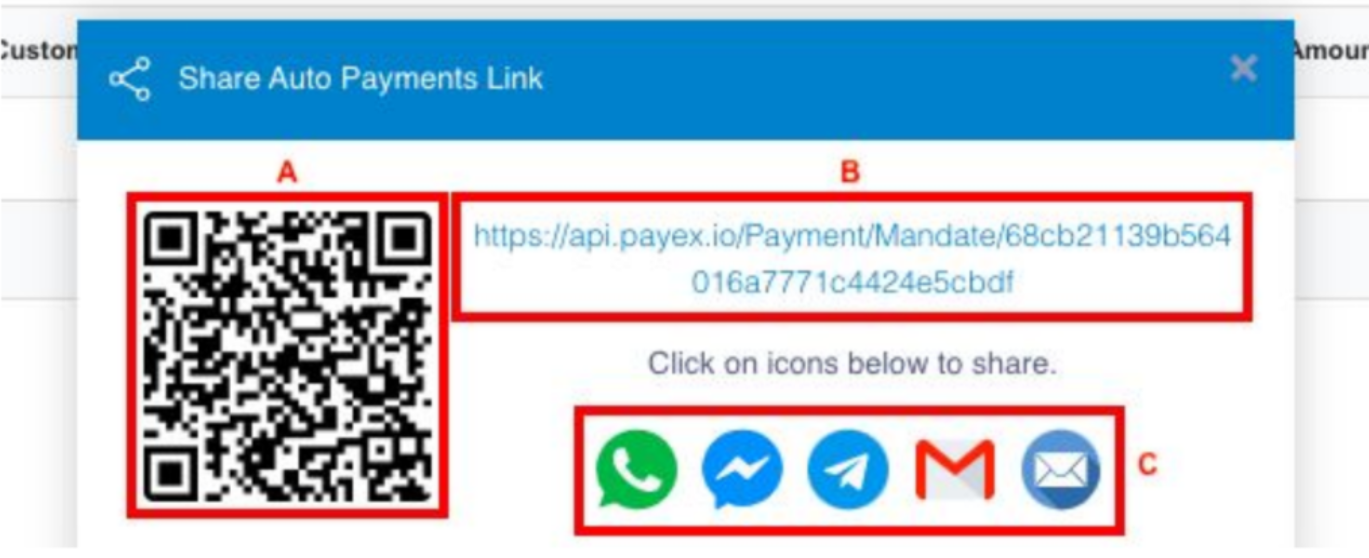
You will see this screen displayed upon generating the mandate link:
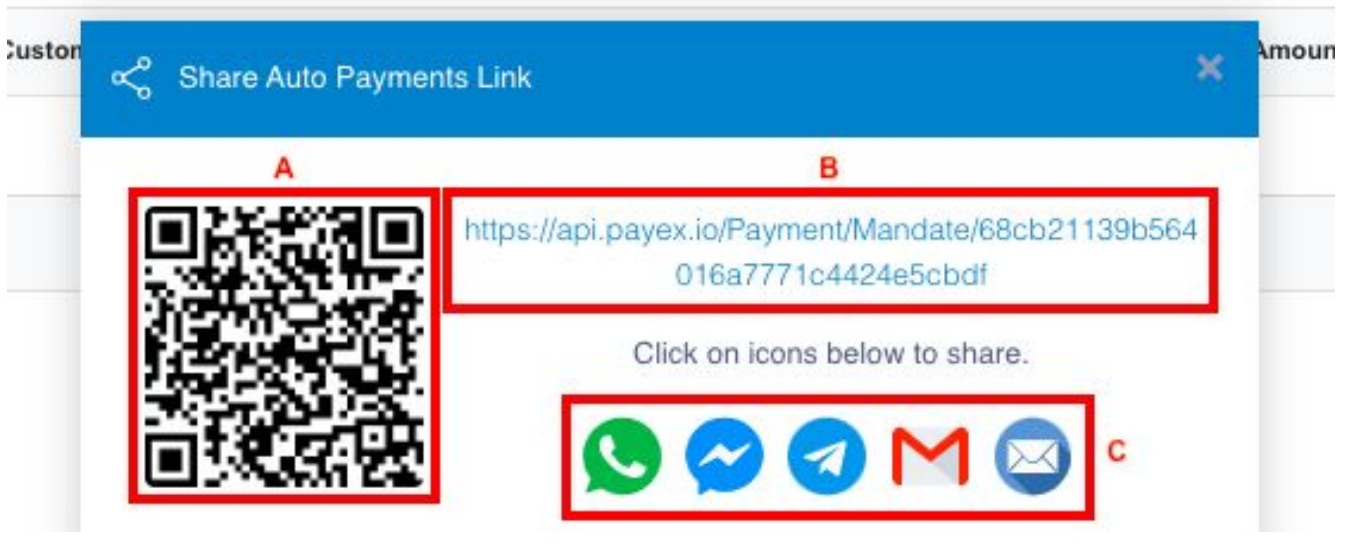
A – right click to save the QR code and share
B – copy the mandate link and share to your customer
C – you can click any icon to share the mandate link to your customer
- Customer clicks the mandate link to fill out the relevant information and click “Proceed”
- There will be a one-time charge of RM 1 (via bank account) for the purpose of account verification and it takes 1 working day to be approved by RHB
- Once it has been approved by the bank then you can start collecting payment from your customers
Step 6: Alter and check the status of your mandate
Click “Auto Payments“
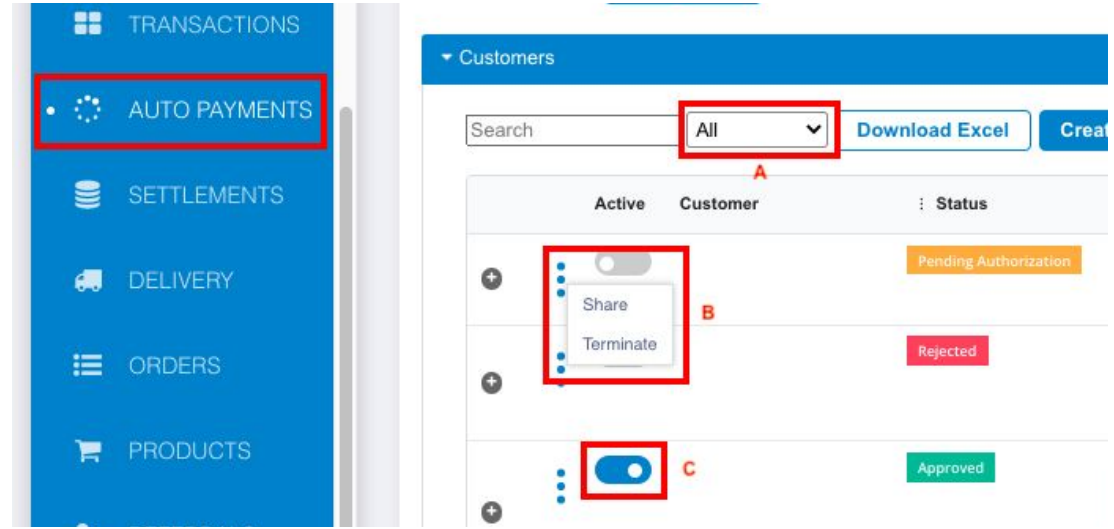
A – can change the filter to “All“
B* – can click “Share” (if you lost it) /
can click “Terminate” your mandate link
C* – can toggle left the button under “Active” column to stop collecting the payment (inactive)
(a) Status: Pending Authorisation – mandate link created but pending authorisation by your customer
- For mandate under status “Pending Authorisation” only, below action can be done:
- Click “Auto Payments“
- A* – can change the filter to “All“ to look for all types of status for all transactions
- B* – can click “Share” (if you lost it the mandate link) / click “Terminate” your mandate link (will permanently terminate the mandate and can’t be reactivate again. If want to reactivate, your customer needs to authorise mandate again)
- C* – can toggle left the button to pause collecting the payment (your mandate will become inactive and stop collecting for the next cycle, until you activate it back).To active back, you can always toggle right to activate again, then your customer won’t need to authorise mandate again.
(b) Status: Approved – mandate link created, authorised by your customer and verification approved by the bank
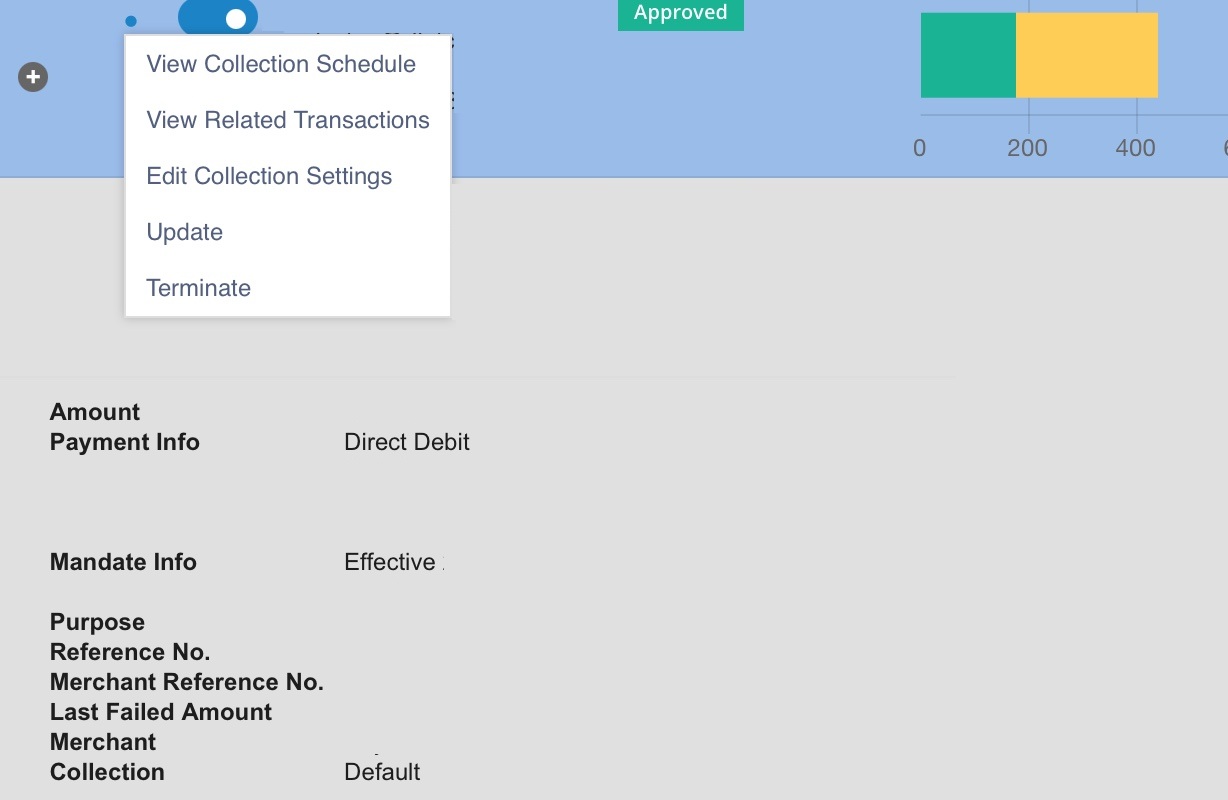
- For mandate under status “Approved“:
- You may see the collection schedule of the mandate by click on “View Collection Schedule“
- You may see your transaction ID no. by clicking on “View Related Transactions“
- You may click “Terminate” your mandate link (will permanently terminate the mandate and can’t be activate again. If want to reactivate, your customer needs to authorise mandate again)
How to do: At the Auto Payments dashboard, select the mandate > click on the 3-dots icon > click “Terminate” > a new link will be generated, please copy and share this termination link to your customer (for them to click for official termination of the mandate) - You may toggle left the button to pause collecting the payment (your mandate will become inactive and stop collecting for the next cycle, until you activate it back).To re-activate, you can always toggle right to activate again, then your customer would not need to authorise mandate again.
(c) Status: Rejected/Invalid – mandate link created, authorised by your customer but failed to verify by the bank
Please inform your customer to check with their bank on the rejection
See also:
]]>Step 1: Login to Payex’s portal
Log on to our portal at https://portal.payex.io/Home, and key-in your credentials.
Step 2: Create mandate link
- Click “Auto Payments” on the left panel once you’re logged in.
- Click “Create Mandate“
Step 3: Fill out the mandate application (Part I)

- VISA Mastercard / Foreign card – link to customer’s local / foreign card
- Fill out the relevant details:
a. Name – customer’s name
b. Email – customer’s email address
c. Phone number – customer’s contact number
d. ID Type – customer’s ID type
e. ID Number – customer’s ID number
f. Max Amount per Transaction – the maximum amount you want to charge the customer/amount you want to charge the customer
g. Merchant Reference Number – any reference number you want to put
Step 4: Fill out the mandate application (Part II)
- Fill out the relevant details:
a. Frequency – Monthly (charge monthly). You may also select daily, weekly, quarterly or yearly frequency.
b. Max Frequency – 1 (charge 1 time in a month)
c. Effective Date – 20/05/2023 (collect payment on every 20th)
d. Expiry Date – you may leave it blank if you do not have a date (i.e. if you choose 30/12/2023, the last collection will fall on 20/12/2023)
e. Purpose – purpose of payment
f. Auto Collection – enable it to auto collect every month
g. Auto Retry – enable it to let system auto retry the collection if payment fails
h. Retry Count – 4 (the maximum retry count for system is 4) (i.e. payment failed to collect on 20th, system will retry on 21st, 22nd, 23rd & 24th)
i. Click “Confirm” to generate the mandate link
Step 5: Share the mandate link to your customer
You will see this screen displayed upon generating the mandate link:
A – right click to save the QR code and share
B – copy the mandate link and share to your customer
C – you can click any icon to share the mandate link to your customer
- Customer clicks the mandate link to fill out the relevant information and click “Proceed”
- There will be no charges / RM0 charge (via local / foreign cards) for the purpose of account verification and it is instant approval by Visa/Mastercard
- Once it has been approved by the bank then you can start collecting payment from your customers
Step 6: Alter and check the status of your mandate
Click “Auto Payments“
A – can change the filter to “All“
B* – can click “Share” (if you lost it) /
can click “Terminate” your mandate link
C* – can toggle left the button under “Active” column to stop collecting the payment (inactive)
(a) Status: Pending Authorisation – mandate link created but pending authorisation by your customer
- For mandate under status “Pending Authorisation” only, below action can be done:
- Click “Auto Payments“
- A* – can change the filter to “All“ to look for all types of status for all transactions
- B* – can click “Share” (if you lost it the mandate link) / click “Terminate” your mandate link (will permanently terminate the mandate and can’t be reactivate again. If want to reactivate, your customer needs to authorise mandate again)
- C* – can toggle left the button to pause collecting the payment (your mandate will become inactive and stop collecting for the next cycle, until you activate it back).To active back, you can always toggle right to activate again, then your customer won’t need to authorise mandate again.
(b) Status: Approved – mandate link created, authorised by your customer and verification approved by the bank
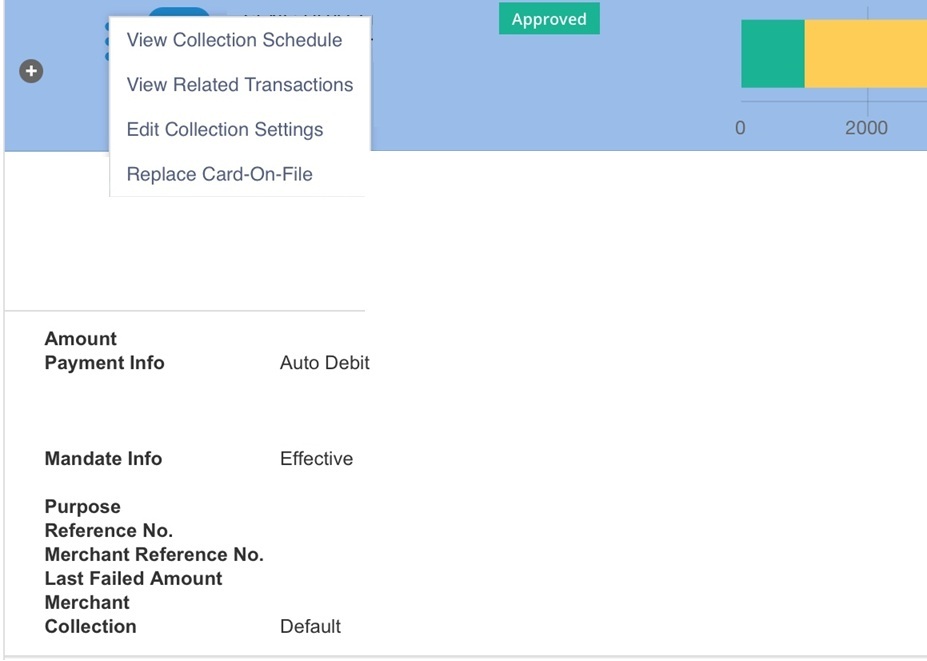
- For mandate under status “Approved“:
- You may see the collection schedule of the mandate by click on “View Collection Schedule“
- You may see your transaction ID no. by clicking on “View Related Transactions“
- You may change the collection date (of every month) and collection amount for future cycles by clicking on “Edit Collection Settings“
- Customer is able to update their card-on-file (debit/credit/foreign) anytime. If your customer wishes to change their payment methods from cards to bank account (or vice versa), you can generate a new mandate to accommodate for this (Refer to Step 7 below)
- You may toggle left the button to pause collecting the payment (your mandate will become inactive and stop collecting for the next cycle, until you activate it back).To re-activate, you can always toggle right to activate again, then your customer would not need to authorise mandate again.
(c) Status: Rejected/Invalid– mandate link created, authorised by your customer but failed to verify by the bank
Please inform your customer to check with their bank on the rejection
Step 7: Replace the card-on-file anytime
During the subscription period, customer can update their card-on-file (debit/credit/foreign) anytime. If your customer wishes to change their payment methods from cards to bank account (or vice versa), you can generate a new mandate to accommodate for this.
- At the Auto Payments dashboard, click on the 3-dots icon > Click “Replace Card-On-File“

- Click “Yes“
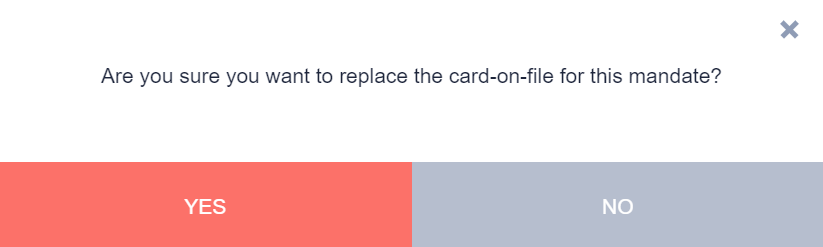
- A new link will be generated for your customer to enter the new card details and proceed with authorisation
See also:
]]>Use case #2: You want to collect a lower or higher amount for a specific month only. See more here.
Use case #3: You fail to collect from customer for a specific month and want to manually collect.
Step 1: Login to Payex’s portal
Log on to our portal at https://portal.payex.io/Home, and key-in your credentials.
Step 2: Click “Auto Payments” on the left panel

Step 3: Select the customer for manual collection

- A: Click the relevant customer until the row is “highlighted in blue“. You may also select multiple rows at a time by clicking multiple customers and you will notice both rows are “highlighted in blue“.
- B: Click “Create Manual Collections”
Step 4: Fill out the collection details of your customers
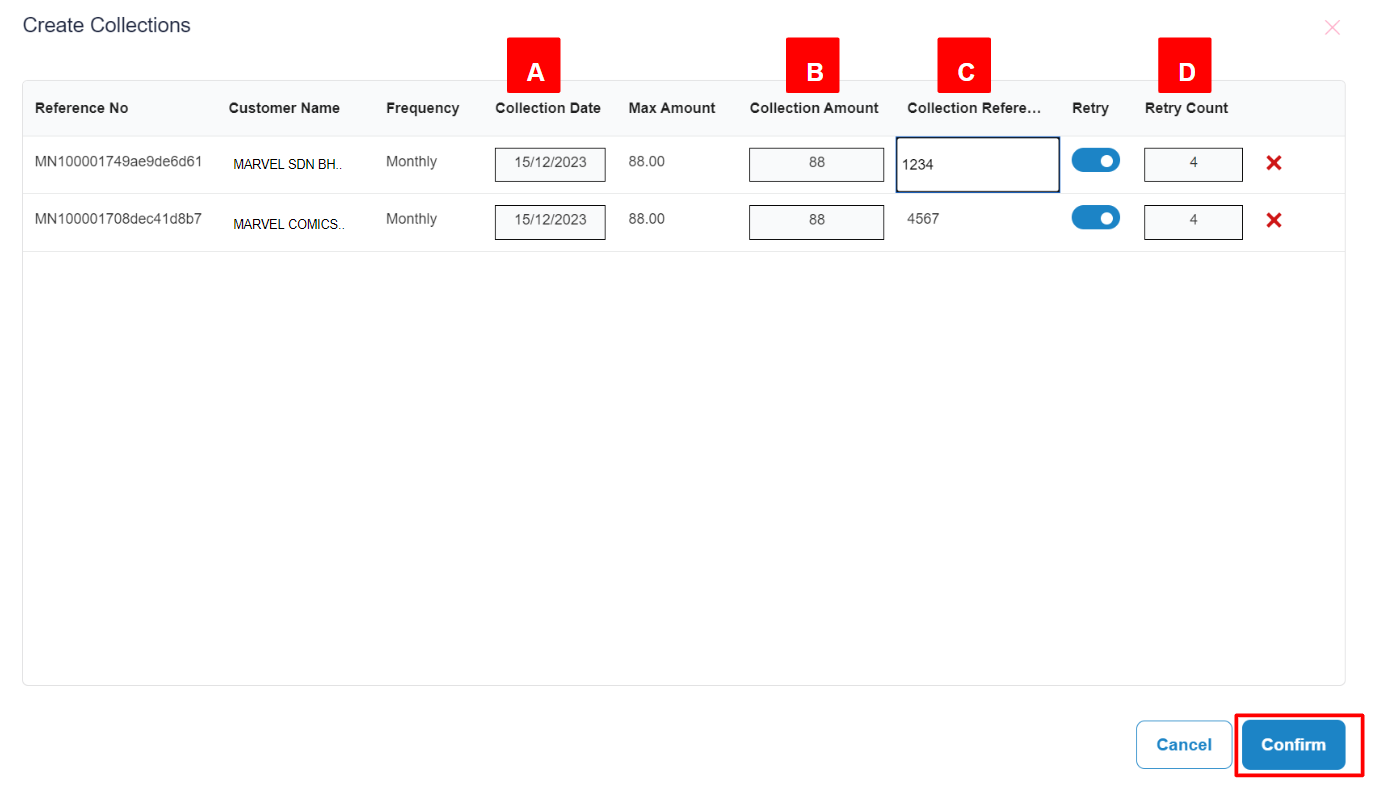
- A: Collection Date – Effective Date or the date merchant wants to collect the payment
- B: Collection Amount – Amount you want to charge your customer
- C: Collection Reference – Optional reference number
- D: Retry Count – Optional retry counts, you may toggle left to disable. Max is 4 retry counts for system to retry if fail to collect.
Click “Confirm” to generate the manual collection link.
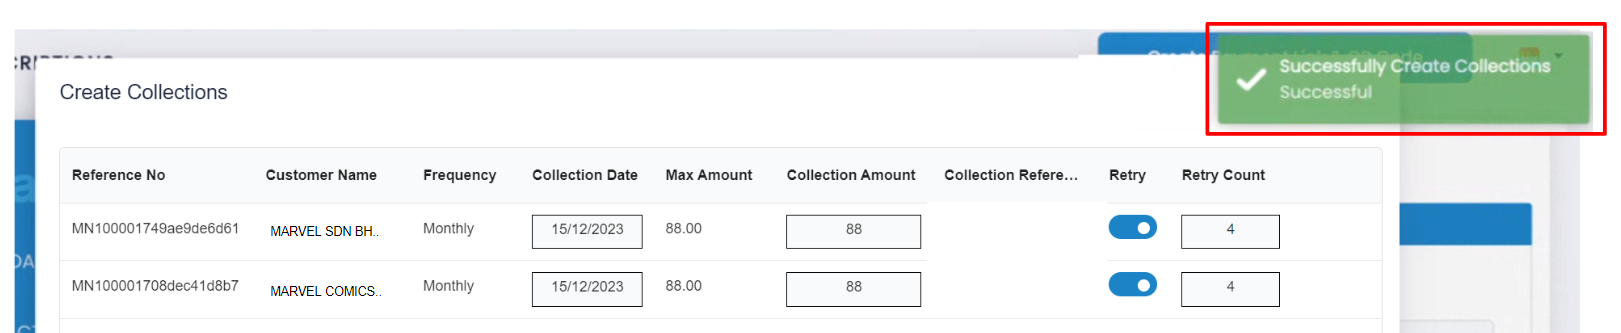
- You will receive a pop up notification in green “Successfully Create Collections Successful“
Step 5: View Collection Schedule
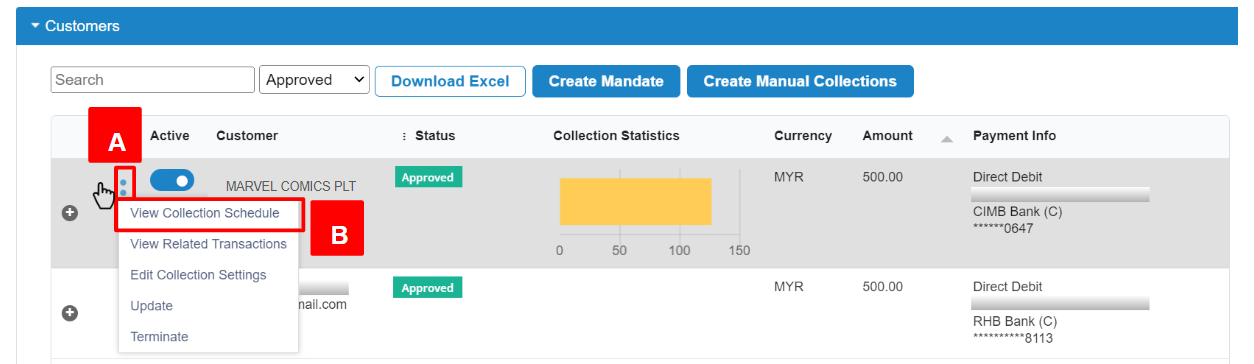
- A: Click the customer with manual collection created
- B: Click the 3-dots button and click “View Collection Scheduled“
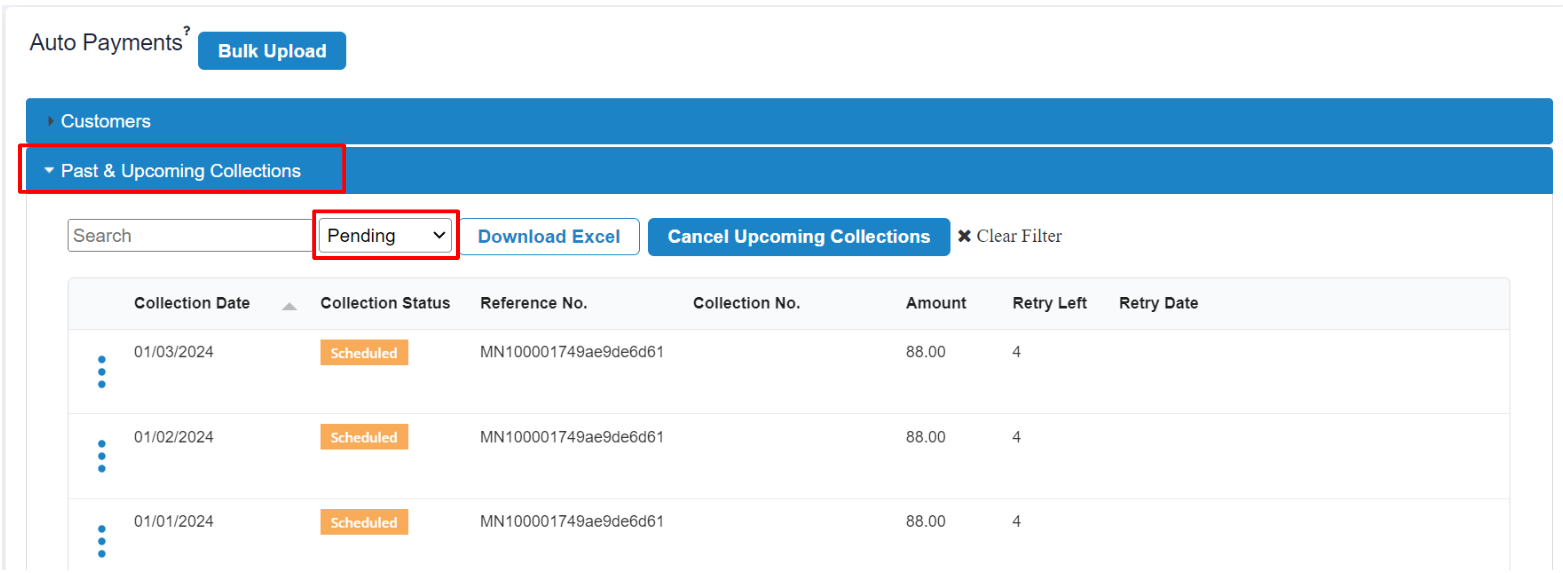
- You will be directed to a list of transactions under “Past & Upcoming Collections“
- Change the filter to “Pending“
- You will see the Collection Status of the manually created mandate under “Scheduled‘
Step 6: Manually retry collection
Note: This is useful if auto retry was not set when the mandate link was generated previously.
Option 1: Retry collection
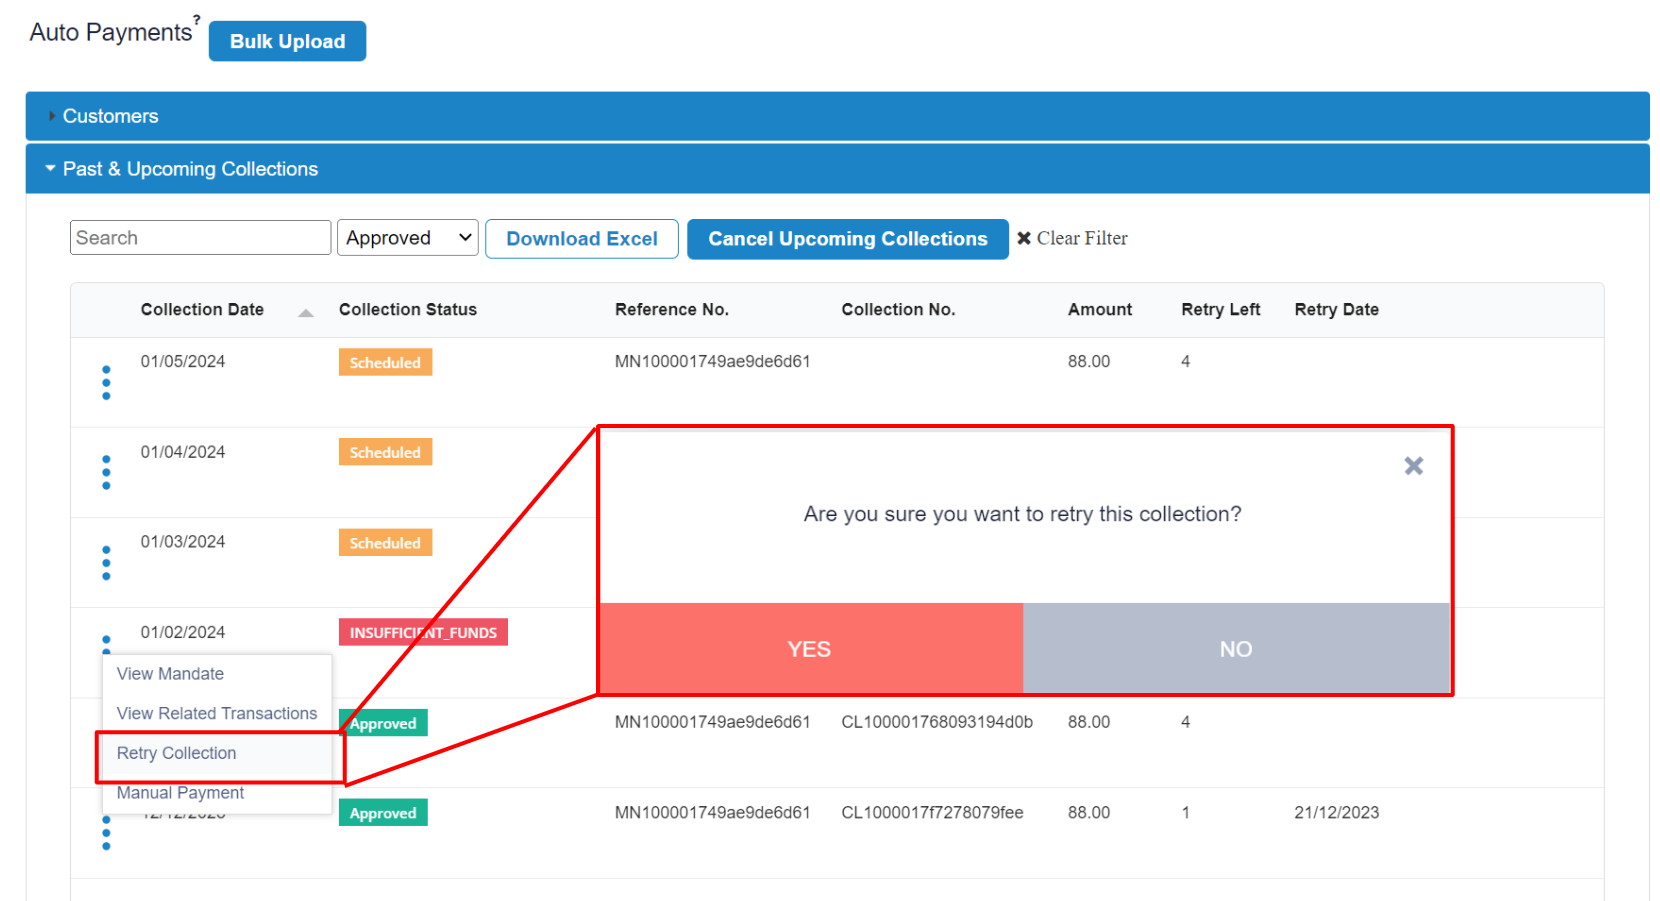
- Click the 3-dots button and click “Retry Collection“
- Click “Yes” and the collection will be scheduled for retry
Option 2: Manual payment
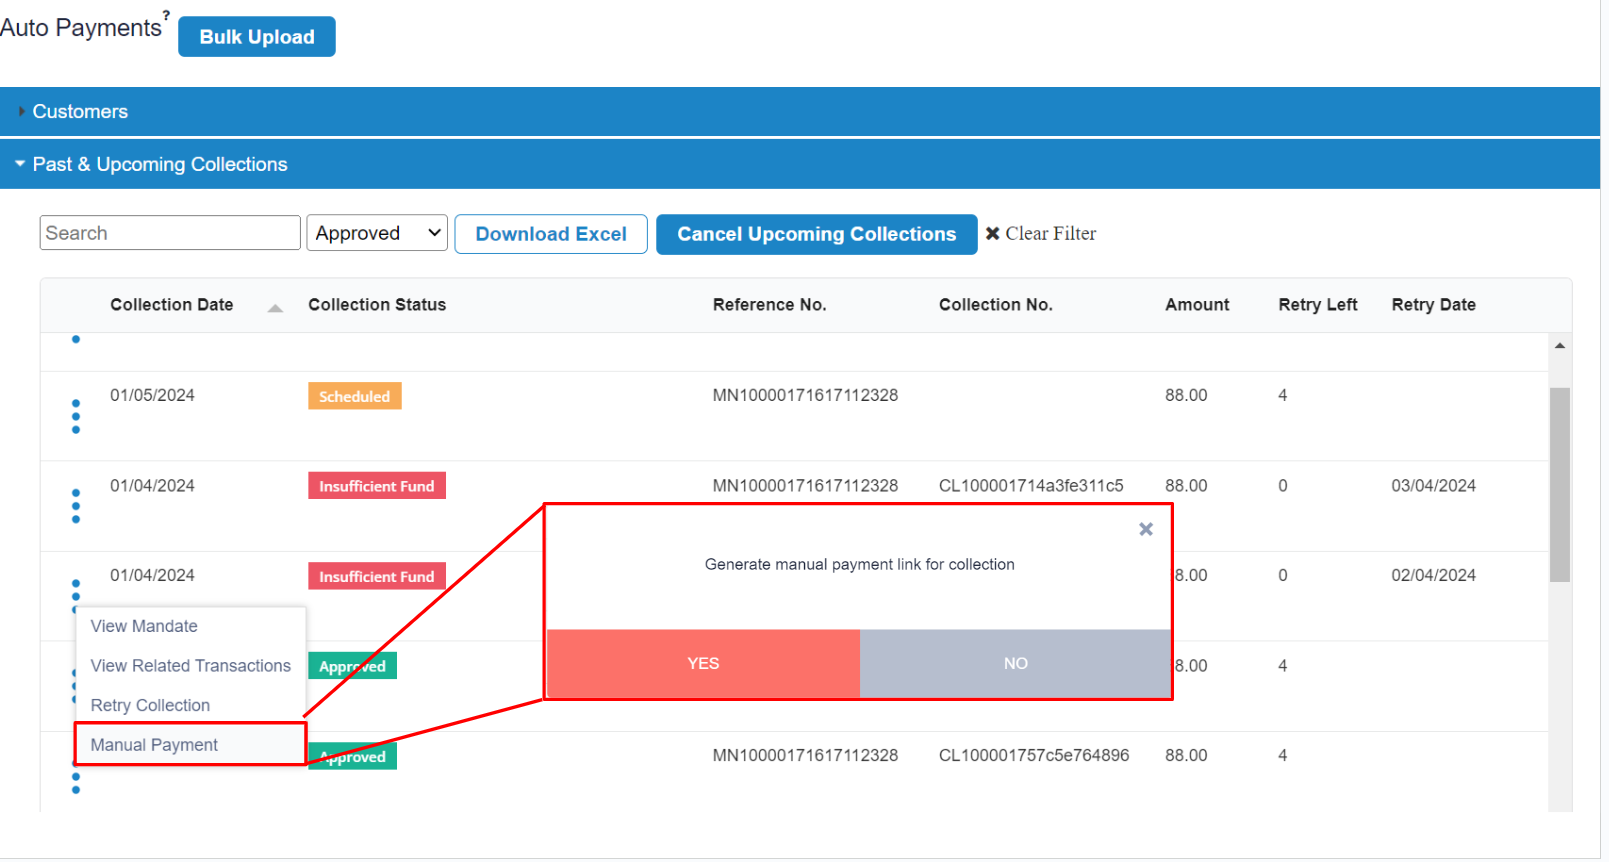
- Click the 3-dots button and click “Manual Payment“
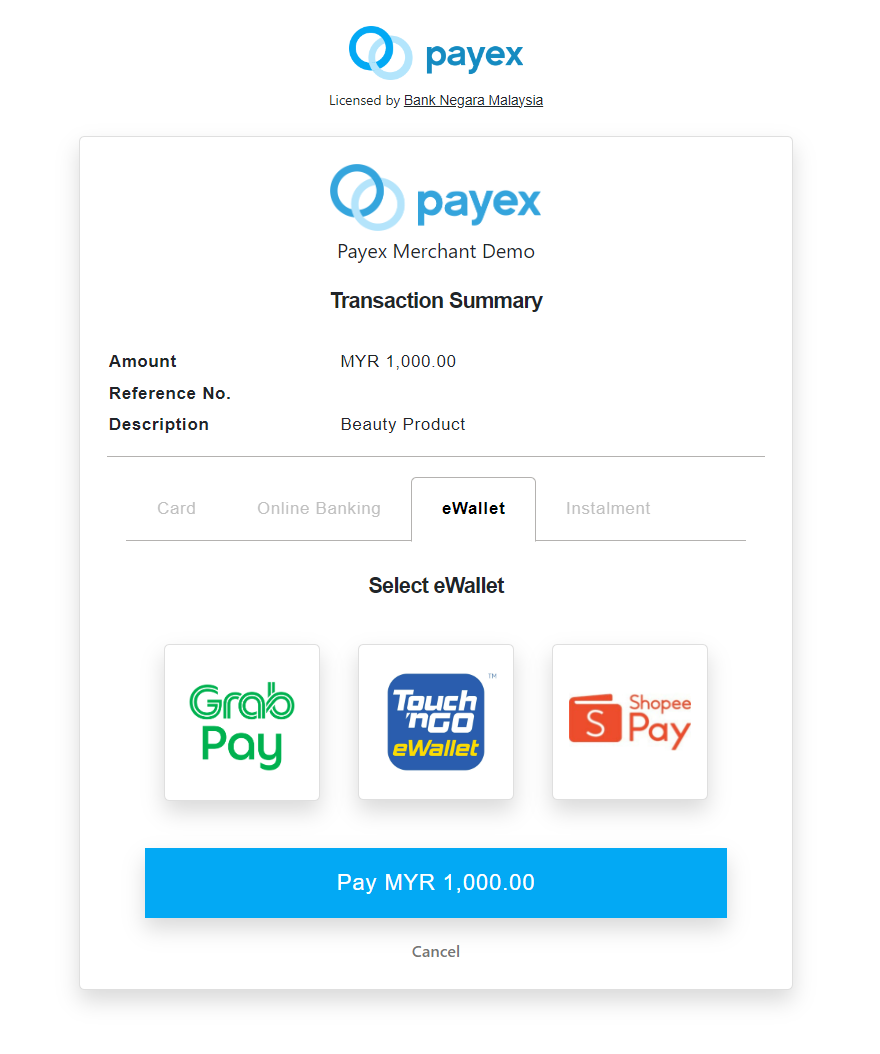
- Click “Yes” and the payment link/QR for collection will be auto-generated to be shared with your customer.
- Upon clicking the link, your customer can select to pay with any payment option, for example Card, FPX, Ewallet and even BNPL instalment such as (Grab PayLater etc)
- Upon successful payment via the link, the collection schedule of that customer will be updated accordingly
API Reference:
- You may refer to Update Collection Settings Request endpoint to update the collection amount just for a specific period.
See More:
Step 1: Login to Payex’s portal
Log on to our portal at https://portal.payex.io/Home, and key-in your credentials.
Step 2: Click “Auto Payments” on the left panel
Step 3: Select and download bulk upload template
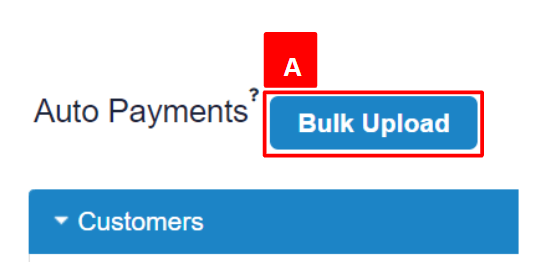
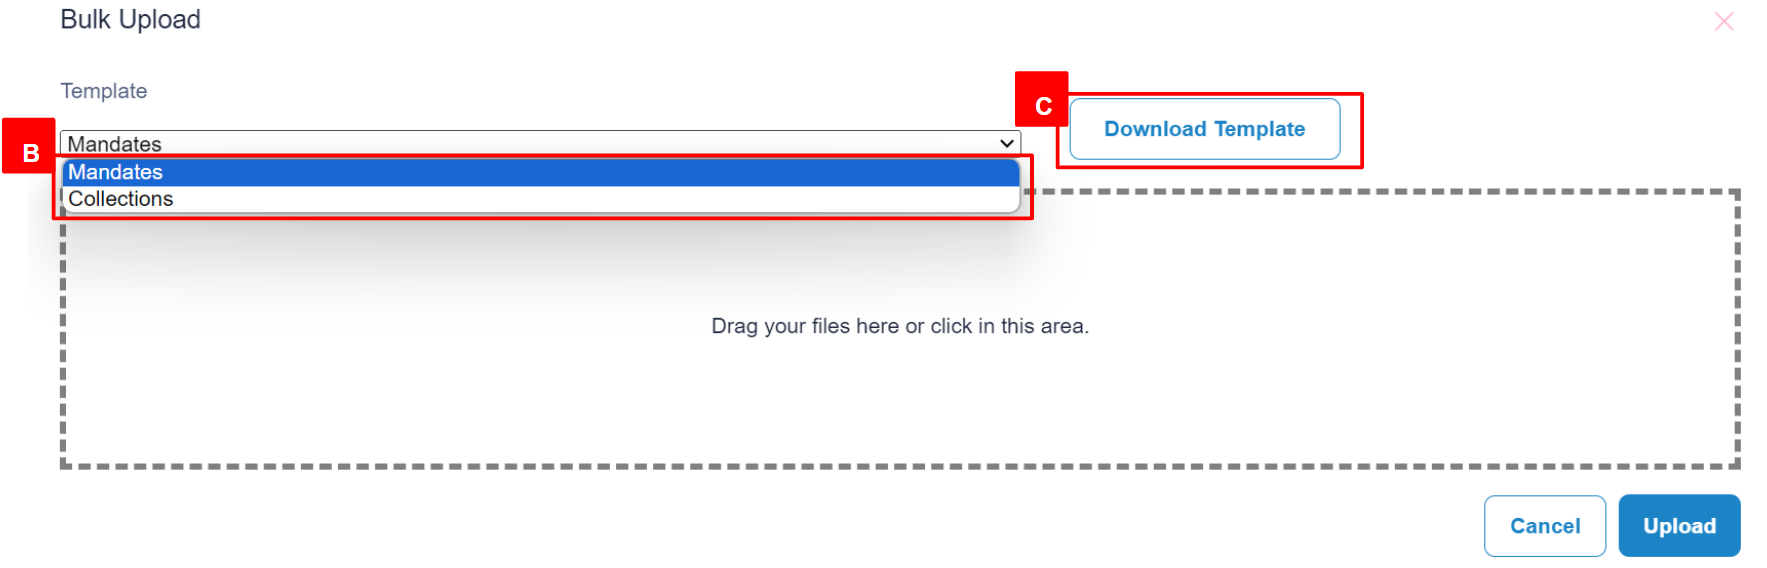
- A: Click “Bulk Upload”
- B: Select “Mandates” or “Collections” from dropdown
- C: Click “Download Template” . An excel document titled “Payex_Mandates_Upload_Template” will be downloaded to your laptop/PC.
Step 4: Fill up the details in the Excel template file
- Mandate Template example
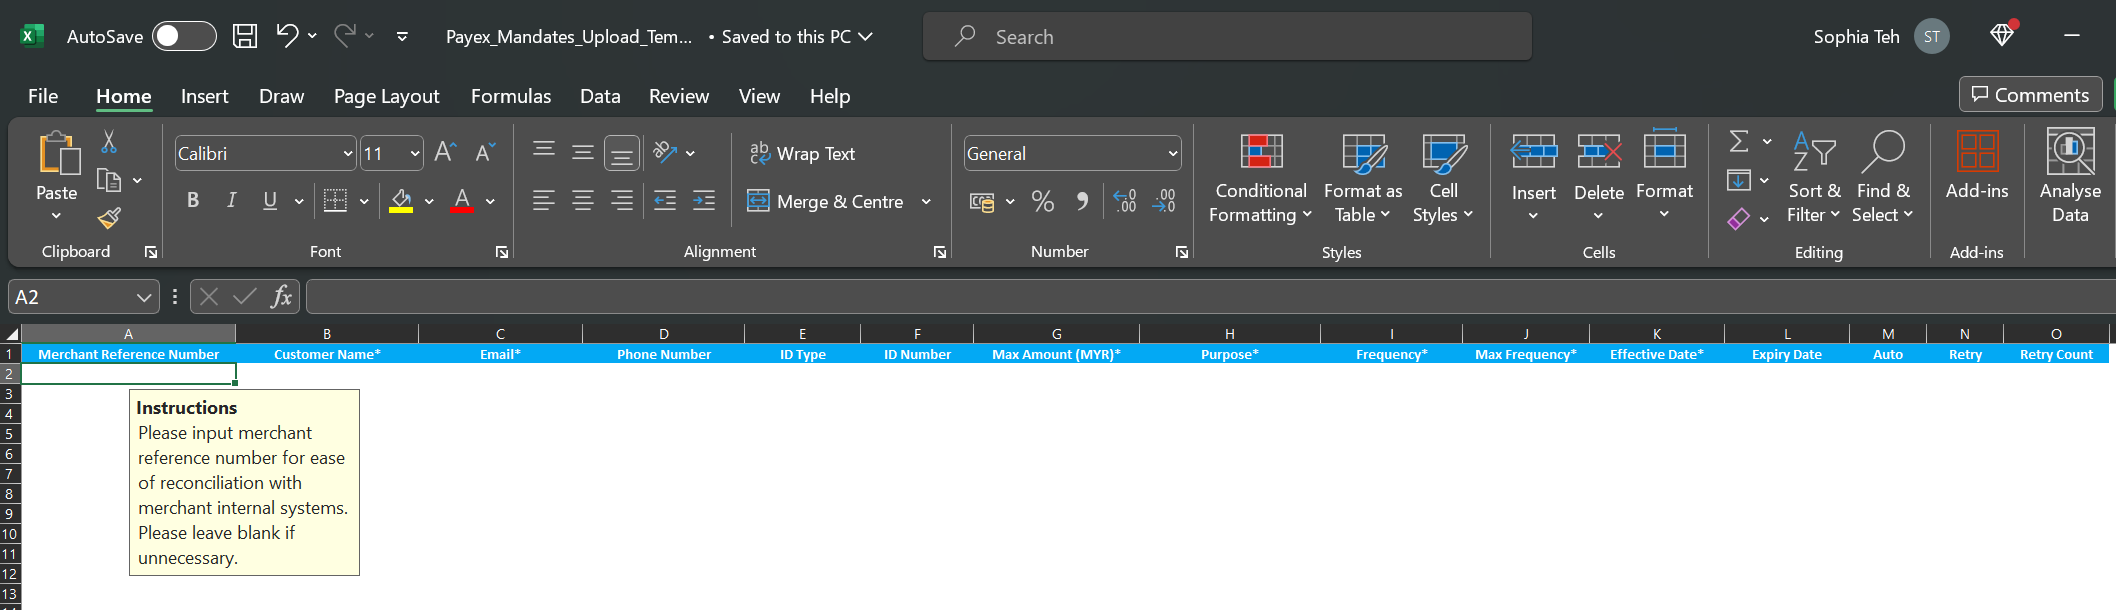
- Fill up the necessary details of your mandate creation based on the columns in the Excel Template downloaded
| Mandate Template _Column Names | Description |
|---|---|
| Merchant Reference Number | Please input merchant reference number for ease of reconciliation with merchant’s internal systems. Optional field so please leave blank if not necessary |
| Customer Name | Required field |
| Required field | |
| Phone Number | Required field |
| ID Type | Optional field 1 – New IC Number, 2 – Old IC Number, 3 – Passport Number, 4 – Business Registration, 5 – Others |
| ID Number | Optional field |
| Max Amount (MYR) | Required field. This refers to the maximum amount of monthly charge to be deducted. |
| Purpose | Required field. Free-text field for any additional information regarding the purpose of payment. |
| Frequency | Required field. Frequency of deduction or charge. DL – daily, WK – weekly, MT – monthly, QR – quarterly, YR – yearly |
| Max Frequency | Required field. Please enter a valid number between 1 to 999 |
| Effective Date | Required field. Please enter a valid date greater than today. Valid date formats are: 31/12/2020, 31-12-2020 2020-12-31, etc |
| Expiry Date | Optional field. Please enter a valid date greater than today. Valid date formats are: 31/12/2020, 31-12-2020 2020-12-31, etc |
| Auto | Optional field. Default to “true” when blank. Auto create collection schedule when “true”. Allow manual collect schedule when “false”. |
| Retry | Optional field. Default to “false” when blank. Auto retry collection on collection failure when “true”. No retry collection when “false”. |
| Retry Count | Optional field. Please enter a valid number between 0 to 4. |
- Collection Template example
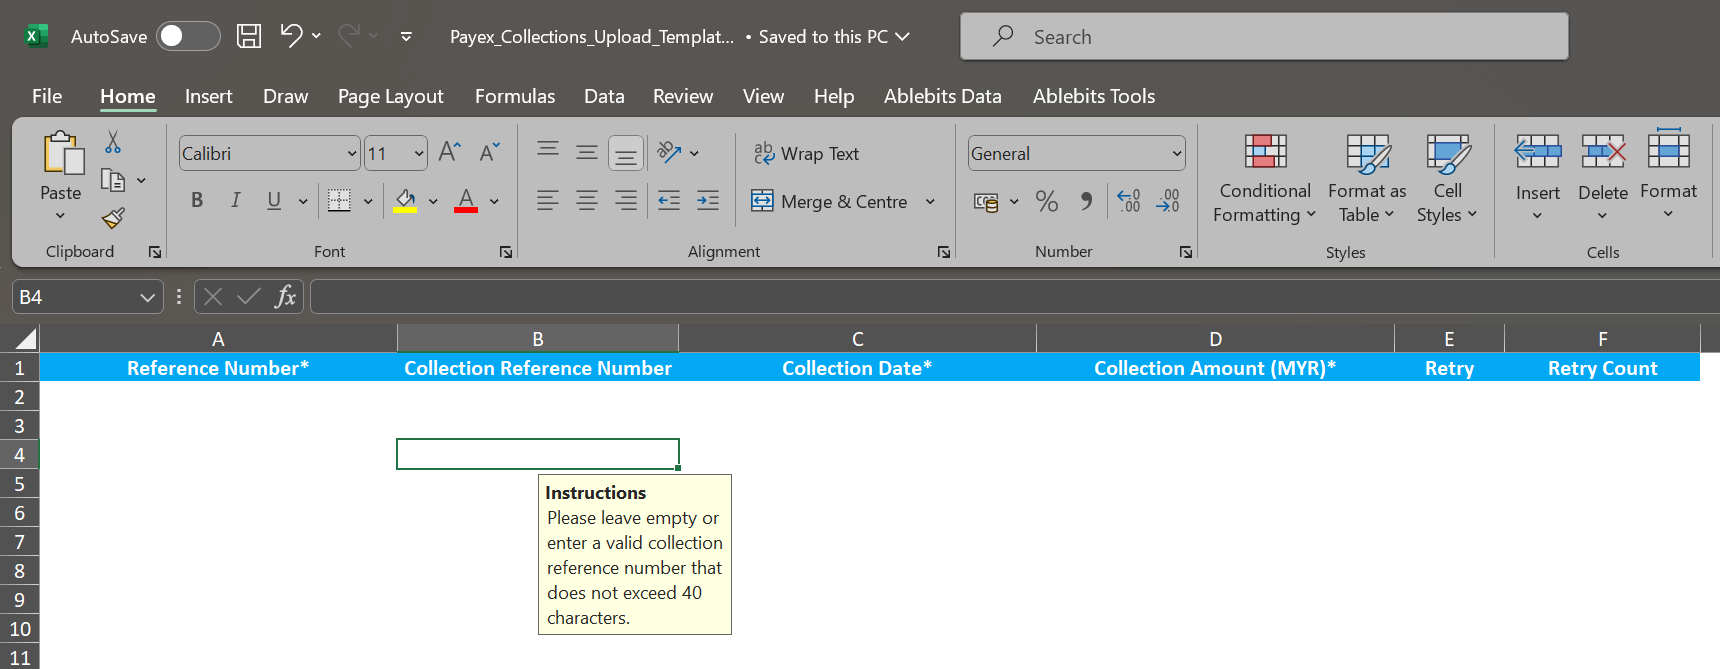
| Collection Template_Column Names | Description |
|---|---|
| Reference Number | Required field. Please enter a valid reference number |
| Collection Reference Number | Optional field. Please leave empty or enter a valid collection reference number that does not exceed 40 characters |
| Collection Date | Required field. Please enter a valid date greater than today. For direct debit, please ensure that the date is a valid working day. Valid date formats are: 31/12/2020, 31-12-2020 2020-12-31, etc |
| Collection Amount (MYR) | Required field. Please enter a valid collection amount that is >= RM1.00 and <= the maximum amount approved for the mandate |
| Retry | Optional field. Default to “false” when blank. Auto retry collection on collection failure when “true”. No retry collection when “false” |
| Retry Count | Optional field. Please enter a valid number between 0 to 4. |
Step 5: Upload Excel template file
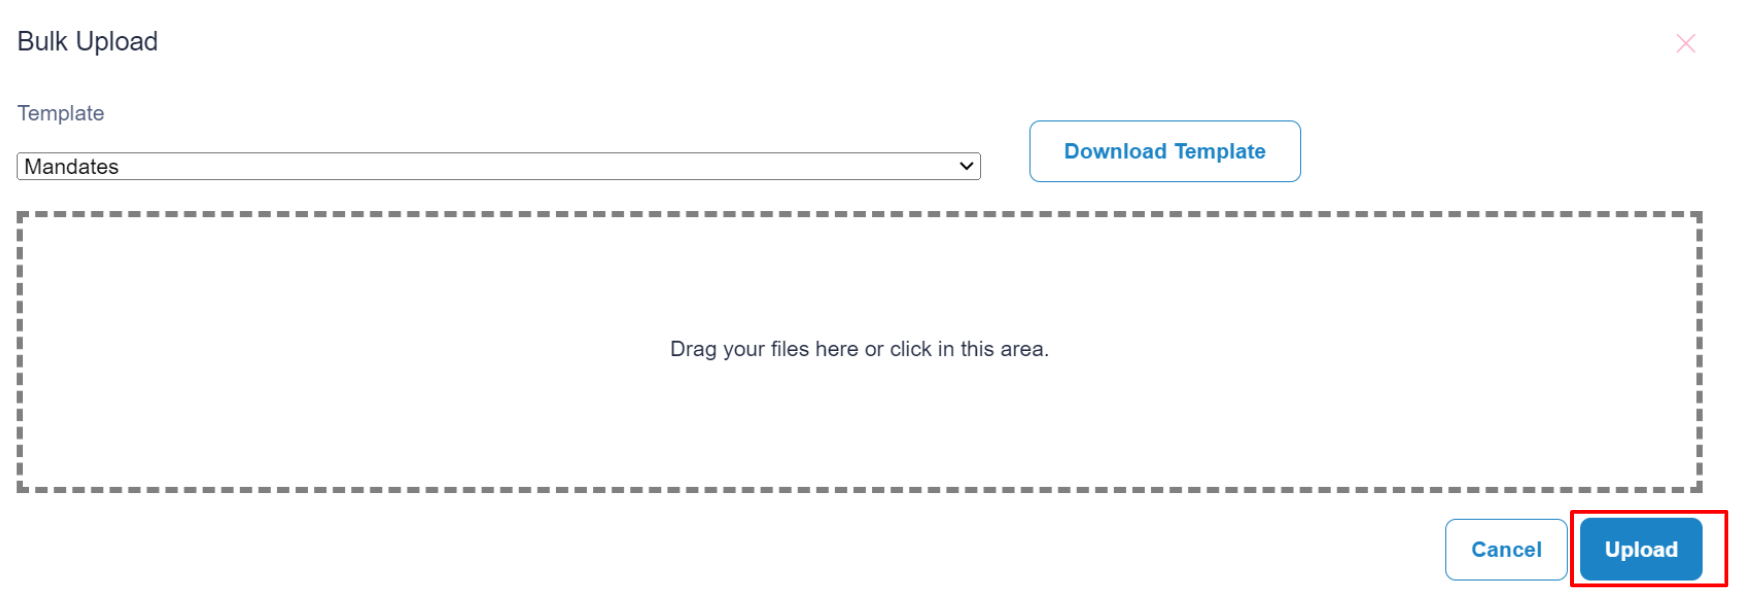
- Upon filling up the columns, save the file and drag your Excel file template here.
- Click “Upload” to upload the file for bulk upload action.
- Done.
- A: Click the 3-dots button
- B: Click “View Collection Schedule“
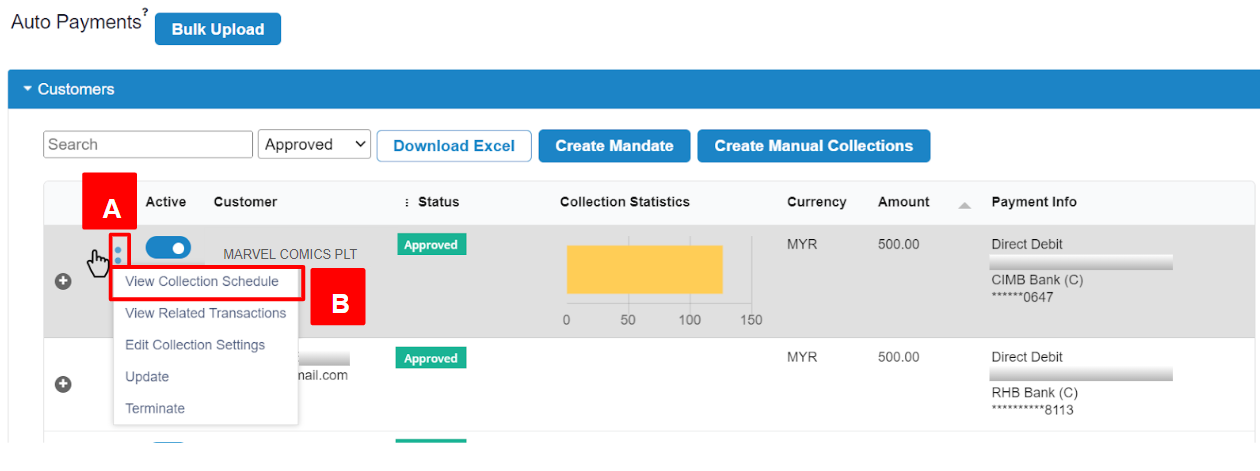
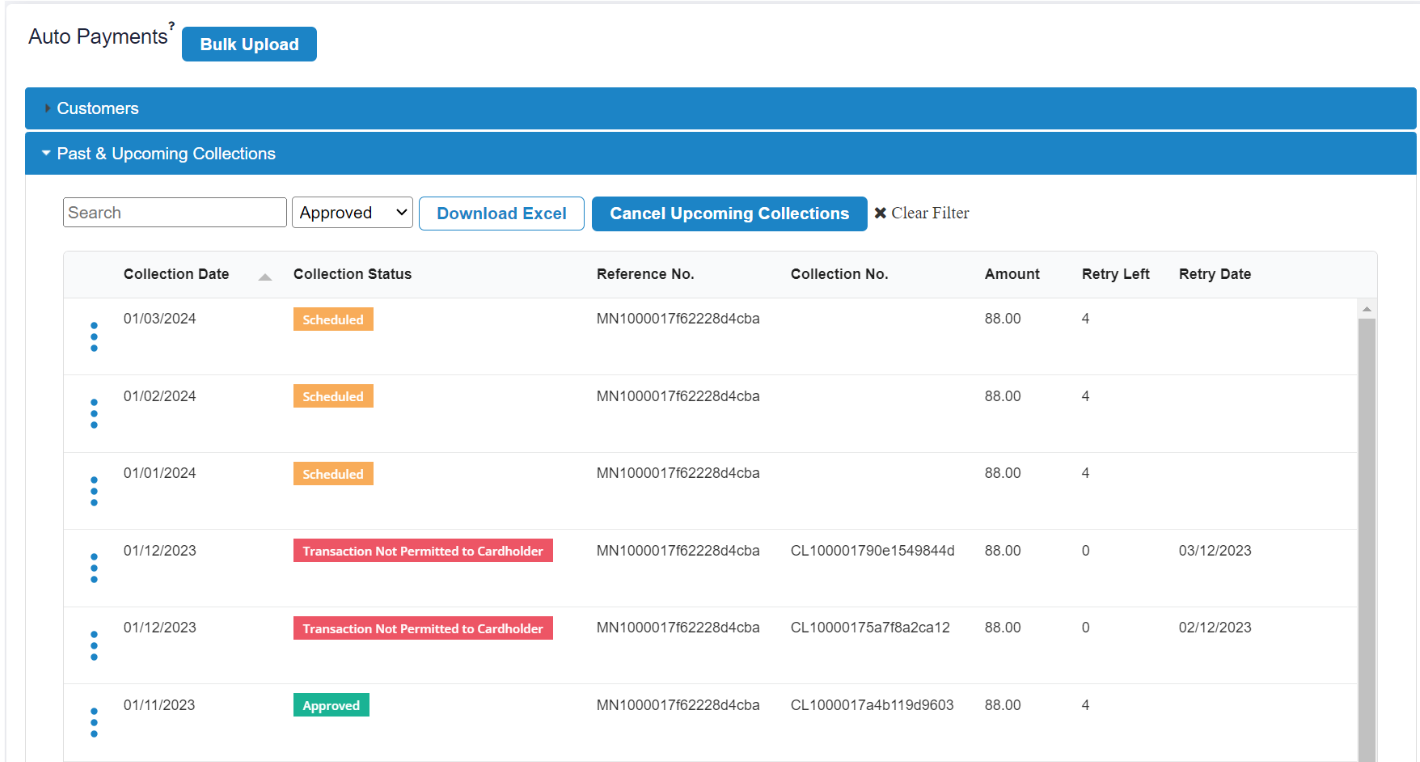
Step 2: View Past & Upcoming Collections of your customer
- Past collections that have been made will display a “Collection No.” next to the “Mandate Reference No”
- Upcoming collections that have been scheduled for future dates will only display a “Mandate Reference No“
- Refer to “Collection Status” column to view the status of collection i.e. Approved (Successful), Failed or Scheduled (Upcoming)
Step 3: Reporting for Accounting and Reconciliation Purpose
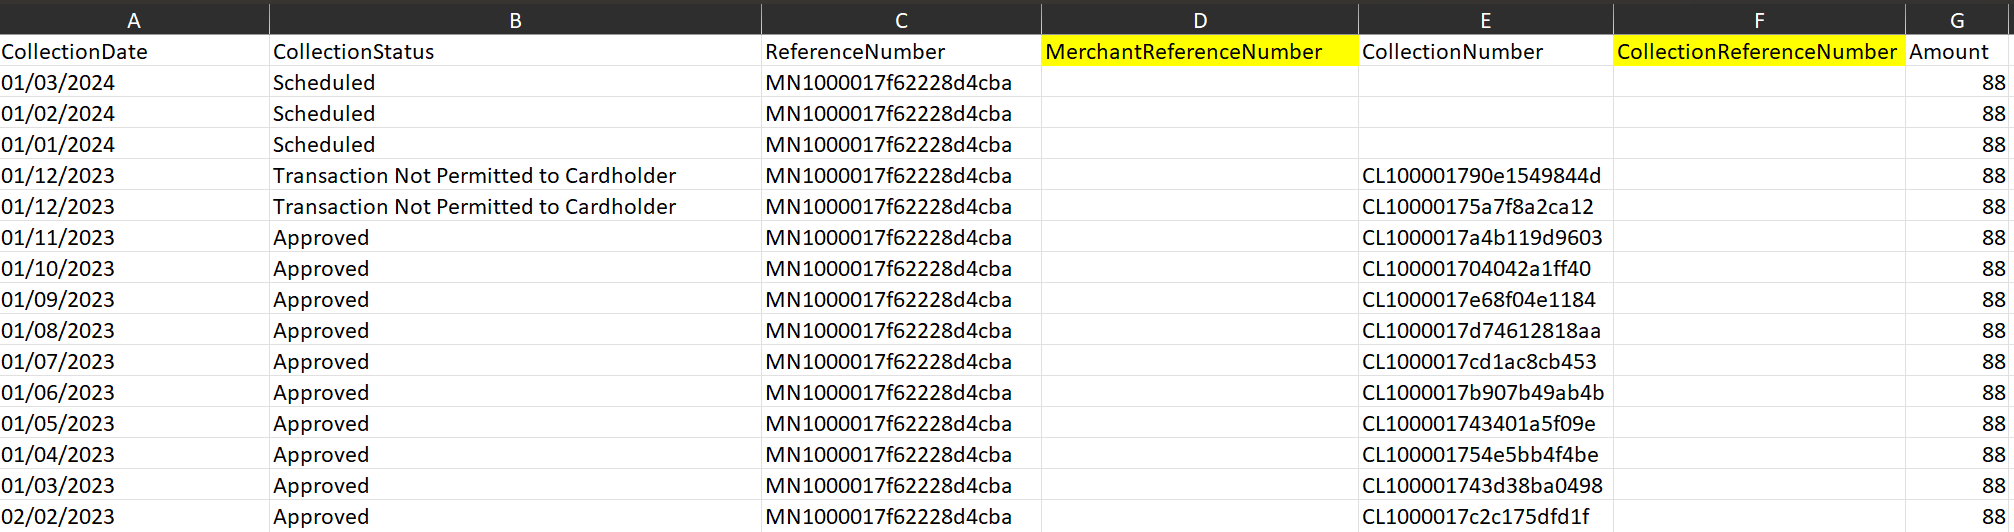
Option 1: Download Excel
- Click “Download Excel” to view more details on collection based on “Reference Number” and “Collection Number” columns
- If you have inputted optional parameters such as Invoice Number it will be displayed under “MerchantReferenceNumber” or “CollectionReferenceNumber” columns
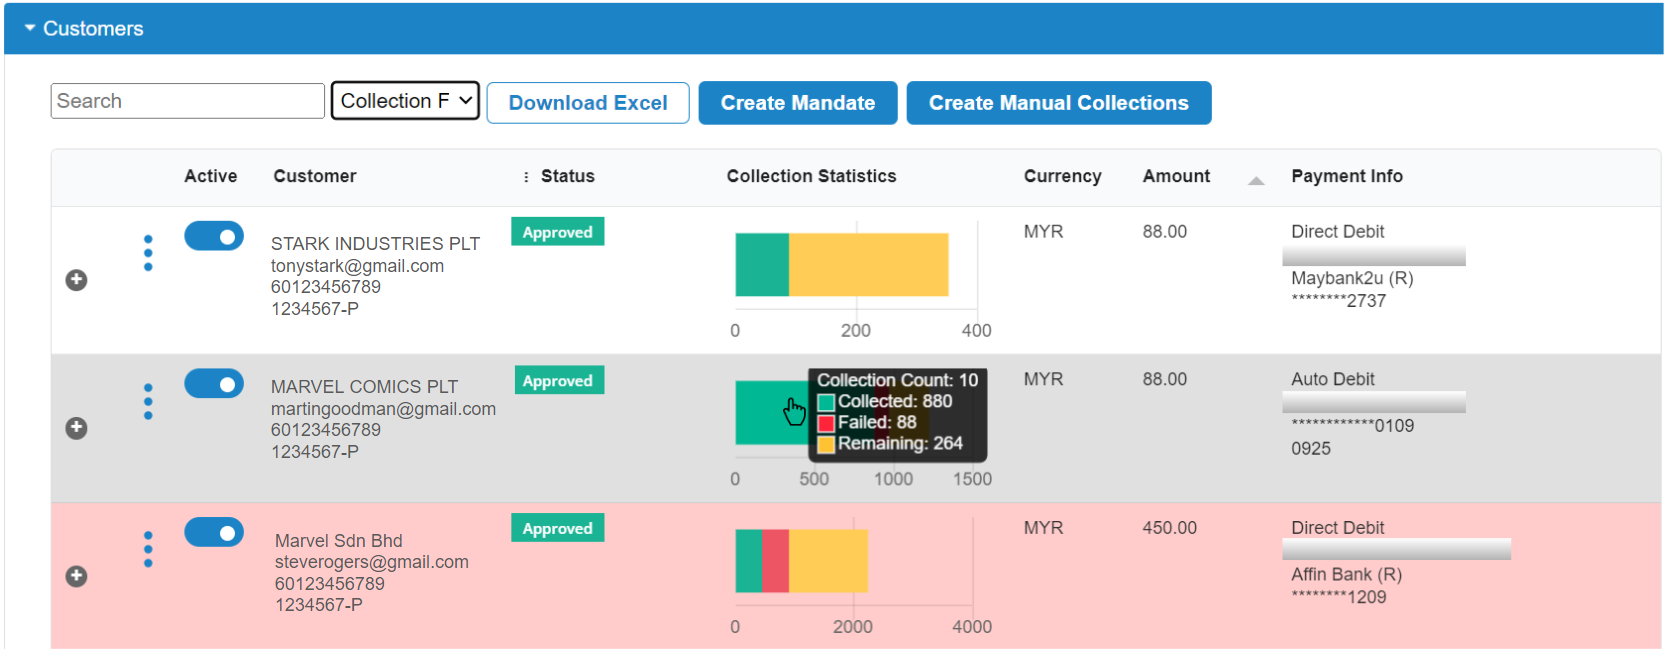
Option 2: Track Collection Statistics
- Mouse over the “Collection Statistics” chart to view details of “Collection Count” which refers to the number of successful collections made (status “Approved“)
- You will get to view a chart legend of “Collection Amount” based on status Collected, Failed and Remaining
Making Subscription payments through Direct Debit is just a simple few steps process:
- Upon creating a mandate link, merchant sends customer a mandate authorisation link
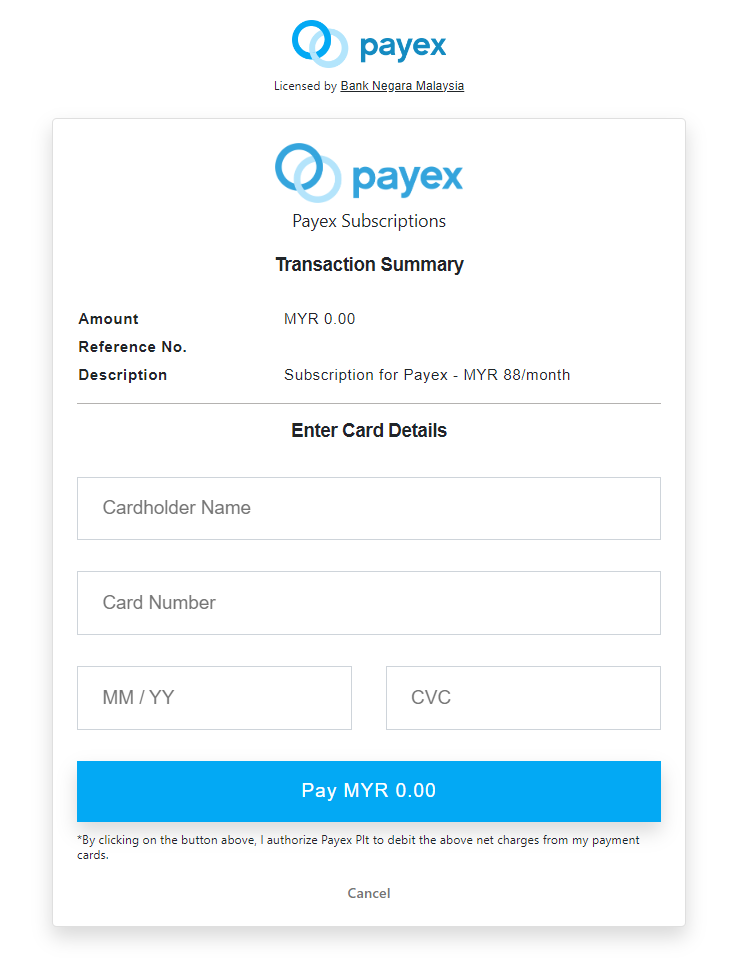
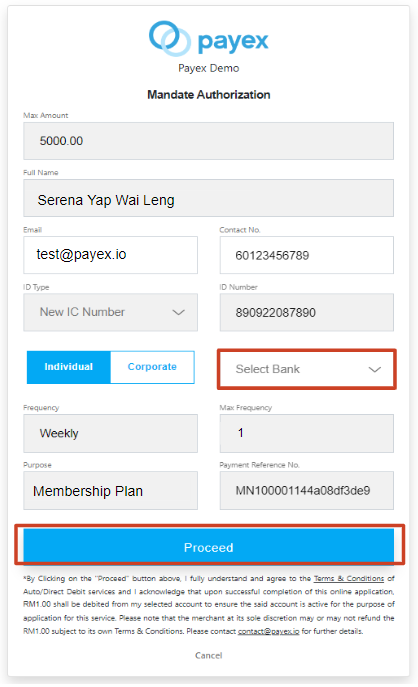
Step 1: Customer enter details on mandate link shared by merchant
- Customer is directed to a pre-filled mandate form
- Customer selects the bank from dropdown list
- Customer clicks “Proceed” to authorise deduction from their bank account
- Customer can select either Individual or Corporate bank account
Note: The “Max Amount” refers to the amount of transaction to be deducted from customer’s bank account
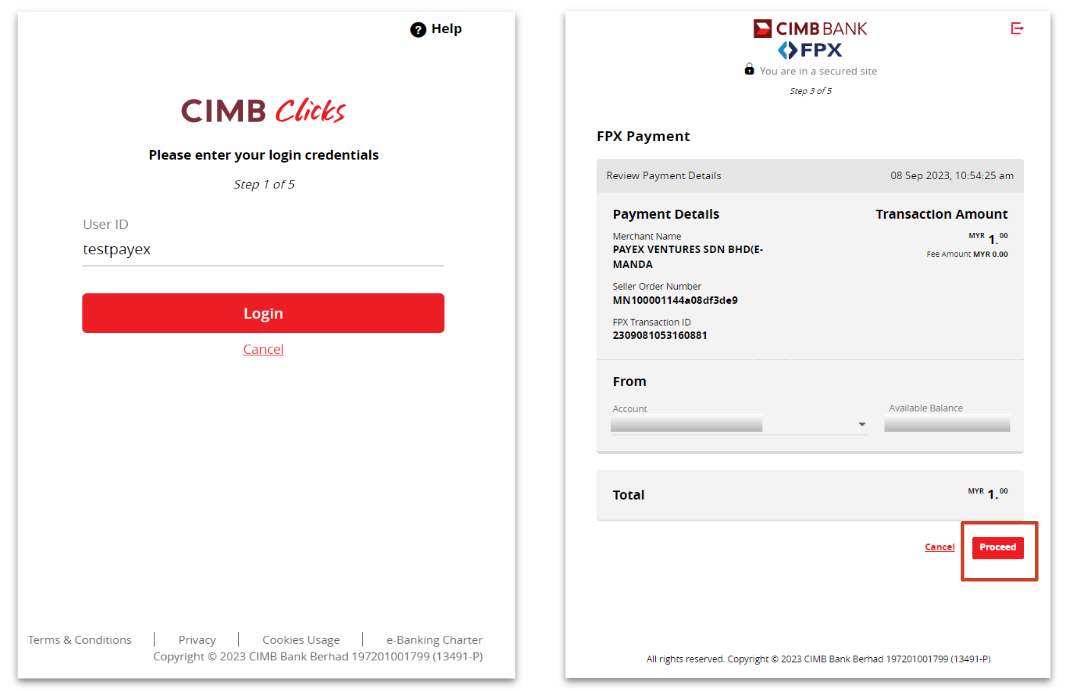
Step 2: Customer login to online banking to authorise mandate
- Customer login to online banking of selected bank and clicks “Proceed” to authorise mandate
- The bank will charge RM1 to verify the customer’s bank account
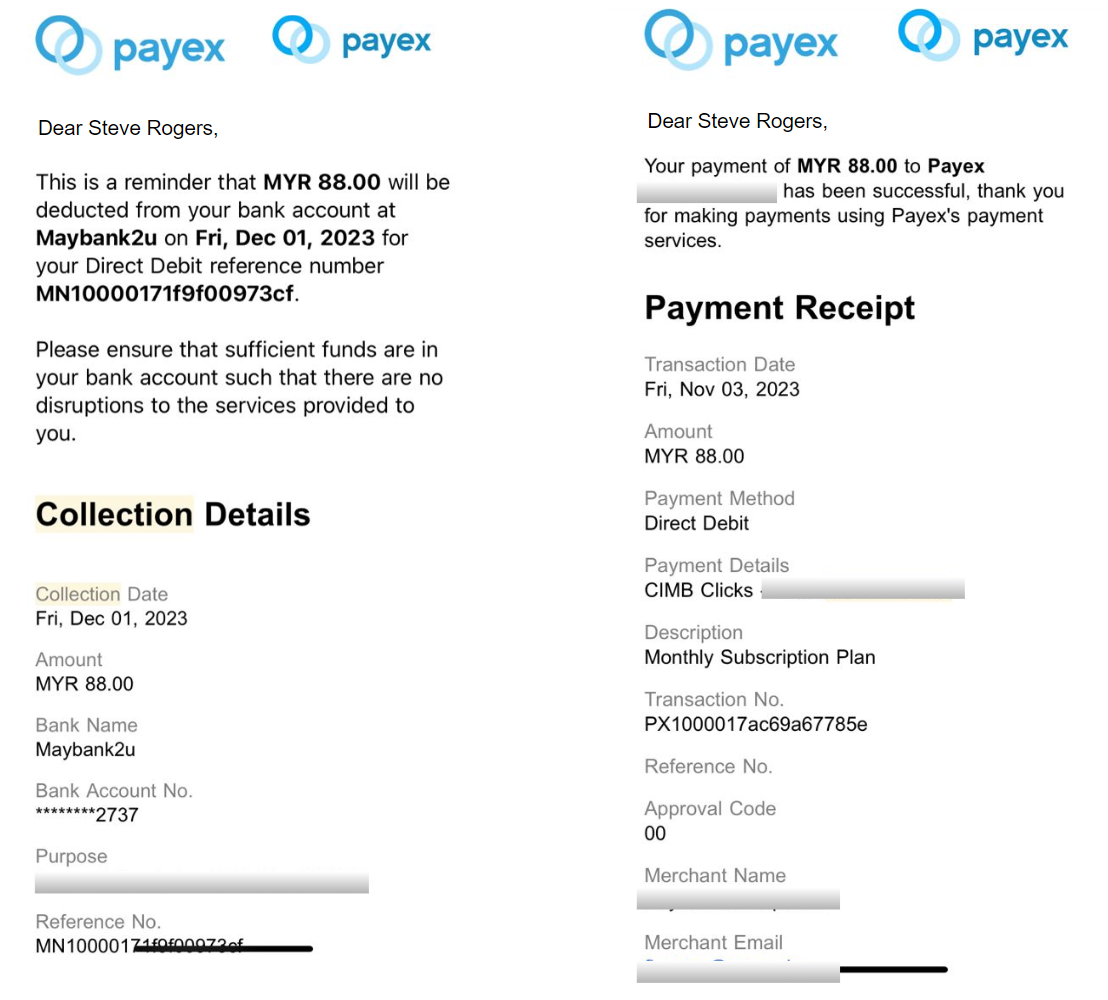
Step 3: Customer receives notification on successful mandate authorisation
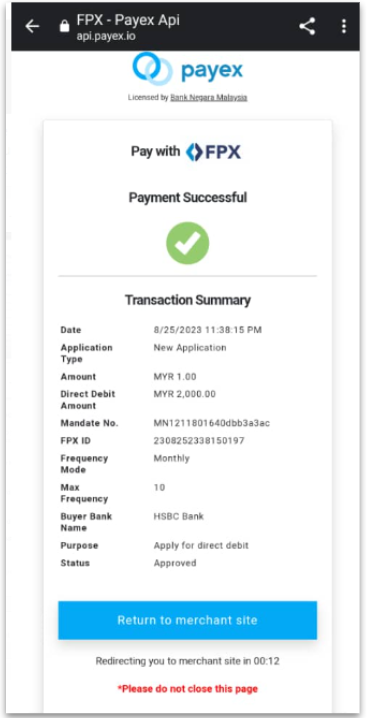
- Customer receives email notification on successful payment of RM1 mandate authorisation fee.
- The Bank will take 1 working day to verify the customer’s bank account.
- Upon approval by the bank, the customer’s bank account will be auto-deducted on the effective date set by merchant.
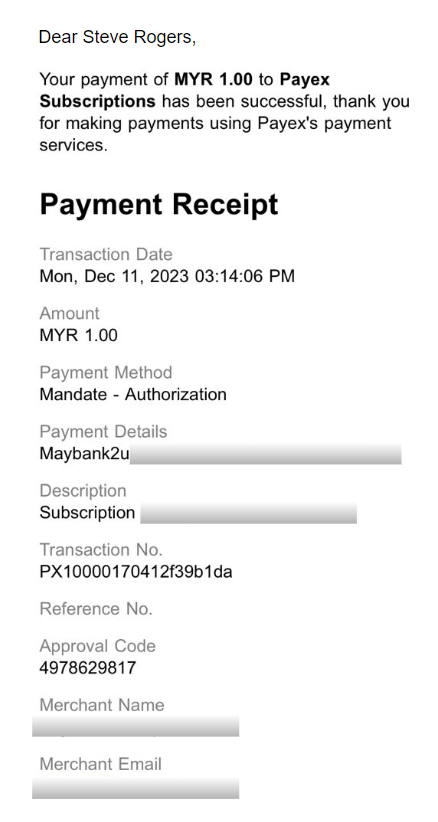
Step 4: Customer receives email notification on successful collection
- Customer receives reminder email on Collection Day
- Customer receives payment notification email on successful payment on Collection Day
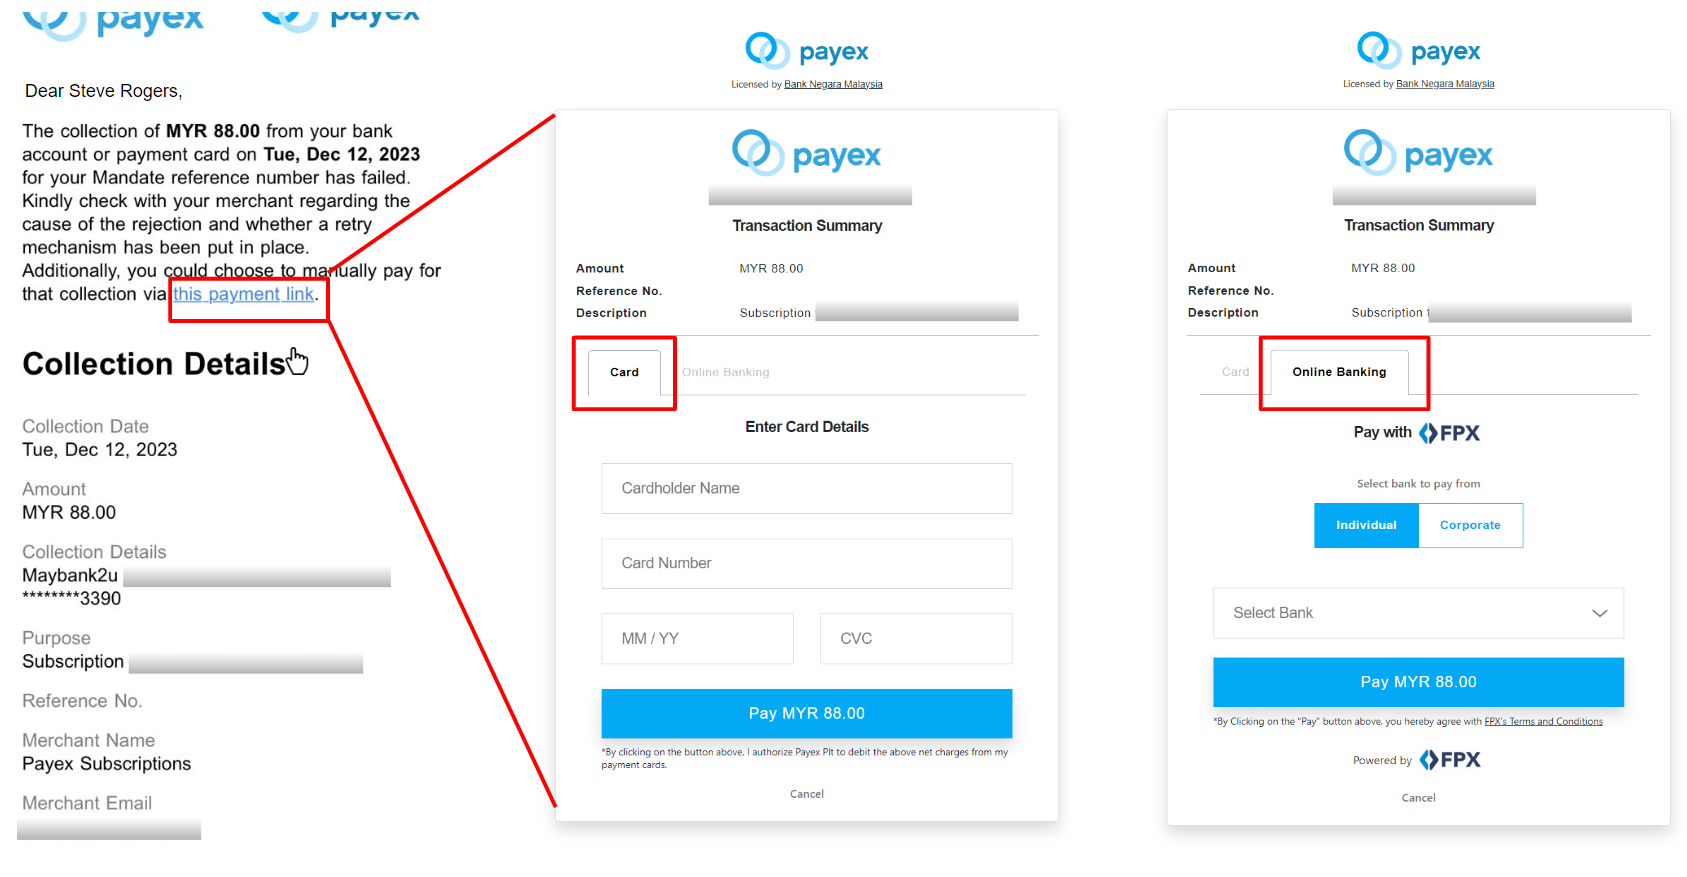
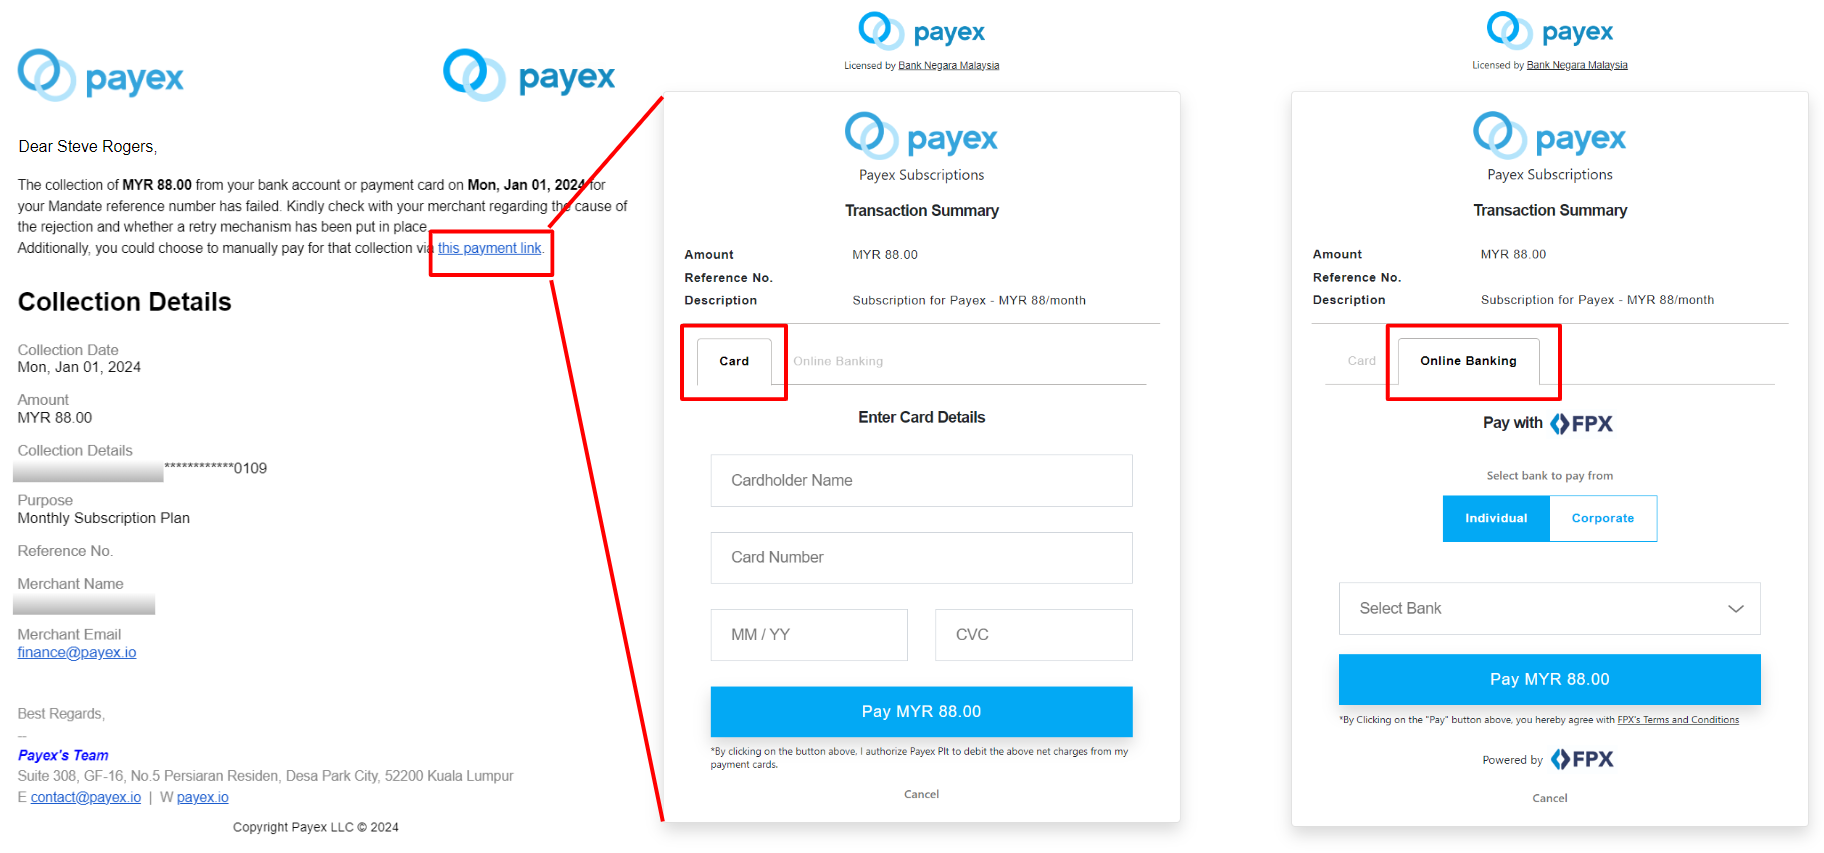
Step 5: Customer receives email notification on failed collection
- Customer receives email on failed collection from bank account
- Customer may proceed to manually pay for that failed collection by clicking the payment link in email
- Customer may proceed payment with either Card or Online Banking (FPX) method
Note:
1. Termination of Direct Debit depends on the merchant and the customer will need to reach out to them for assistance.
2. On the effective date, deduction may be unsuccessful due to the following reasons:
- Insufficient balance in the customer’s account.
- Mandate authorisation hasn’t been approved or has been rejected by the Bank.
Making Subscription payments through Auto Debit is just a simple few steps process:
- Upon creating a mandate link, merchant sends customer a mandate authorisation link
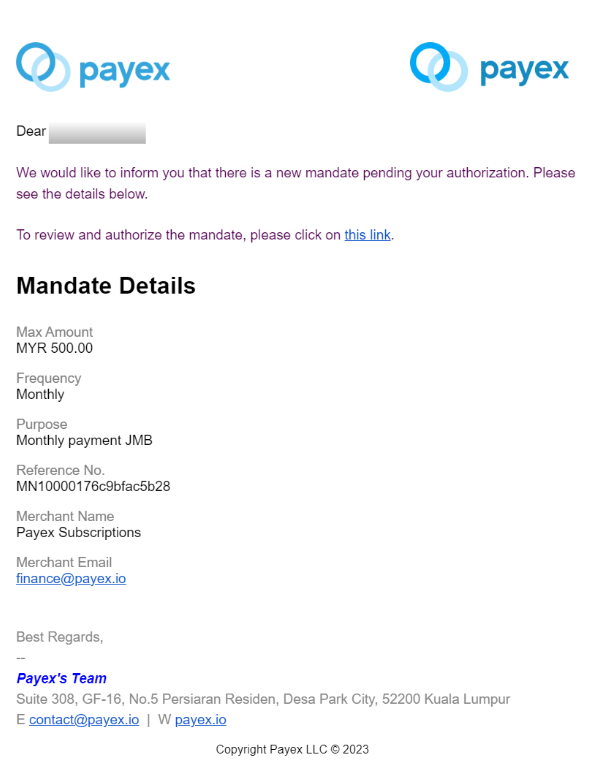
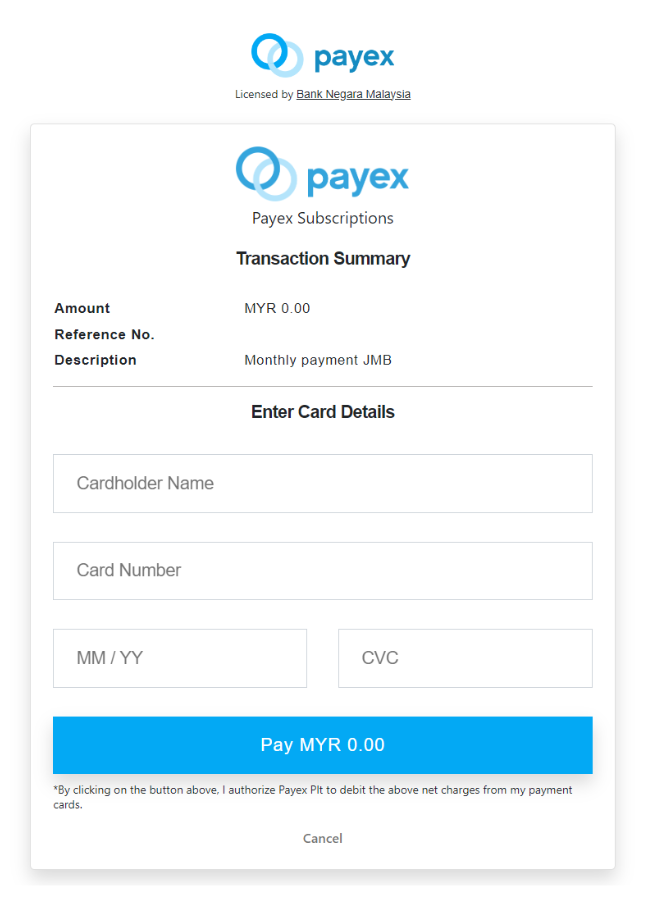
Step 1: Customer enters card details on mandate link shared by merchant
- There will be no charge/a charge of RM0 by Visa/Mastercard to verify the customer’s card
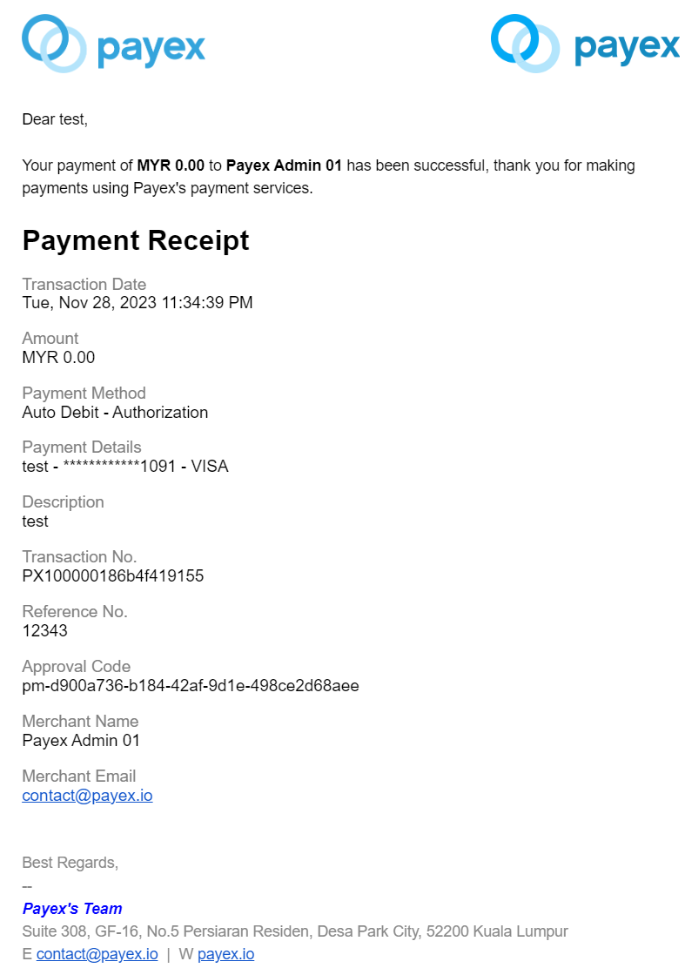
Step 2: Customer receives email notification on successful mandate authorisation
- Customer receives email notification on successful payment of RM0 mandate authorisation fee.
- Upon verification, the customer’s card will be auto-deducted on the effective date set by merchant.
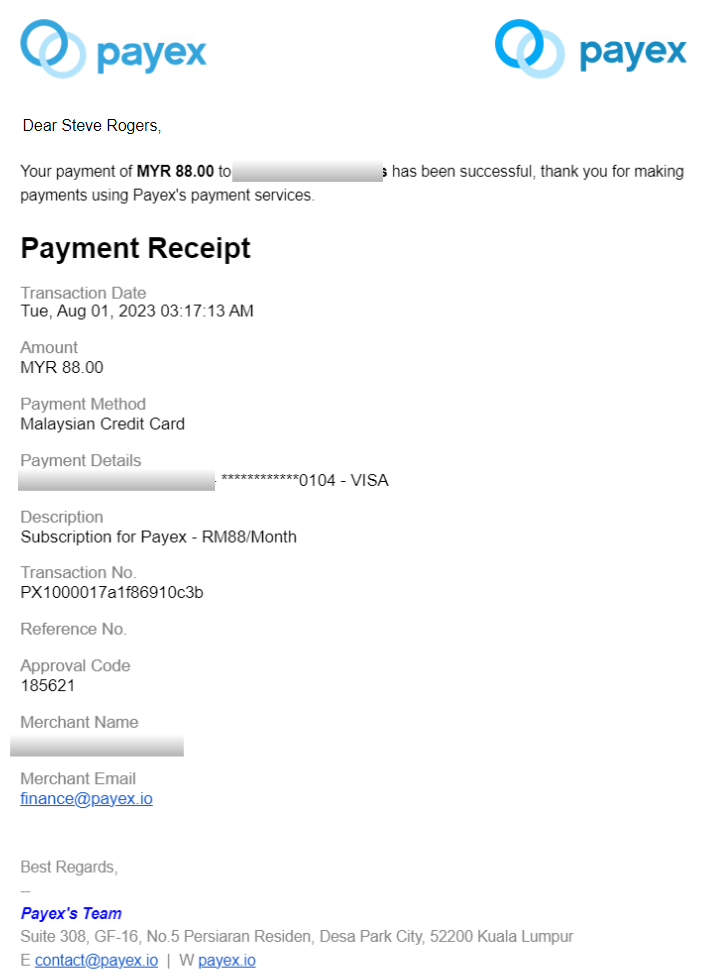
Step 3: Customer receives email notification on successful collection
- Customer receives payment notification email on successful payment on Collection Day
Step 4: Customer receives email notification on failed collection
- Customer receives email on failed collection from card
- Customer may proceed to manually pay for that failed collection by clicking the payment link in email
- Customer may proceed payment with either Card or Online Banking (FPX) method
Note:
1. Termination of Auto Debit depends on the merchant and the customer will need to reach out to them for assistance.
2. On the effective date, deduction may be unsuccessful due to the following reasons:
- Insufficient balance amount or credit limit in the customer’s debit card/credit card
- Customer’s card yet to be activated for 3DS/ecommerce payment