As the owner of Payex Dashboard, you can add new users, login to your Payex Dashboard. In your Users Dashboard you will see an interface that looks like a picture below:
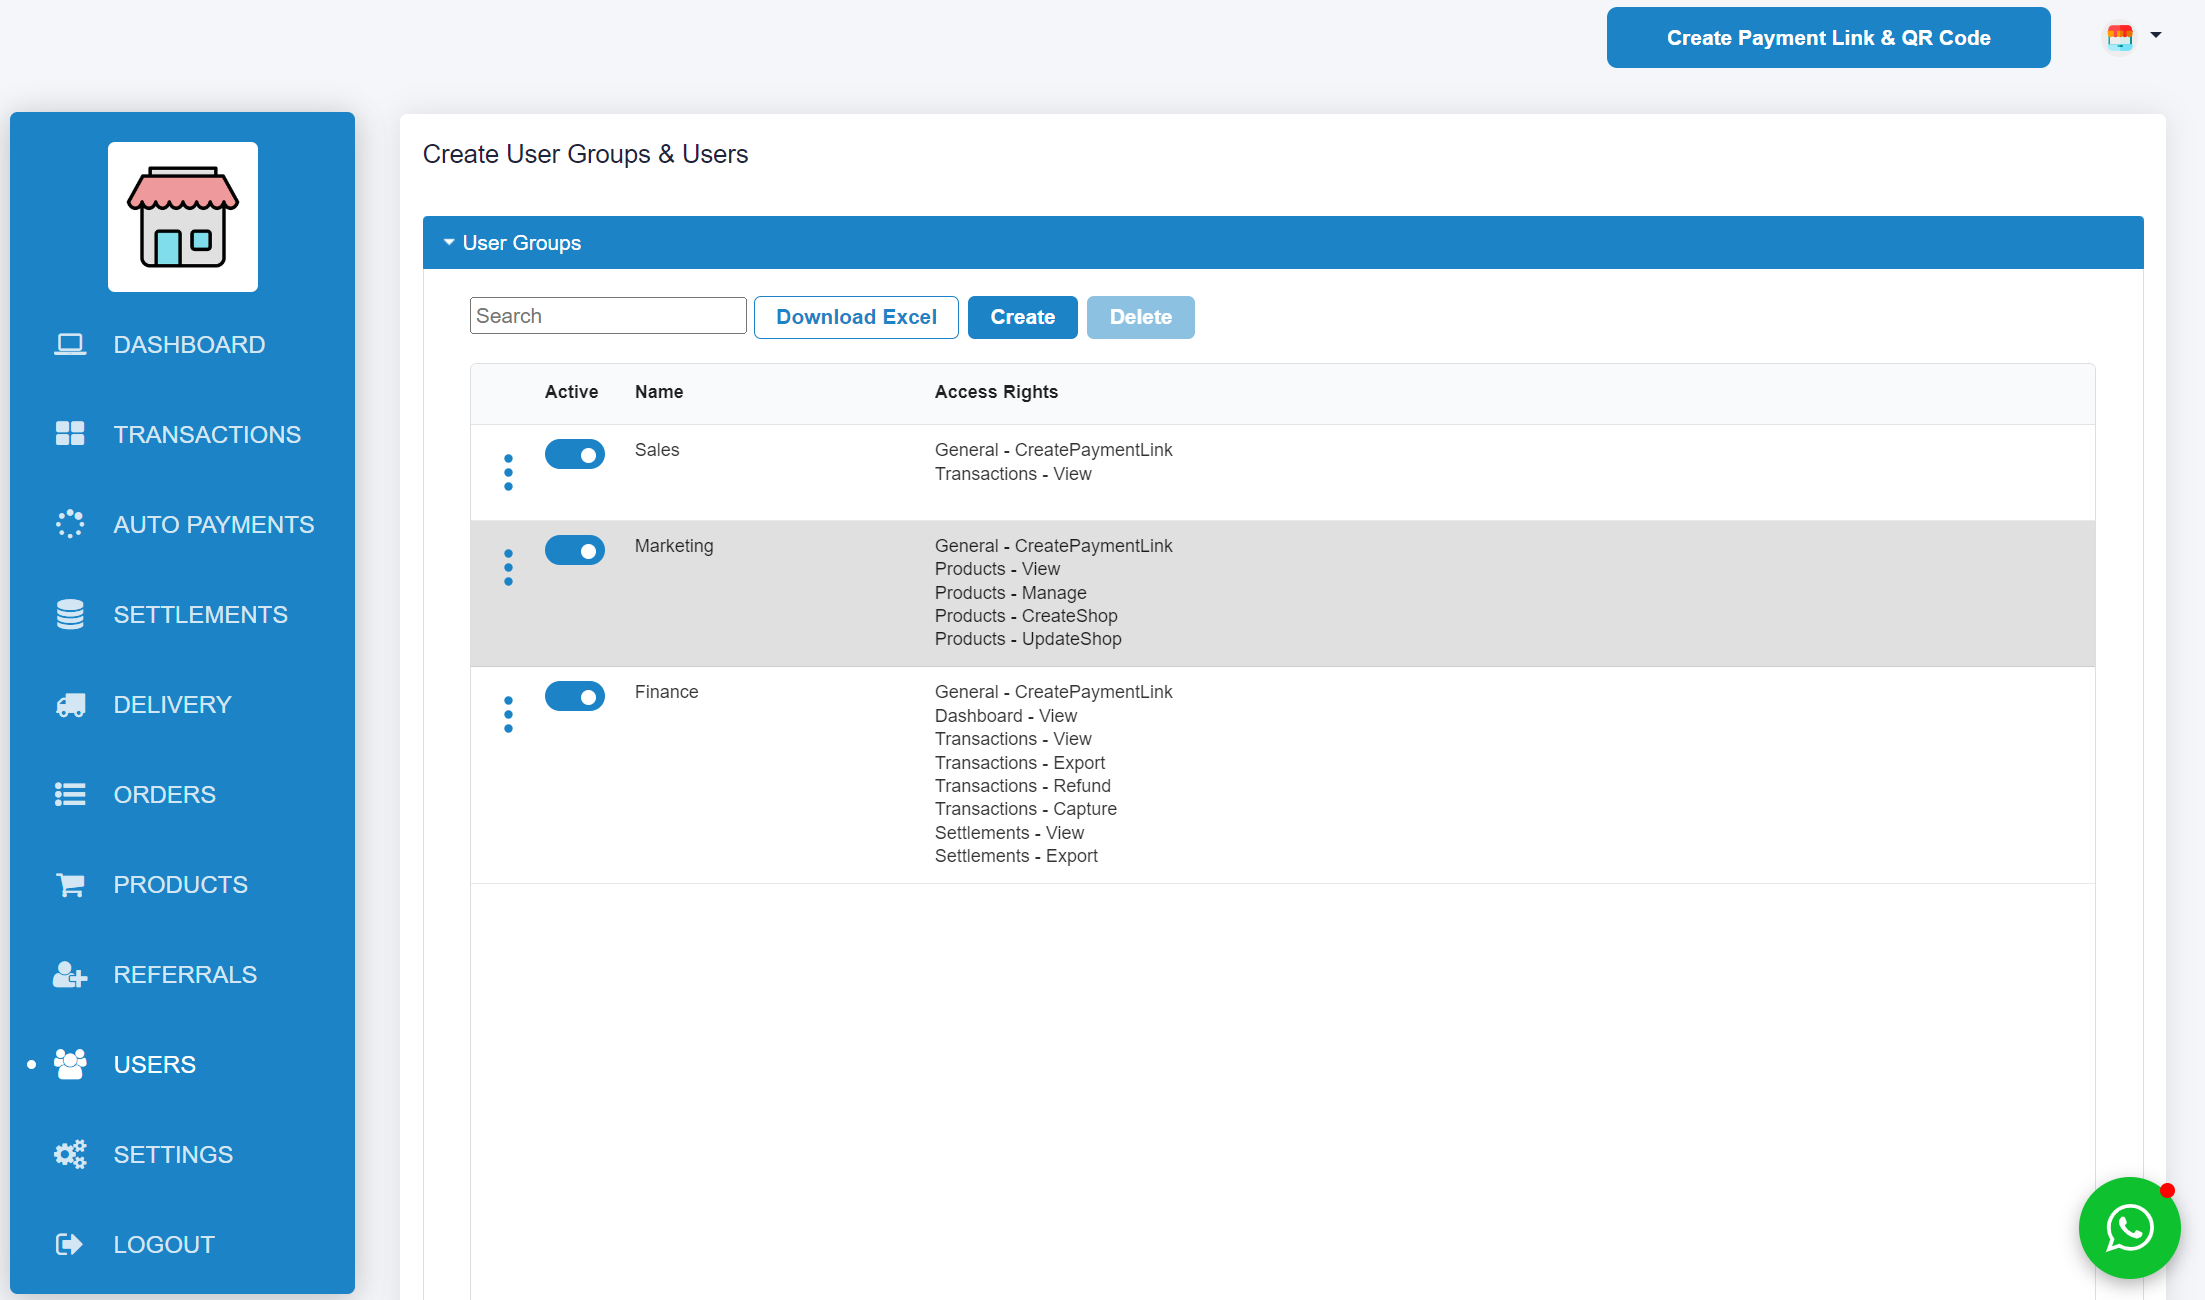
The below table gives details on each permission settings that you can set for users:
| Category | Access Rights |
|---|---|
| General | Create Payment Link |
| Dashboard | View |
| Transactions | View, Export, Refund, Capture, Splits |
| Auto Payments | View, MandateView, MandateExport, MandateCreate, MandateUpdate, MandateCancel, CollectionView, CollectionExport, CollectionCreate, CollectionCancel, CollectionSettingUpdate |
| Settlement | View, Export |
| Delivery | OrderView, OrderPay, OrderCancel, Create, Settings |
| Orders | View, Export, Update |
| Products | View, Manage, CreateShop, UpdateShop |
Keep your logins and password safe
Keep your login details and password to yourself in order to prevent unauthorized access to your dashboard, and clear the login details from your browser. Please also stay alert and avoid any phishing and pop-ups that might request for your login details.
API key
We provide unique API keys that allows you to interact with our system. You will be required to use your API keys to execute any transactions. Please make sure that you do not share your API keys to anyone.
]]>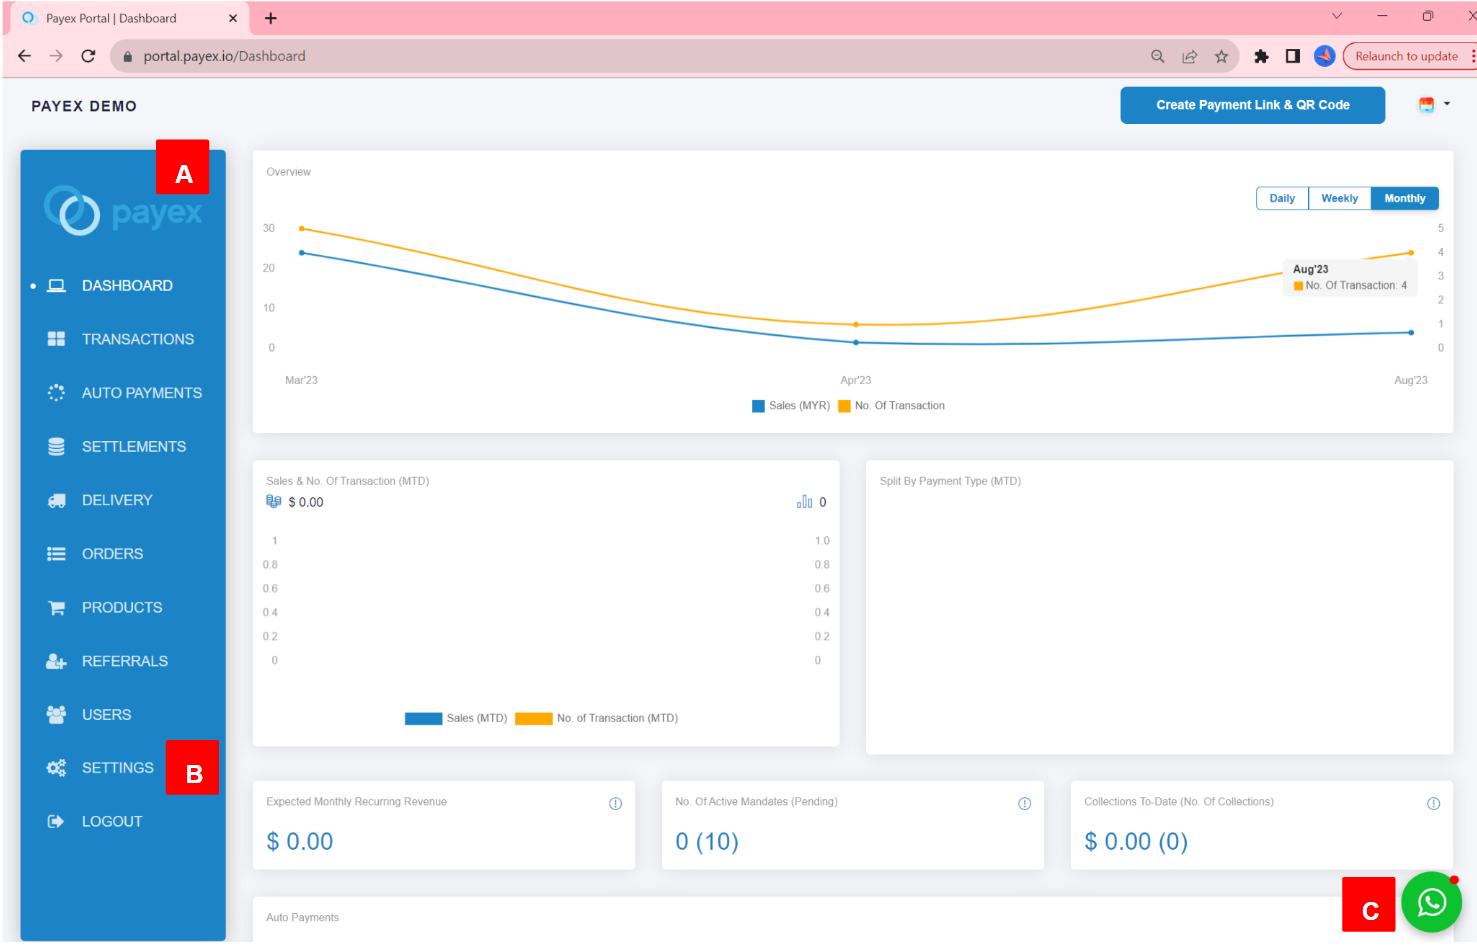
A. Side Bar
To choose feature available on Dashboard.
B. Settings
If you want to manage business and account details.
C. Help
To contact Payex Merchant Support on WhatsApp at +60192713728
Our chat support is available during our operational hours, which are:
Monday – Friday: 9 am – 6 pm.
Even when we’re not available, you can still use this button to send inquiries to our friendly merchant support team.
]]>Example of use case as below:
A has Payex dashboard
A wants to give B access to view the sales
A wants to give C access to check settlement
A wants to give D access to create payment link

A, B, C and D are accessing to the same portal
Step 1: Login to Payex’s portal
- Log on to our portal at https://portal.payex.io/Home, and key-in your credentials.
Step 2: Select “Users”

- Click “Users“
Step 3: Create user group
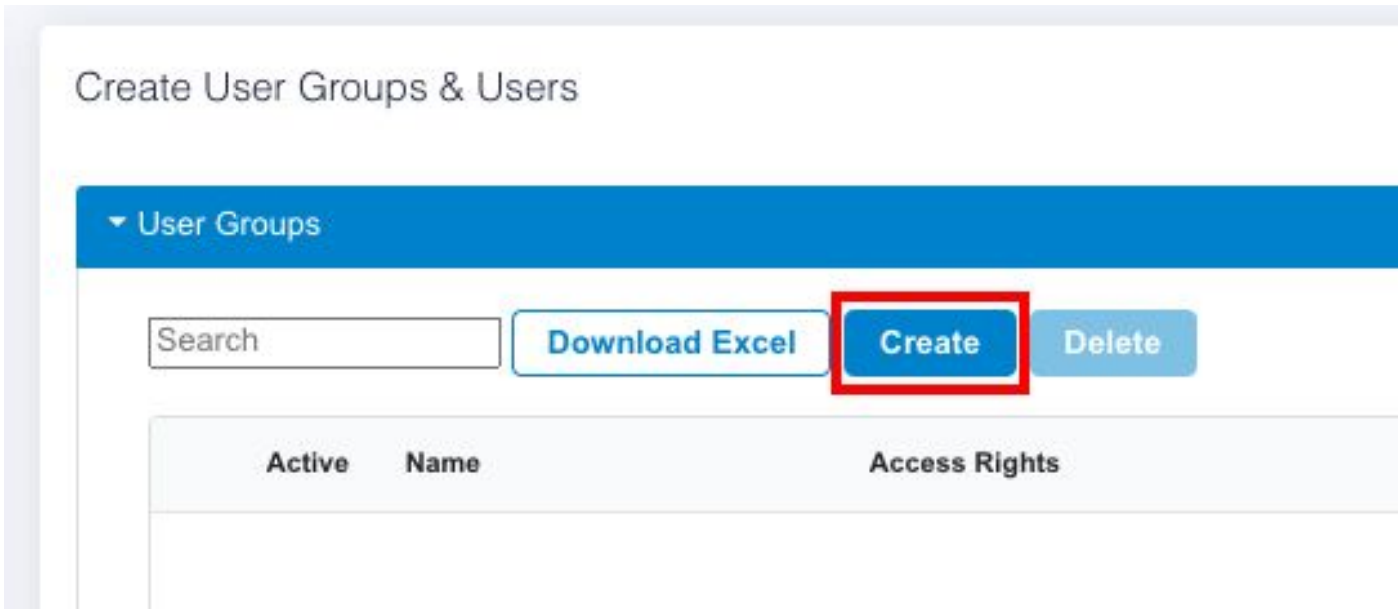
- Click “Create”
Step 4: Fill out user group’s details
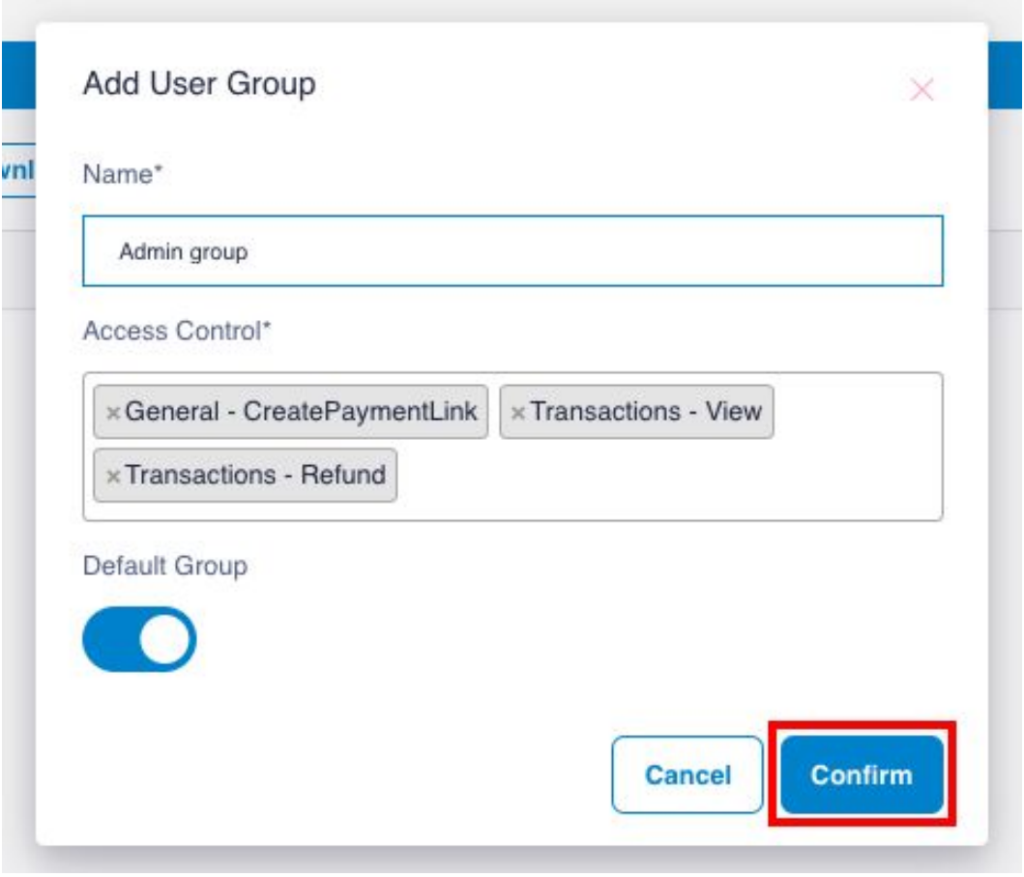
- Fill out the relevant details:
a. Name – fill out the name of your user group
b. Access Control – select the relevant access control for this user group
c. Default Group – toggle right the button if you would like to make this group as default group
- Click “Confirm” to add the user group
Step 5: Edit user groups
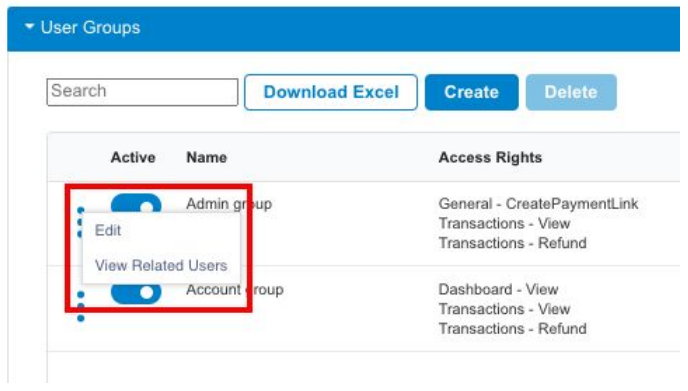
- You can edit and view the related users
- Toggle left the button to deactivate the user group
Step 6: Create users
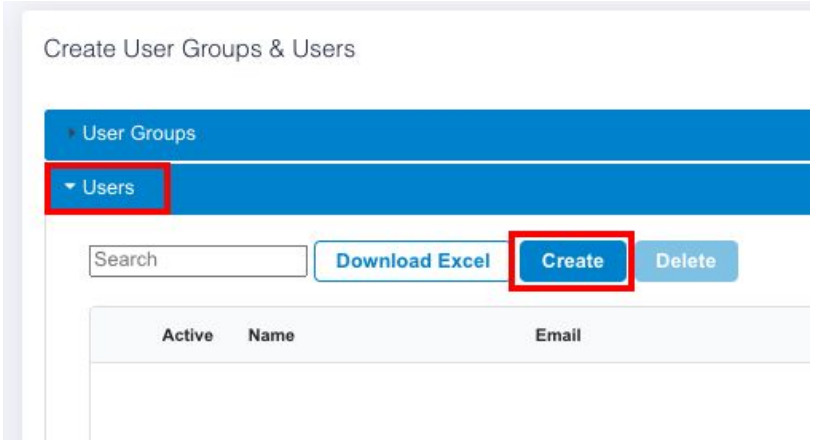
- Click “Users”
- Click “Create”
Step 7: Fill out users’ details
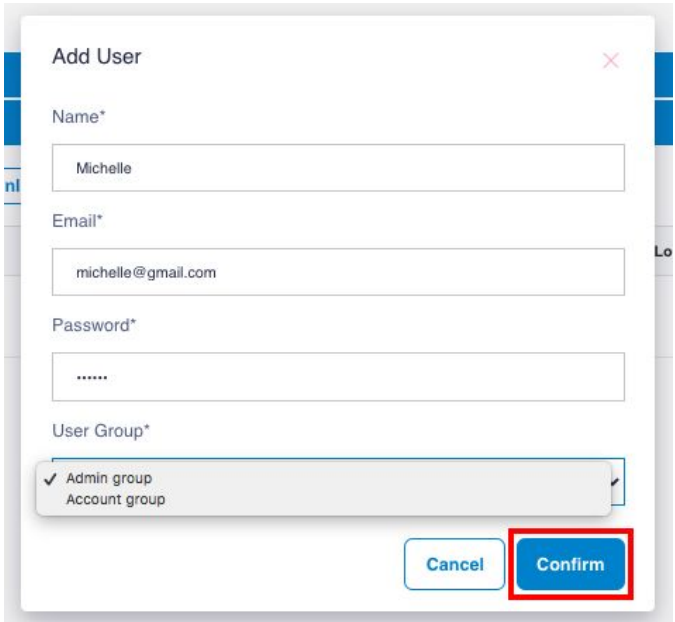
- Fill out the relevant details and share the email and password to the user
- Select the relevant user group for the user
- Click “Confirm”
Step 8: Edit the users
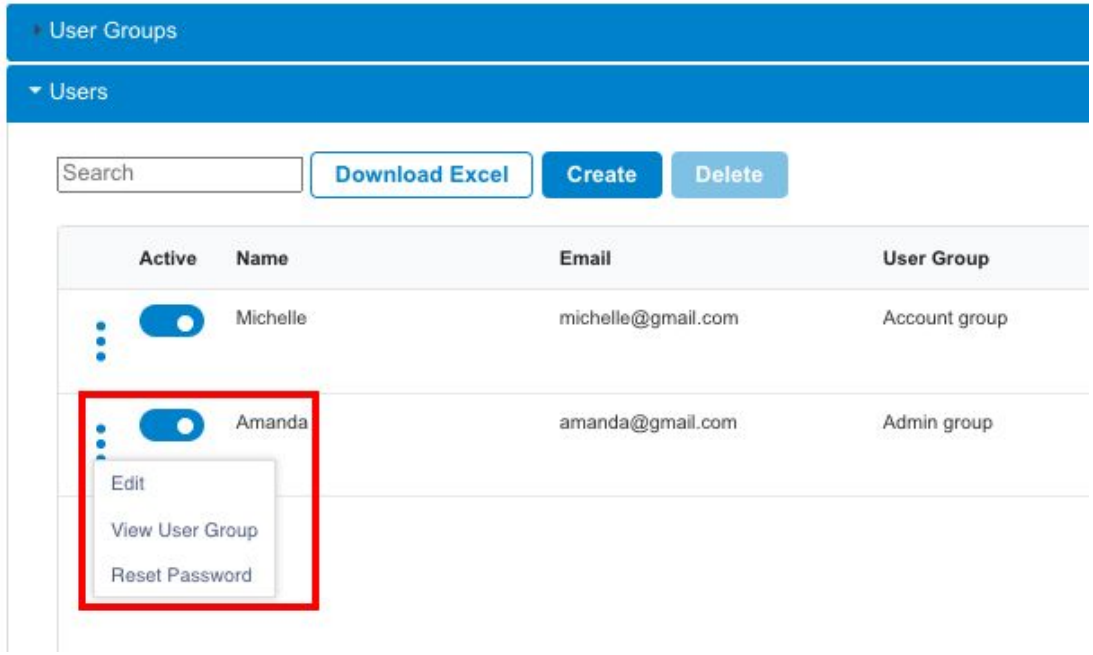
- You can edit / view / reset password
- Toggle left the button to deactivate the user
- Log on to our portal at https://portal.payex.io/Home, and key-in your credentials.
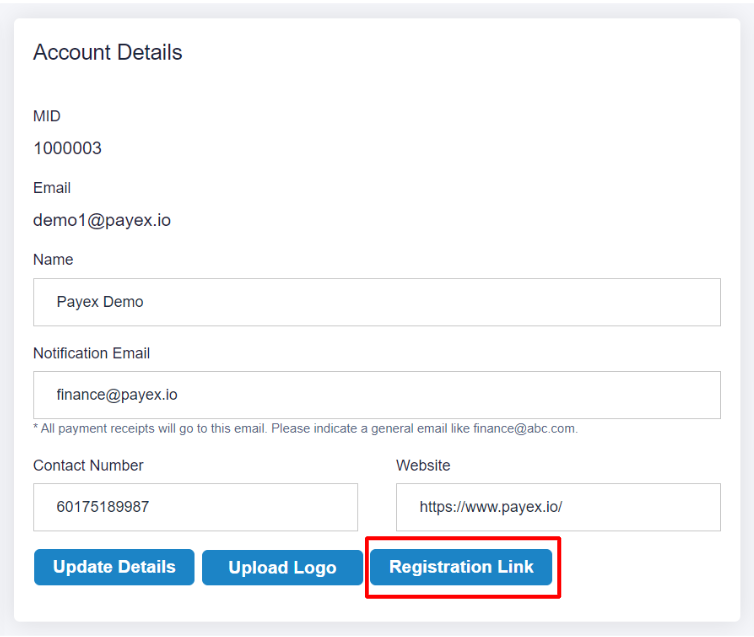
Business Account Details
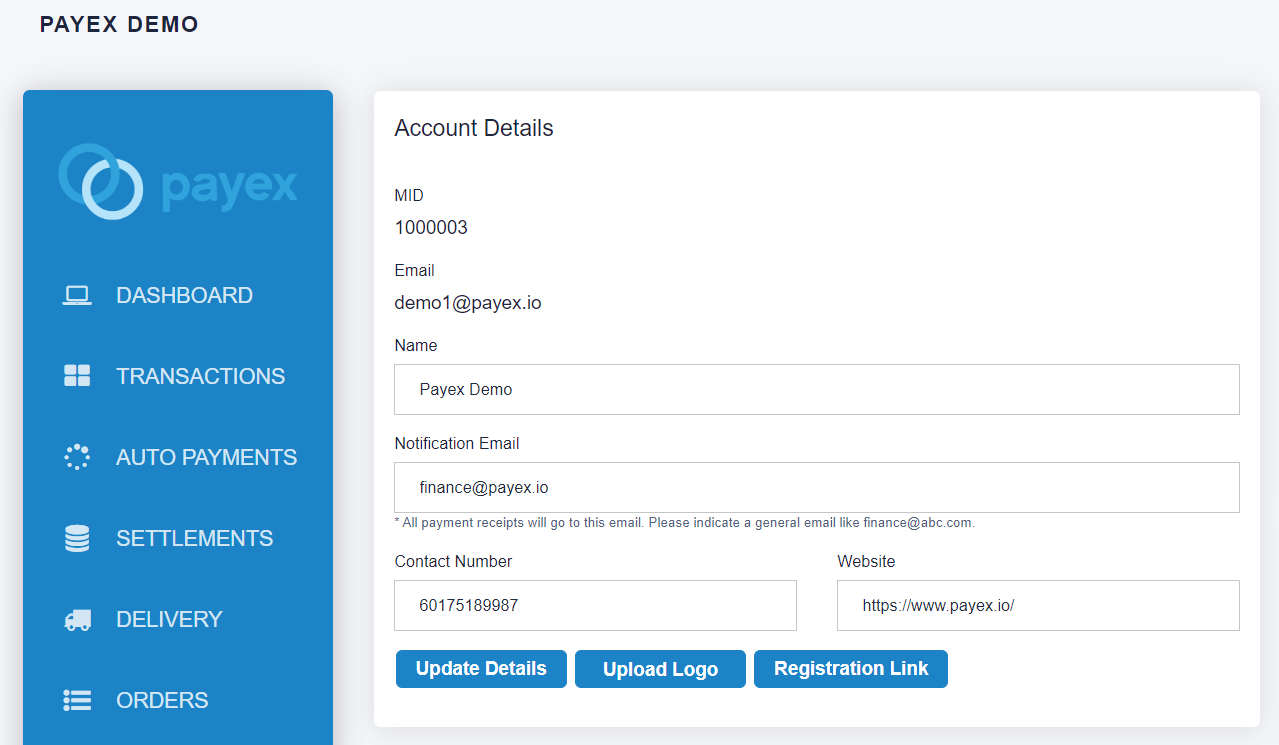
- You can set up your business information (Business logo, business name, notification email, contact number and website) on
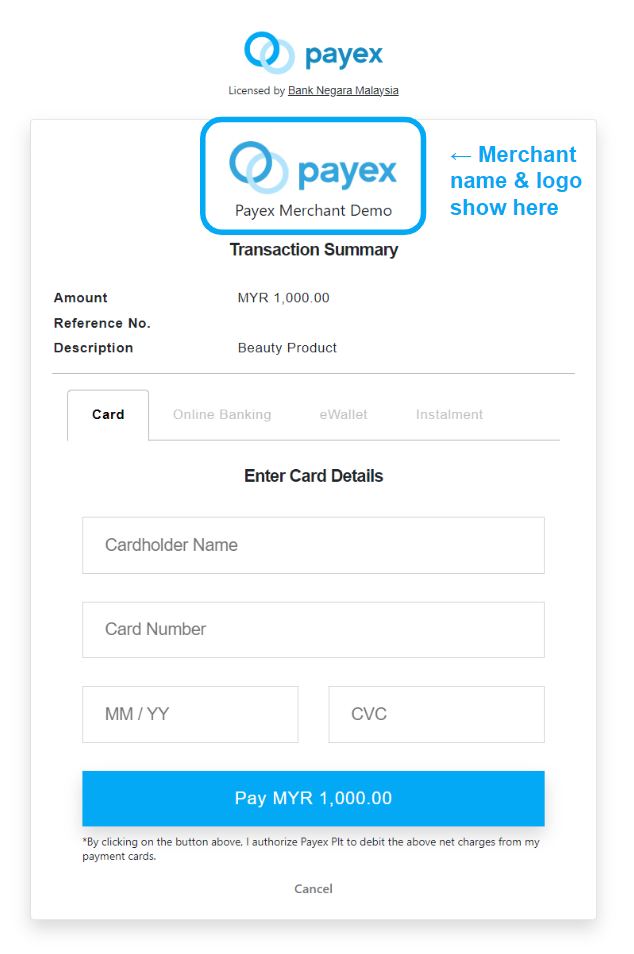
Settings-> Account Details - Your updated merchant name & logo will be displayed at the payment page, refer example in payment link below. Please note that logo update may take a little longer to reflect when using the API method, approximately 30 minutes.
Address

- You can also update your own registered business address
Settings-> Address
Change Password
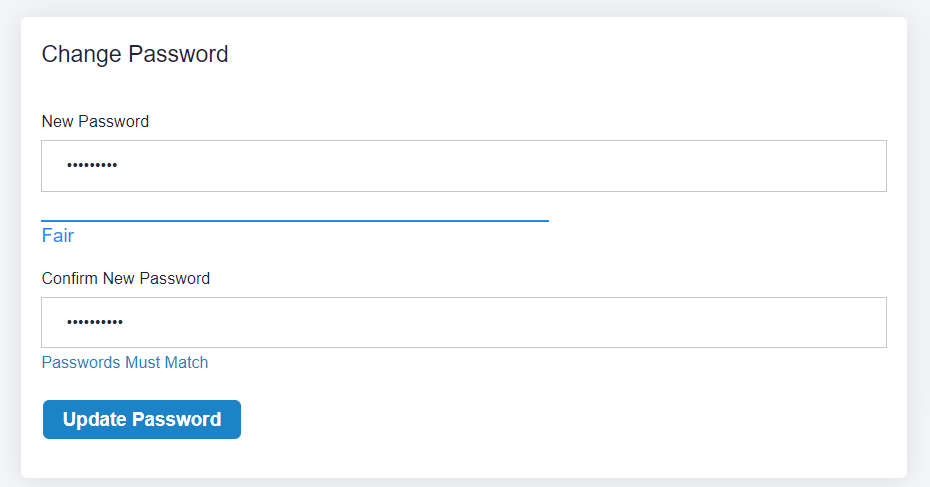
- In Your Profile, you can change your password
Bank Details
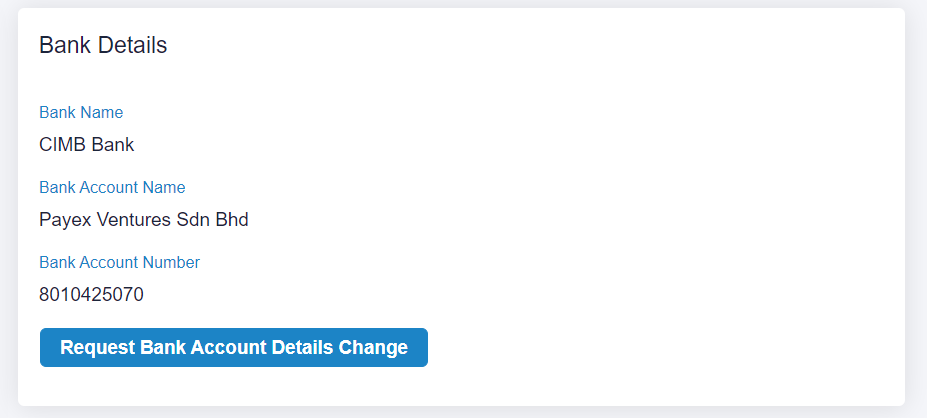
- In order to request for change in bank account details, please contact merchant support via email at merchantsupport@payex.io or Whatsapp at +60192713728
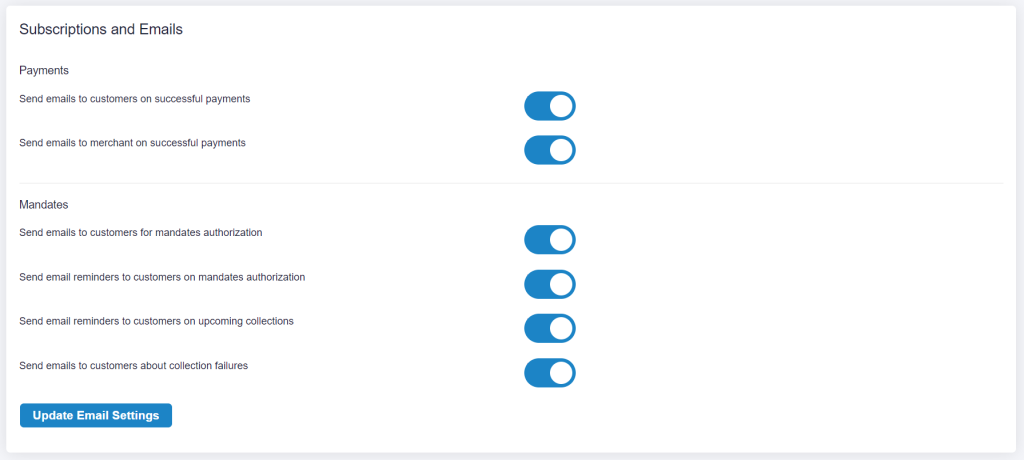
Go to Settings > Subscriptions and Emails > Update Email Settings
Log on to our portal at https://portal.payex.io/Home, and key-in your credentials.
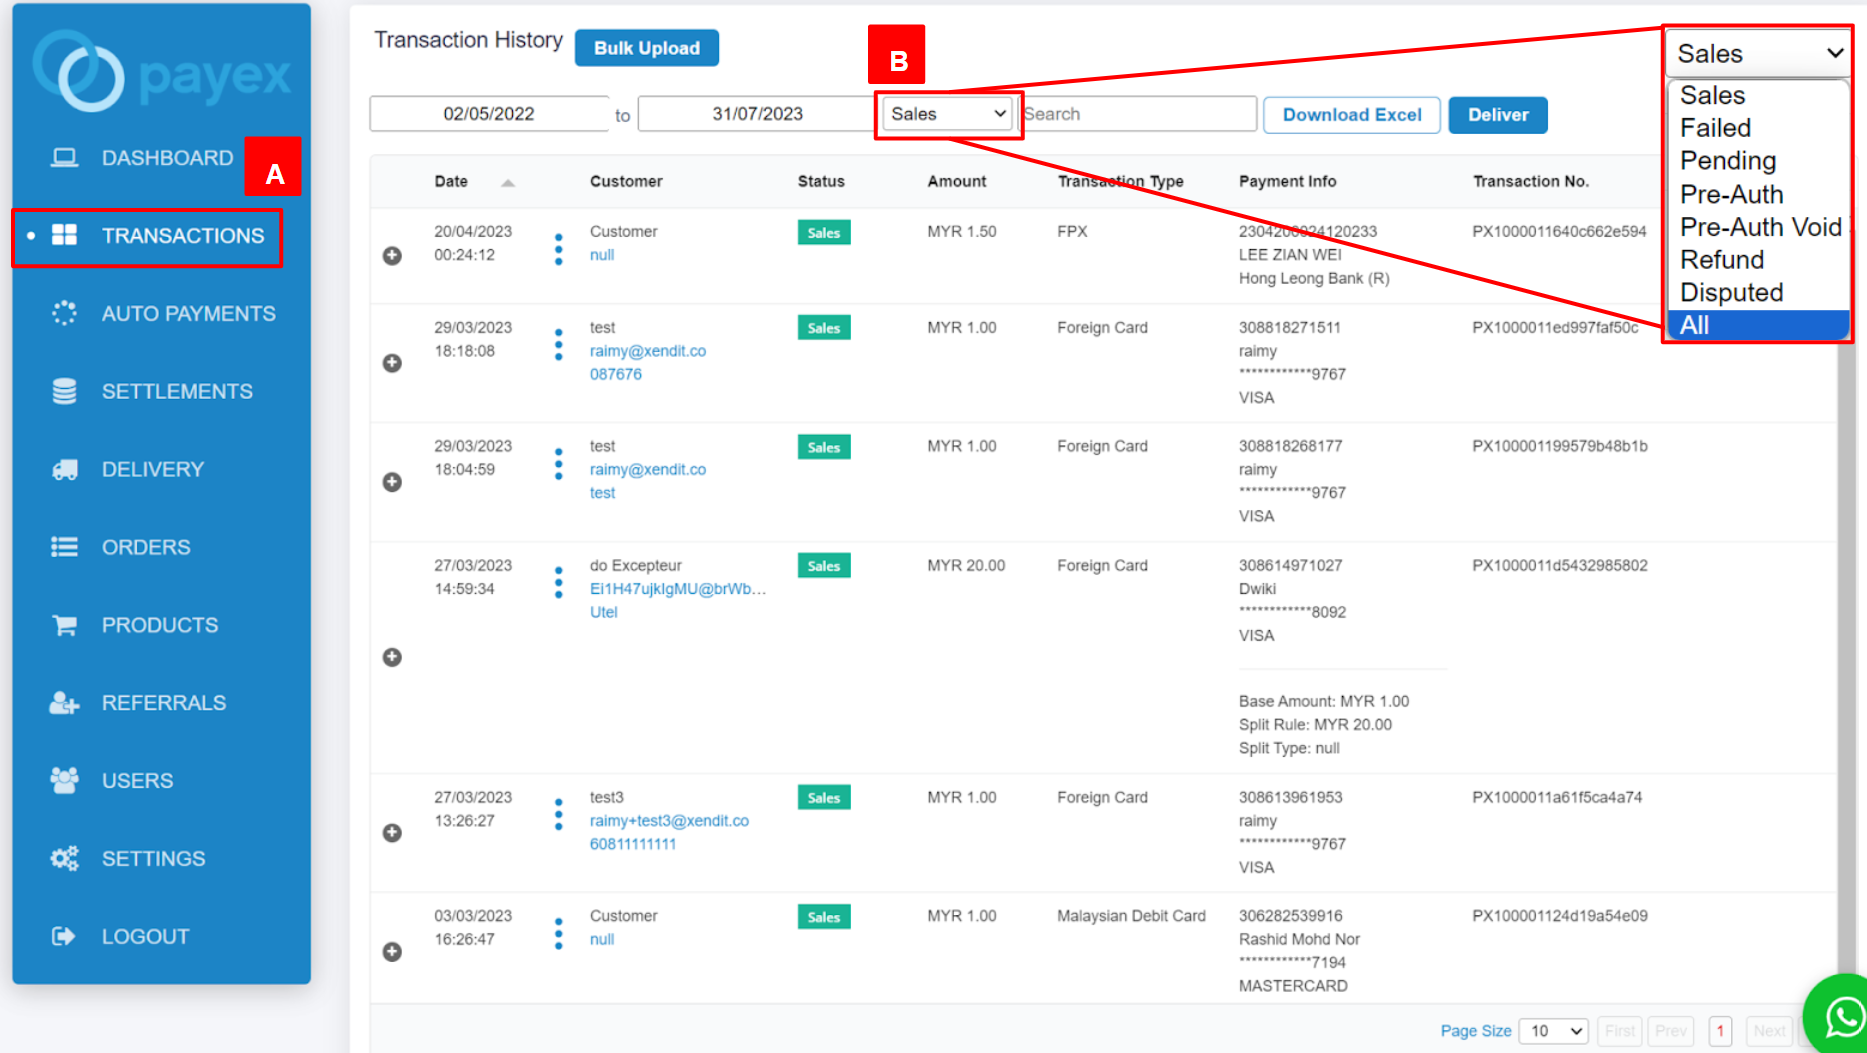
Step 2: Filter to view status of all transactions
- A: Click “Transactions” on the left panel
- B: In order to view all status of transactions, change the filter from “Sales” to “All“
Step 3: View more details of each transaction
There are two options for this:
Option 1: Click the “+” button
To view more detailed information such as description and delivery address, simply click the “+” icon next to the transaction row.
Payex Dashboard on success (sales) transaction example

Payex Dashboard on failed transaction example
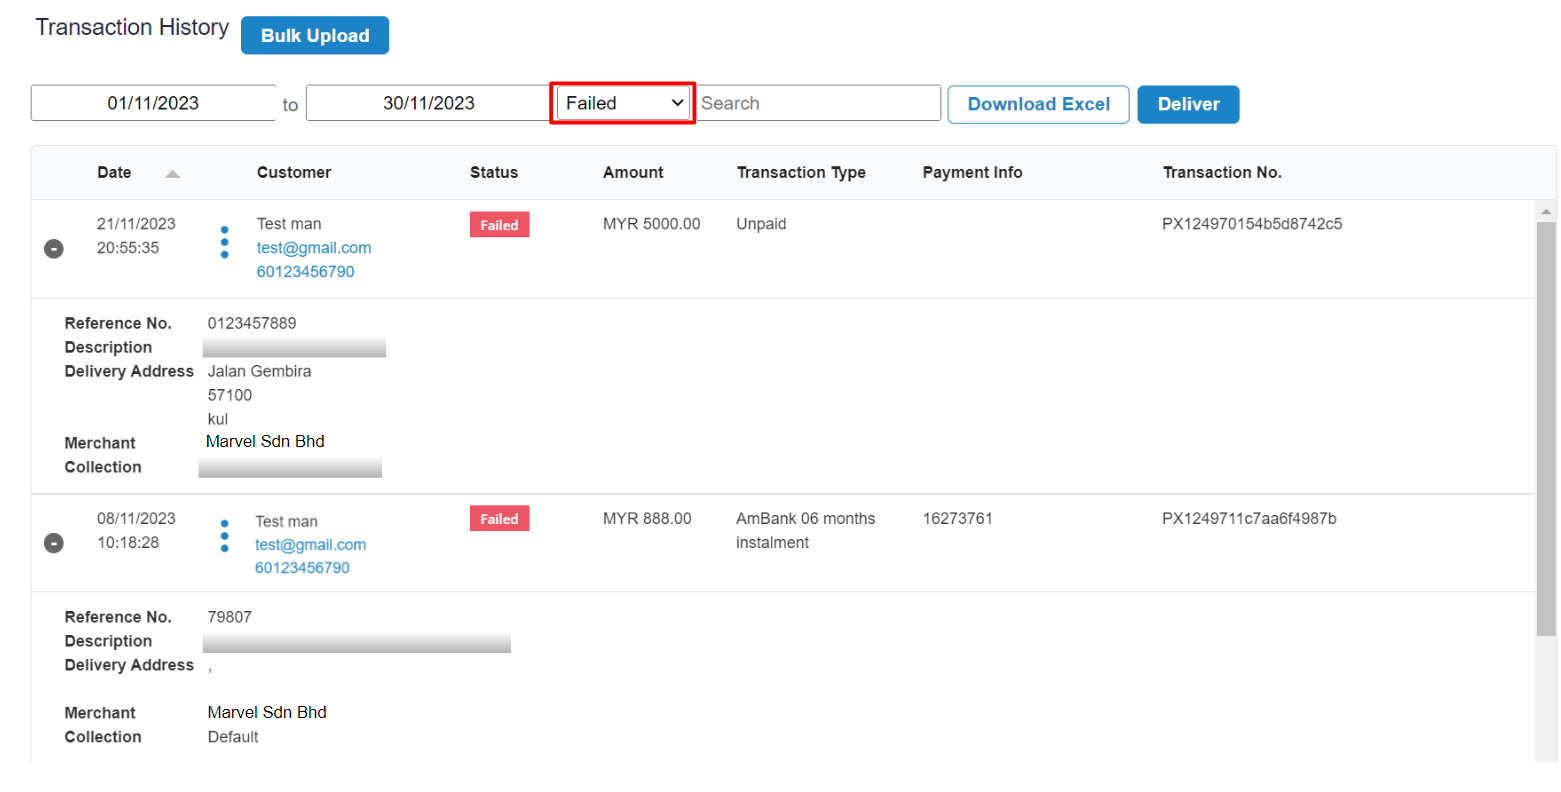
- Filter “Failed” to view all failed payment transactions by your customers
- Note that Failed code (Auth Code) is not displayed in the dashboard. Merchant needs to refer to the Excel for this (refer below)
Option 2: Download Excel
To download all transactions into an Excel file for your internal reporting/tracking, simply click the “Download Excel” button. The file will be named “Transaction.”

Reason of my customer’s failed payment transactions
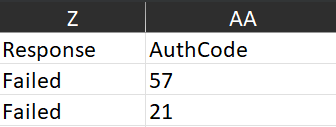
- You can easily find the Failed code for each transaction in the Excel file by looking at the “Auth code” column in the report.
- Example of Failed code as below under the “Card” section:
- Auth Code 57: “Transaction Not Permitted to Cardholder”
Auth Code 21: “No Transactions” - Refer here to the list of response code from Payex
- Auth Code 57: “Transaction Not Permitted to Cardholder”
Available Columns
Below are the available columns in the Transaction Excel that you may refer to:
- Date
- Merchant
- Collection
- Collection ID
- Status
- Customer Name
- Contact Number
- Currency
- Base Amount
- Amount
- Refund Amount
- Transaction Type
- FPX Buyer Bank Name
- FPX Buyer Name
- Cardholder Name
- Card Number
- Card Brand
- Transaction ID
- Reference Number
- Mandate Reference Number
- Collection Number
- Collection Reference Number
- Payment Intent
- External Transaction ID
- Response
- Auth Code
- Auth Number
- Description
- Split Amount
- Split Rule
- Split Type
- Split Description
- Delivery Address
- Postcode
- City
- State
- Settlement is the process in which the money received from your customers is settled by Payex to your bank account.
- Settlements for all payments are done in RM (Malaysian Ringgit).
- Payex will deduct the fees before settlement to the merchant’s bank account.
Settlement Frequency
- The settlement days are varied depending on the mode of payments that have been transacted.
- Our settlement cycle is T+X working days, T being the date of transaction.
- This means that the captured payments are settled within X working days from the date of transaction.
| Product | Settlement Frequency |
|---|---|
| Local credit card, local debit card, foreign card | 2 working days |
| FPX | 1 working day |
| Local eWallets (Grab Pay, Touch N Go, Shopee Pay) | 1 working day |
| Foreign eWallets (Alipay and WeChat Pay) | 2 working days |
| Subscription payment via bank account | Instant |
| Subscription payment via cards | 2 working days |
| 0% credit card instalment via Ezbeli | 7 working days for all banks |
| Multi-currency payment | 5 working days |
| 3-month instalment via Riipay | 7 working days |
| 3-month instalment via Atome | 3 working days |
| Postpaid via Grab PayLater 4-month instalment via Grab PayLater | 2 working days |
| Offline card machine | 2 working days |
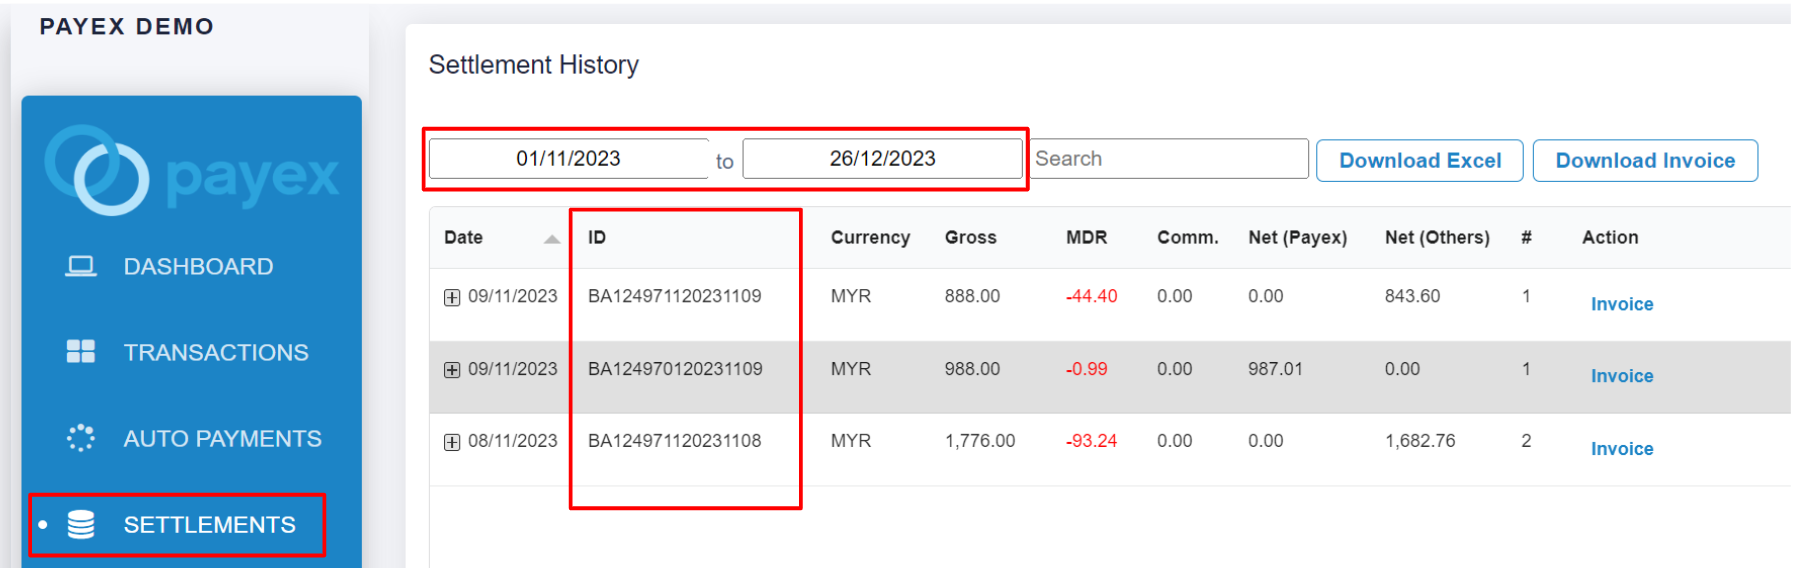
Step 1: Login to Payex’s Portal
Log on to our portal at https://portal.payex.io/Home, and key-in your credentials.
Step 2: Navigate to Settlements
- Please note that you will not be able to locate the Settlement ID if the settlement is not due yet
- If your settlement is already due, click “Settlements” on the left panel
- Filter the due dates of your settlement (e.g. T+3 working days for Payex CIMB credit card instalment)
- Each settlement has a Settlement ID (e.g. BA124971120231109) and you can see this number in the ID column
Step 3: View more details of each settlement
There are three options for this:
Option 1: Click the “+” button
- As one settlement could include multiple transaction’s settlement, click the “+” button to expand the settlement row. You will get to view more details of each settlement alongside the transaction ID.
- Click “View” to navigate back to the specific transaction at the Transaction History dashboard

Option 2: Download Excel
Click the “Download Excel” button to extract all settlement information into an Excel file named “Settlement“.
- You can download a daily, weekly, monthly or yearly report by filtering the date field.
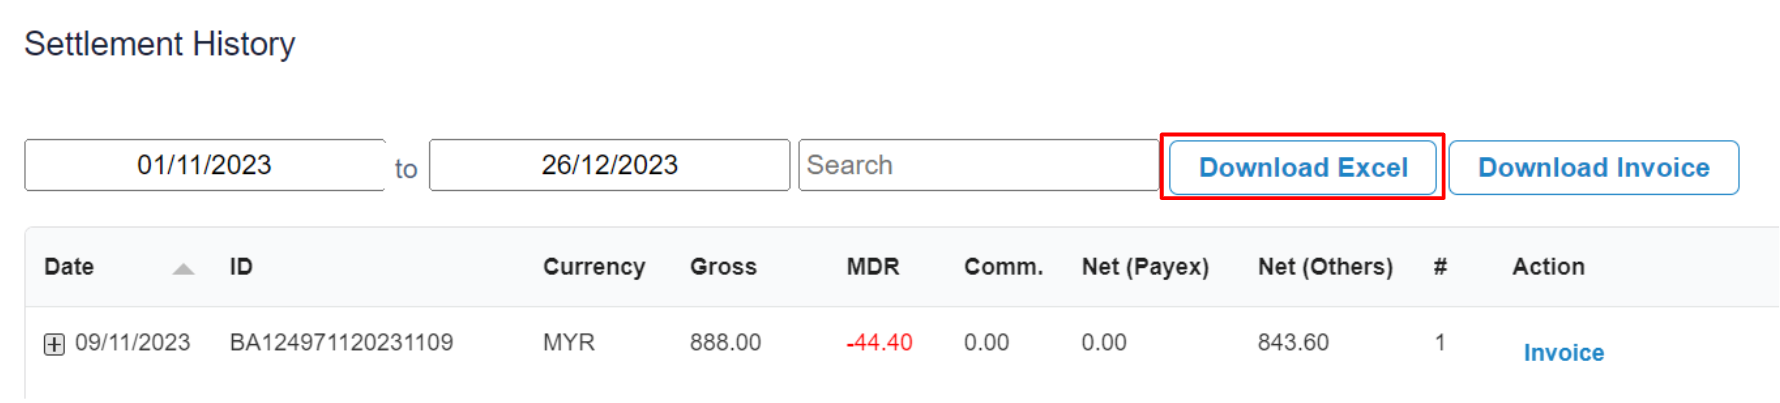
- The report contains settlement amount with the corresponding Transaction IDs and Settlement IDs. Refer sample columns on settlement details from the Excel file below.

Option 3: Download Invoice
Click the “Download Invoice” button to extract all settlement expenses into an Invoice (PDF file) to track your company MDR expenses for accounting purpose.
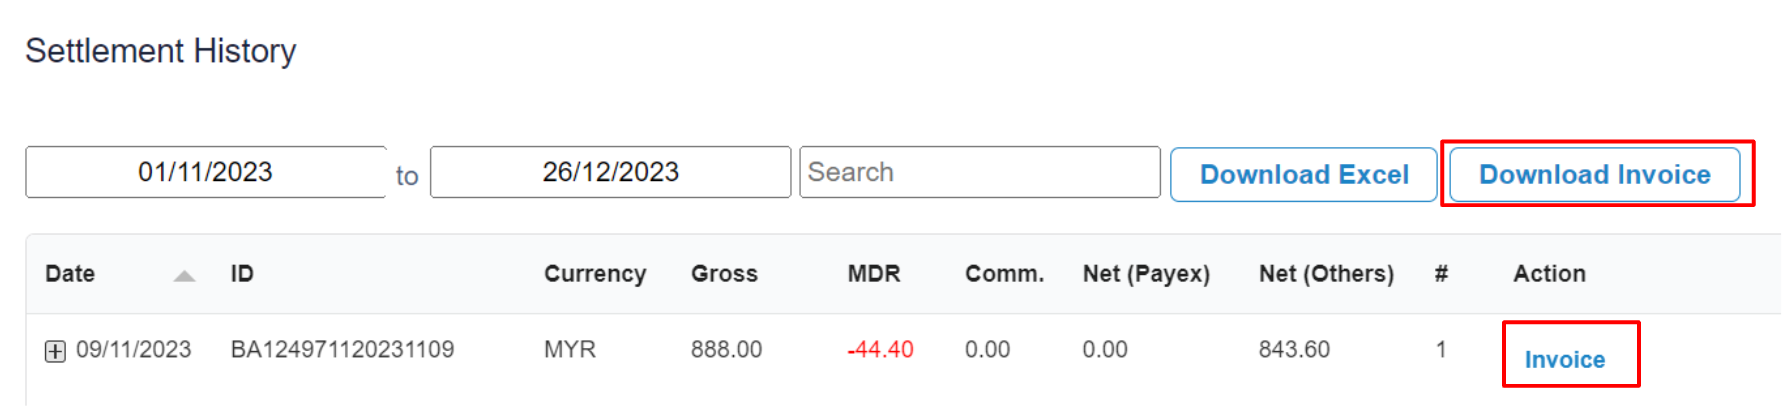
- Click “Download Invoice” for total settlement expenses invoice (e.g. you may filter the dates by monthly settlement)
- Click “Invoice” for individual settlement expense invoice
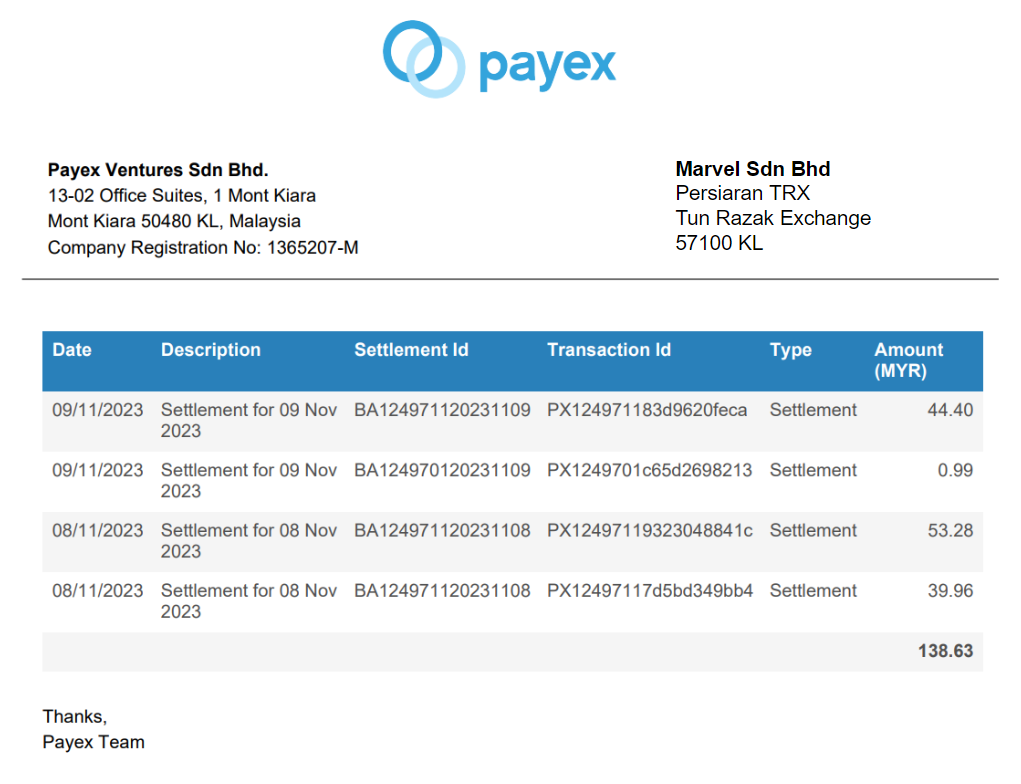
Refer below for example of Settlement Invoice
Step 4: Reconcile Settlement with your Bank Statement
For settlement of payments
(FPX one-time, eWallets, credit card instalment):
Refer to the Settlement ID (e.g. BA 124971120231109) found in your bank statement to identify this settlement belongs to which transaction.
For settlement of payments
(FPX direct debit via RHB Bank):
Refer to the Collection ID (e.g. CL 10000178a1c91b565e) found in your bank statement to identify this settlement belongs to which transaction.
Available Columns
Below are the available columns in the Settlement Excel that you may refer to:
- SettlementDate
- TransactionDate
- MID (Merchant ID)
- Merchant
- SubMID
- SubMerchant
- SettledBy
- Type
- Description
- SettlementId
- TransactionId
- ReferenceNumber
- MandateReferenceNumber
- CollectionNumber
- CollectionReferenceNumber
- TxnType
- BaseCurrency
- BaseAmount
- BaseMDR
- Currency
- Gross
- MDR
- Comm
- Net
- NetPayex
- NetOthers
Make sure to see if your payment is due by checking the Settlement Frequency table according to your payment method. Remember, you can check the Settlement ID on the Payex Portal only after the settlement is due.
If your Settlement is already due, simply follow steps below:
- Log in to Payex’s portal.
- Click on the “Settlement” tab.
- Search by the Settlement dates to display all settlement for the desired period.
- Locate the Settlement ID (e.g., BA130211120240337) and click on the “+” sign to expand the details.
You’ll find a breakdown of each settlement based on its respective Payex Transaction ID (e.g., PX13023333042e4f872d).
Our settlement cycle is T+X working days, where T is the date of the transaction. The “Settlement” Tab will show you the expected date when you’ll receive the funds and it does not mean that the funds has already reflected in your bank account.
Please note that it may take until the end of the day (sometimes before midnight/12am, depending on your bank) for the funds to be credited to your bank account. If you don’t see the funds during office hours, we recommend checking again in the evening or at night as the day is not yet over.
To find your transaction details:
- Log in to Payex’s portal.
- Click on the “Settlement” tab.
- Search by the Settlement dates to display all settlement for the desired period.
- Locate the Settlement ID (e.g., BA130211120240337) and click on the “+” sign to expand the details.
You’ll find a breakdown of each settlement based on its respective Payex Transaction ID (e.g., PX13023333042e4f872d).
The reason you don’t see a Settlement report/ID is because the settlement is not due yet. If the settlement hasn’t occurred, there won’t be a Settlement report/ID.
Additionally, if some of your transactions were unsuccessful during this period, there will be no settlement made to your account, resulting in no available report for download.
To accurately monitor settlements, you can check the transaction status on the Payex portal. Simply log in to Payex’s Portal, go to the Transaction tab, and change the filter from “Sales” to “All” to view all transaction statuses, including those that have failed.
If you have initiated a refund to your customer, the transaction status will change to “refund.” This means that the amount will be refunded to the bank (where the bank will then process the refund to your customer), and hence there will be no settlement to you for that refunded transaction.
Example of use case as below:
(Principal account) ("A")
sub-account 1 -("B")
sub-account 2 ("C")
sub-account 3 ("D")
A can see all the sales of A, B, C & D (in aggregate in 1 portal) A can also click B to view B's individual sales B can also see it's B individual sales
Step 1: Login to Payex’s portal
Log on to our portal at https://portal.payex.io/Home, and key-in your credentials under your Payex principal account.
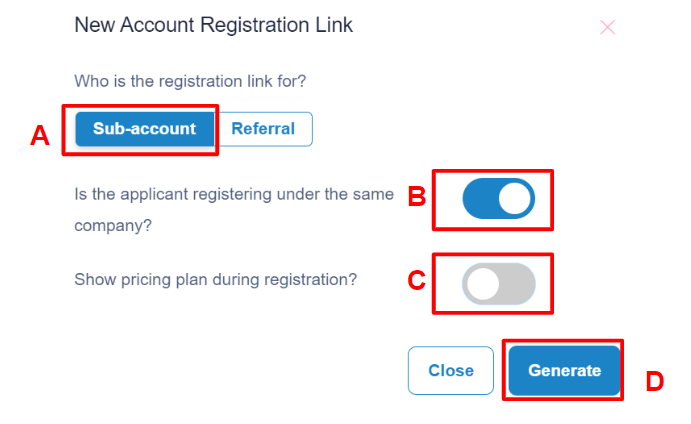
Step 2: Navigate to Settings > Click Registration Link
Step 3: Generate sub-account registration link
A: Select “Sub-account“
B: Toggle right if the sub-account user is to be created under the same company
C: Toggle right if pricing plan to be displayed during sub-account user registration (however this is not relevant for such registration)
D: Click “Generate“
- You may register for a sub-account under same company/SSM with different bank account from the principal account already registered with Payex
- You may even register for a sub-account under different company/SSM with different bank account from the principal account already registered with Payex
Step 4: Copy the sub-account URL link to the user for self-registration
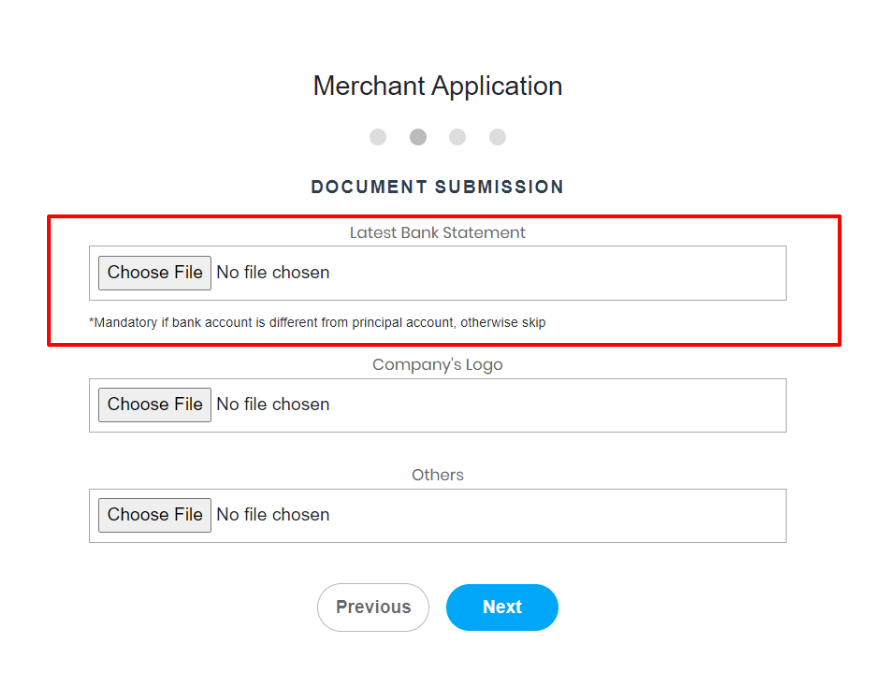
- Similar to merchant application, Sub-account user need to fill up all the required details on the self-registration link
What to take note:
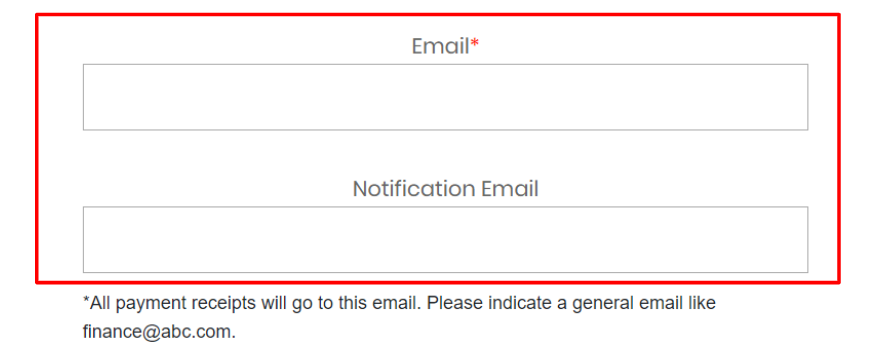
- The Merchant Email must be different from the principal account.
- The Finance Notification Email can remain the same or different as the principal account’s notification email.
- Sub-account user may choose to register a different bank account for settlement purpose. *Skip if bank account is the same as principal account.
- Sub-account user can leave the services unchecked. Note that all user sub-accounts will have access to similar payment services as merchant primary account
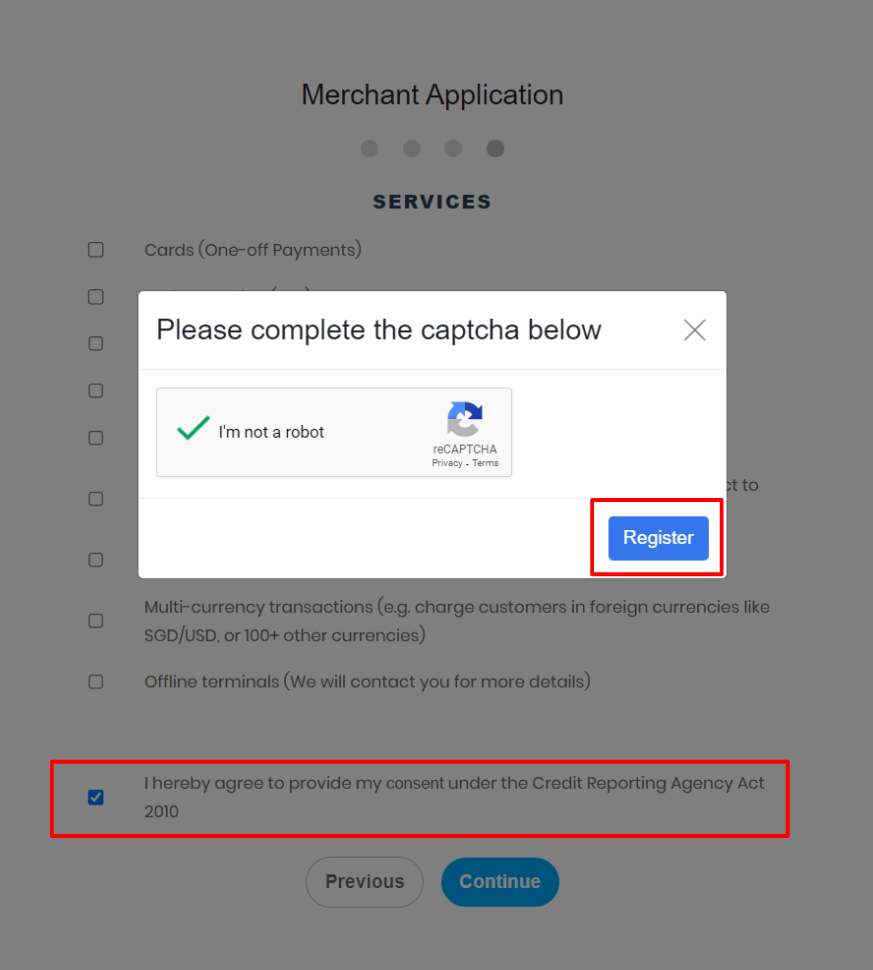
- Sub-account user only need to tick the consent checkbox and captcha checkbox on the final screen
- Sub-account user clicks “Register” and Done!
Next steps after registration:
- Just like the Payex standard merchant application process, once you submit your sub-account registration, our team will review it. If your application is approved, we’ll notify you via email and WhatsApp within 1-3 working days.
- The sub-account user will need to verify the letter of offer/agreement received from us. Once you accept and click agree to it, you will receive another email with Payex Login Details.
- Login to Payex Dashboard and you are all set to test out our features and start real transaction in live mode with your customers.
 To refund for FPX
- Merchants have to manually refund to the customer after receiving settlement from Payex
To refund for:
– Visa / Mastercard
– eWallet (Grab Pay, Touch N’ Go, Shopee Pay, Alipay, WeChat Pay)
– Atome / PayLater by Grab
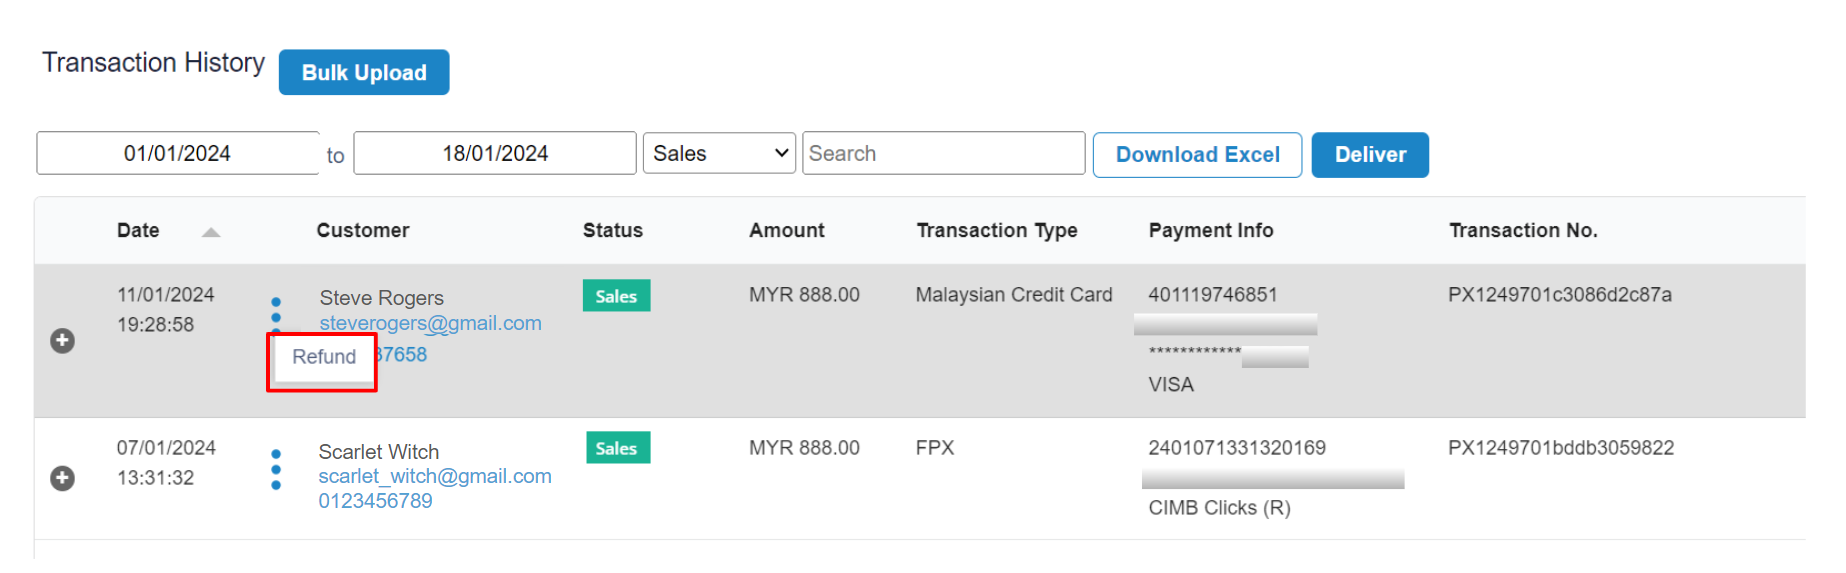
- Log in to Payex portal > Click “Transaction” > select the transaction merchant wants to refund > click “3-dots” > click “Refund”
- **No rates incurred if void on the same day (before 12am)
To refund for Credit Card Instalment
- No cancellation, no void and no refund allowed for credit card instalment
- Merchant can manually refund to the customer after receiving the settlement from Payex
To refund for Subscription Payment via Visa / Mastercard
- Log in to Payex portal > Click “Transaction” > select the transaction merchant wants to refund > click “3-dots” > click “Refund”
- **No rates incurred if void on the same day (before 12am)
To refund for Subscription Payment via bank account
- Merchants have to manually refund to the customer after receiving settlement from Payex
To refund for Riipay
- Please WhatsApp Riipay Support Team at +60 16-552 5768